
Discover how to add and customize widgets on your Mac in 2025. Follow a clear, step-by-step guide to organize your Apple desktop, adjust widget sizes, and enhance your workflow efficiently.
Elevate Your Mac Experience with Widgets
Widgets have become an essential part of the modern Mac experience, offering a convenient way to access information and tools without opening full applications. Whether you want a quick glance at your calendar, the latest weather updates, or control over your music, widgets bring functionality directly to your desktop and Notification Center.
With macOS Sonoma, Apple has expanded the possibilities for desktop customization by allowing widgets to live directly on the desktop, not just in the Notification Center. This integration provides a smoother workflow, keeping essential information readily available while you focus on your tasks.
In this guide, we’ll walk you through the step-by-step process of adding, arranging, and personalizing widgets on your Mac. We’ll also explore how you can incorporate widgets from your iPhone, maximize the interactive features introduced in macOS Sonoma, and ensure your workspace remains efficient and visually organized.
By the end of this article, you’ll have a clear understanding of how to use widgets effectively, turning your Mac into a more productive and personalized workspace.
Understanding Widgets: Your Mac’s Quick-Access Tools
Widgets are small, interactive elements designed to provide instant information and direct access to key features without the need to open full applications. They live on your desktop or within the Notification Center, acting as miniaturized app interfaces that keep your most-used functions within easy reach.
The Role of Widgets in Daily Mac Use
By offering at-a-glance insights, widgets help you stay organized and make your workflow more efficient. For example, you can:
- Check upcoming events on your calendar
- Track the current weather and forecast
- Monitor stock prices or battery levels
- Access music controls and photos instantly
Widgets are particularly valuable for users who want to streamline their Mac experience, reducing the number of apps they need to open while keeping essential information visible at all times.
Types of Widgets You Can Use
macOS provides a range of built-in widgets, each serving a specific function:
- Calendar & Reminders: Keep track of schedules and tasks
- Weather: Get real-time updates without leaving your desktop
- Clock: Monitor multiple time zones simultaneously
- Stocks: Follow market trends at a glance
- Photos & Music: Enjoy media controls and visual highlights
Additionally, third-party widgets from the Mac App Store allow for enhanced customization, offering specialized tools, aesthetic variations, and extended functionality.
Why Widgets Matter for Your Workflow
Widgets are not just decorative—they enhance productivity by letting you access critical information without interrupting your tasks. In macOS Sonoma, widgets are interactive and adapt to your desktop environment, ensuring they complement your workspace rather than clutter it.
By understanding the types of widgets available and their functional benefits, you can make informed decisions about which widgets to add, how to organize them, and how they can improve your Mac experience.
Bringing Your Desktop to Life: Adding Widgets on Mac
Adding widgets to your Mac desktop is a simple yet powerful way to personalize your workspace and make essential information readily accessible. With macOS Sonoma, widgets are no longer confined to the Notification Center—they can now be placed directly on your desktop, offering a more dynamic and interactive experience.
Accessing the Widget Gallery
To start, you’ll need to open the Widget Gallery, which houses all the available widgets for your Mac:
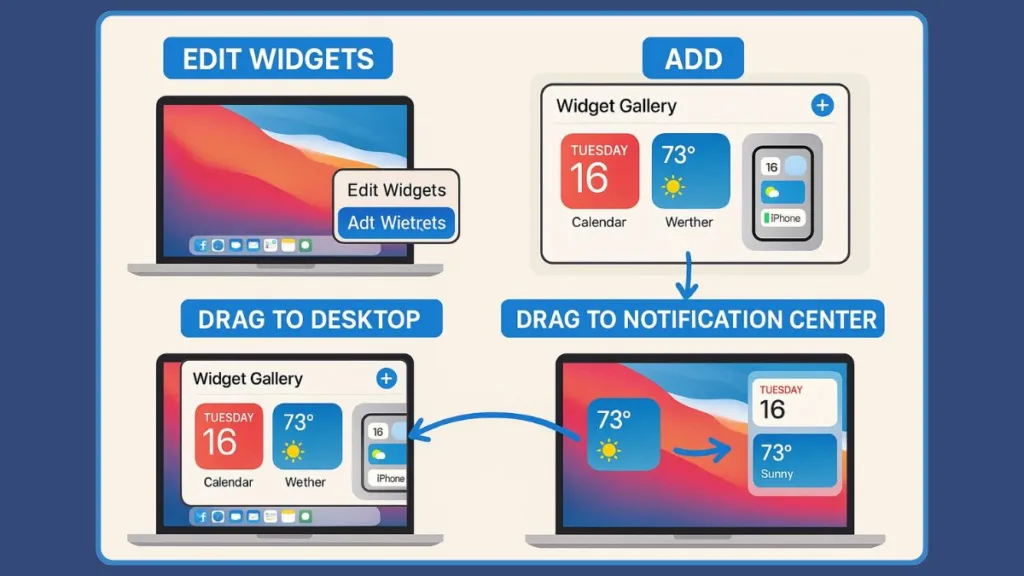
- Control-click on your desktop (or right-click if you’re using a trackpad or mouse).
- From the context menu, select Edit Widgets.
- The Widget Gallery will appear, displaying categories on the left and available widgets on the right.
The gallery is organized to make it easy to browse by function or search for a specific widget. Categories include Calendar, Weather, Clock, Stocks, Music, Photos, Batteries, and more, ensuring you can quickly find what fits your workflow.
Adding Widgets Automatically or Manually
Once you’ve found a widget you want to add, macOS gives you two ways to place it on your desktop:
- Automatic positioning: Simply click the widget or its Add button. macOS will place it in an available space on your desktop, taking care to avoid overlaps with other items.
- Manual positioning: Click and drag the widget to any spot on your desktop. This method is ideal if you want to create a specific layout or arrange widgets according to your workflow preferences.
After adding, you can always reposition the widget by clicking and dragging it, making it easy to adjust your setup as your needs evolve.
Ensuring Visibility of Desktop Widgets
Sometimes widgets may appear hidden behind open windows. To bring them into view:
Click on your desktop wallpaper to move windows aside and reveal your widgets.
Alternatively, adjust the “Click wallpaper to reveal desktop” setting in System Settings → Desktop & Dock. You can set it to Only in Stage Manager, so clicking the desktop only moves windows when using Stage Manager.
Customizing Placement and Interaction
Widgets on macOS Sonoma are designed to interact seamlessly with your desktop:
- You can stack widgets for compact arrangements, especially useful for related information like multiple calendars or weather forecasts.
- Interactive widgets allow you to tap or click on highlighted areas to open specific app functions, like viewing details in the Calendar or controlling Music playback.
Tips for an Organized Desktop
Group related widgets: Keep productivity-related widgets together and entertainment or media widgets in a separate area.
Consider widget size: Many widgets come in small, medium, or large sizes. Use a size that balances visibility with desktop real estate.
Avoid clutter: While it’s tempting to add every widget, focus on essential widgets that improve workflow to maintain a clean and functional workspace.
By following these steps, you can transform your Mac desktop into a personalized control center, where the information you need is always visible, easy to access, and organized according to your unique preferences.
Centralizing Information: Adding Widgets to Notification Center
While the desktop provides an interactive workspace for your widgets, the Notification Center offers a dedicated space to view and manage key information without cluttering your main desktop. Adding widgets here ensures that important updates remain accessible at a glance, even while you focus on other tasks.
Opening the Notification Center
To start, you need to access the Notification Center:
- Click the date and time in the menu bar at the top-right corner of your screen.
- The Notification Center will slide out, displaying your existing widgets and notifications.
- Scroll to the bottom and click Edit Widgets to open the Widget Gallery, where all available widgets are organized by category.
This layout allows you to quickly browse or search for widgets, whether you are looking for productivity tools like calendars or entertainment widgets like music controls.
Adding Widgets Step by Step
Once the gallery is open, adding widgets to the Notification Center is straightforward:
- Drag-and-Drop: Click a widget in the gallery and drag it to the upper-right area of the Notification Center.
- Add Button: Click the Add button associated with a widget to place it automatically in the Notification Center.
You can repeat this process to add multiple widgets, customizing the Notification Center to suit your daily workflow.
Organizing Widgets Within Notification Center
The Notification Center allows you to rearrange widgets for better visibility:
- Drag a widget up or down to reorder its position.
- Group similar widgets together for efficient access, such as placing weather and calendar widgets adjacent to each other.
- Remove unwanted widgets by hovering over them and clicking the Remove button, or by Control-clicking and selecting Remove Widget.
Tips for an Efficient Notification Center
Prioritize essential widgets: Keep frequently used widgets at the top for quick access.
Consider widget size: Medium or large widgets provide more detail, while smaller ones maintain a cleaner appearance.
Integrate iPhone widgets: If enabled, you can include widgets from your iPhone to expand functionality without crowding the desktop.
By strategically adding and arranging widgets in the Notification Center, you create a centralized hub for essential information. This approach enhances your Mac’s productivity, allowing you to check updates, manage tasks, and interact with apps without switching windows or disrupting your workflow.
Bridging Devices: Using iPhone Widgets on Your Mac
One of the standout features of macOS Sonoma is the ability to incorporate iPhone widgets directly onto your Mac. This functionality leverages Apple’s Continuity system, allowing you to extend your mobile apps and information seamlessly to your desktop. By doing so, you can access tools and data from your iPhone—even if the corresponding app isn’t installed on your Mac—without interrupting your workflow.
System Requirements and Preparations
Before adding iPhone widgets to your Mac, ensure the following conditions are met:
- Your iPhone is running iOS 17 or later.
- Both your Mac and iPhone are signed in to the same Apple ID.
- The devices are either near each other or connected to the same Wi-Fi network.
These requirements allow the Mac to detect available widgets on your iPhone and ensure a smooth, real-time connection between devices.
Enabling iPhone Widgets on Your Mac
To begin using iPhone widgets, you need to enable the feature on your Mac:
- Open the System Settings app.
- Navigate to Desktop & Dock in the sidebar, then scroll down to locate the Widgets section.
- Toggle on Use iPhone Widgets.
Once activated, your Mac will recognize eligible iPhone widgets in the Widget Gallery, making them available for addition to either your desktop or Notification Center.
Adding iPhone Widgets to Desktop and Notification Center
Adding iPhone widgets follows the same intuitive process as built-in Mac widgets:
- Open the Widget Gallery by right-clicking the desktop or selecting Edit Widgets from the Notification Center.
- Browse the gallery or use the search function to locate iPhone widgets. These are typically marked or grouped separately for easy identification.
- Drag and drop the widget onto your desktop or Notification Center, positioning it wherever it suits your workflow.
- For widgets that exist on both your Mac and iPhone, you can switch to the iPhone version for expanded functionality.
This integration allows you to access apps that may not have a native macOS version, expanding your desktop capabilities while maintaining continuity with your mobile device.
Tips for Effective Use
Proximity matters: Keep your iPhone nearby or ensure both devices are on the same network to maintain a stable connection.
Interactive functionality: Many iPhone widgets retain interactivity on Mac, allowing you to complete tasks such as checking reminders, controlling music, or viewing live updates directly from the widget.
Organize alongside Mac widgets: Place iPhone widgets in logical groups with your existing Mac widgets to maintain a clean, productive workspace.
Maximizing Productivity with Cross-Device Widgets
Incorporating iPhone widgets into your Mac setup can dramatically improve efficiency. Whether you are tracking appointments, monitoring fitness goals, or managing smart home devices, these widgets act as extensions of your mobile apps, keeping essential information at your fingertips without switching devices.
By leveraging this feature, your Mac becomes a unified hub where information from multiple devices converges, creating a seamless and highly personalized computing environment.
Tailoring Your Desktop: Customizing Widgets on Mac
Once widgets are added to your Mac, the next step is personalizing them to fit your workflow, aesthetic preferences, and information priorities. Customization ensures that your desktop remains functional, visually appealing, and intuitive, allowing you to interact with the information that matters most efficiently.
Resizing Widgets for Optimal Layout
Many widgets come in multiple sizes, typically small, medium, or large. Choosing the right size helps balance information density with available desktop space:
- Control-click the widget you want to resize.
- Select Choose Size (or a similar option depending on the widget).
- Pick the size that best suits your desktop layout and readability preferences.
- Small widgets are ideal for supplementary information, like a single reminder or battery status.
- Medium widgets provide a broader snapshot, such as a calendar week or weather forecast.
- Large widgets are useful for detailed displays, such as full music controls or photo slideshows.
Editing Widget Content
Some widgets allow you to customize the information displayed to better match your priorities:
- Control-click the widget and select Edit [Widget Name].
- Modify the options, such as choosing a specific calendar list, news feed, or reminder category.
- Click Done to save changes.
If the Edit option isn’t available, the widget may only display default content, but sizing and placement adjustments remain possible.
Rearranging and Organizing Widgets
Maintaining a clean and efficient desktop often requires careful placement and grouping of widgets:
- Drag widgets to new locations on your desktop for logical grouping—such as clustering productivity tools like calendars and reminders together.
- Align widgets visually to maintain a tidy appearance. Mac’s snap-to-grid feature can assist in keeping items evenly spaced.
- For Stage Manager users, widgets can remain on the side of the screen but can be dragged into the main workspace when needed, providing flexibility between focused work and quick reference.
Combining Built-in and iPhone Widgets
With iPhone widgets enabled, customization extends across devices:
- Place iPhone widgets alongside Mac-native widgets for a unified desktop layout.
- Adjust sizes and positions to ensure the desktop remains uncluttered while still providing access to both Mac and iPhone tools.
Practical Tips for a Personalized Workspace
Prioritize essentials: Focus on the widgets that provide the most value to your daily workflow.
Experiment with layout: Try different arrangements until the desktop feels intuitive and easy to navigate.
Maintain readability: Ensure text and information are visible against your desktop wallpaper.
Use stacking: Some widgets support stacking, letting you cycle through related widgets in a single space, reducing clutter while keeping information accessible.
By customizing widgets effectively, your Mac desktop transforms from a static workspace into a dynamic control center, tailored to your personal and professional needs. This level of personalization ensures that every glance at your desktop delivers meaningful and actionable insights.
Clearing the Clutter: Removing Widgets on Mac
While widgets are designed to enhance productivity, there are times when you may want to remove them—either to declutter your desktop, streamline your workspace, or replace outdated widgets with new ones. macOS provides flexible options for removing widgets from both the desktop and Notification Center, ensuring you maintain a clean and organized environment.
Removing Widgets from the Desktop
To remove a widget from your desktop, follow these steps:
- Enter Edit Mode:
- Control-click (or right-click) on the desktop and select Edit Widgets from the menu.
- The Widget Gallery will open, displaying all widgets currently active on your desktop.
- Select the Widget to Remove:
- Click the Remove button (a small minus sign) in the corner of the widget you want to remove.
- Confirm Removal:
- Once removed, the widget disappears immediately, freeing up space for other widgets or a cleaner desktop layout.
Removing Widgets from Notification Center
The Notification Center allows you to manage widgets without affecting your desktop setup. To remove a widget here:
- Open the Notification Center by clicking the date and time in the menu bar.
- Enter Edit Widgets mode at the bottom of the panel.
- Choose one of the following methods to remove a widget:
- Control-click the widget and select Remove Widget from the shortcut menu.
- Option + click on the widget’s remove icon to delete it directly.
Tips for Efficient Widget Management
Prioritize active widgets: Remove widgets you rarely use to avoid distraction and maintain focus on essential information.
Temporary removal: Widgets can be removed and re-added at any time, so don’t hesitate to experiment with layouts or seasonal widgets.
Organize before adding new widgets: Clearing space makes it easier to integrate new widgets without overcrowding the desktop or Notification Center.
Check dependencies: For iPhone widgets or third-party widgets, removing a widget does not delete the app on your device—it simply removes the display from your Mac workspace.
Maintaining a Balanced Workspace
Removing unnecessary widgets is just as important as adding them. By periodically reviewing which widgets you actively use, you can:
- Keep your desktop clean and uncluttered, reducing visual distractions.
- Ensure your Notification Center highlights only the most relevant information.
- Improve performance and responsiveness on older Mac models by minimizing active widget processes.
Effectively managing widgets—including timely removal—is key to maintaining a productive, personalized, and visually appealing Mac environment. Whether you are decluttering your desktop for focus or replacing widgets with more relevant tools, macOS offers intuitive controls to make the process seamless and efficient.
Curating Your Desktop: Popular Widgets to Try
Widgets are more than just functional tools—they can enhance productivity, simplify daily tasks, and add personality to your Mac workspace. Choosing the right widgets ensures your desktop delivers meaningful insights at a glance, without creating clutter or distraction.
Essential Built-In Widgets
macOS offers a robust collection of native widgets designed to provide immediate access to key information:
- Calendar & Reminders: View upcoming events, deadlines, and to-do lists without opening the full app.
- Weather: Check current conditions and forecasts in your location or multiple cities.
- Clock: Track different time zones simultaneously, ideal for remote work or international collaboration.
- Stocks: Monitor market trends and key investments in real time.
- Photos & Music: Display a rotating gallery of your favorite images or control music playback directly from the desktop.
- Batteries: Keep tabs on your Mac and connected devices, including AirPods, iPhone, and Apple Watch.
These built-in widgets are designed to blend seamlessly with macOS aesthetics, offering clear visuals and smooth animations that match your desktop wallpaper and workflow.
Third-Party Widgets for Expanded Functionality
Beyond Apple’s built-in offerings, the Mac App Store hosts a variety of third-party widgets that provide specialized functionality and customization options:
Productivity Tools: Apps like Things, Todoist, and TickTick offer task and project management widgets, showing tasks, deadlines, and progress at a glance.
News & Information: Stay updated with widgets from news apps or RSS readers that deliver headlines without opening a browser.
Health & Fitness: Track activity, hydration, or reminders to take breaks throughout the day.
Aesthetic Enhancements: Minimalist clocks, weather visualizations, and customizable photo displays can personalize your desktop to match your style.
When selecting third-party widgets, prioritize trusted sources to ensure compatibility, security, and smooth performance.
Combining Widgets for Maximum Productivity
Group by Function: Place productivity widgets together, media widgets separately, and information widgets in another zone to create an organized layout.
Layer Desktop and Notification Center Widgets: Use desktop widgets for continuous visibility and Notification Center widgets for quick reference, avoiding overcrowding in either space.
Leverage iPhone Widgets: Extend functionality by incorporating compatible iPhone widgets for apps not installed on your Mac.
Tips for Choosing Widgets Wisely
- Start with essential widgets before exploring decorative or secondary tools.
- Avoid clutter by rotating widgets seasonally or as tasks change.
- Experiment with size, placement, and stacking to optimize both accessibility and aesthetics.
- Review which widgets you interact with regularly and remove those that no longer add value.
By selecting a balanced mix of built-in and third-party widgets, you can transform your Mac into a highly functional and personalized workspace, ensuring the information you need is always readily accessible and visually appealing.
FAQs: Common Questions About Mac Widgets
How do I use widgets on my Mac desktop?
Widgets can be added via Control-clicking the desktop and selecting Edit Widgets. Drag or click widgets from the gallery to place them where you want.
How do I get iPhone widgets on my Mac?
Enable Use iPhone Widgets in System Settings → Desktop & Dock → Widgets. Ensure your iPhone is nearby, on the same Wi-Fi, and signed into the same Apple ID.
Can I customize or resize widgets?
Yes. Control-click a widget to change its size, edit its content (if supported), or remove it. Widgets can also be dragged to reposition them on your desktop.
Why can’t I add certain widgets?
Some widgets may require the corresponding app to be installed on your Mac, or they may only be available for iPhone integration via Continuity.
Are widgets always visible?
Widgets can remain on the desktop or in Notification Center. With Stage Manager, they fade into the background while you focus on apps but remain accessible.
Conclusion: Streamline and Personalize Your Mac
Widgets offer a powerful way to enhance productivity and keep important information at your fingertips. By understanding how to add, customize, rearrange, and remove widgets, and by integrating iPhone widgets, you can create a desktop setup that’s both functional and visually organized.
Experiment with different layouts and combinations of built-in and third-party widgets to tailor your Mac to your workflow. With thoughtful placement and selection, your Mac becomes a dynamic, efficient, and personalized workspace that supports both focus and convenience.
Useful Resources:
Apple Support: Add and Customize Widgets on Mac: Step-by-step official guide for adding, arranging, and removing widgets, including iPhone widgets.
macOS Overview: Explore new features, including desktop widgets and Stage Manager integration.
Apple User Guides: Comprehensive manuals covering macOS features, including customization and widgets.
Visit Our Post Page: Blog Page