
Wondering how to check your chipset driver version on Windows 10 & 11? Learn how to verify Intel and AMD drivers and keep your system up to date.
Every computer runs on a delicate balance of hardware and software, and at the heart of this is the chipset — the bridge that helps your CPU, memory, and peripherals communicate smoothly. Knowing your current chipset driver version isn’t just a technical curiosity; it’s a key step toward ensuring your system runs reliably and efficiently. Outdated or missing chipset drivers can lead to performance hiccups, compatibility issues, or even system instability.
Whether you’re using Windows 10 or Windows 11, this guide is designed to help you find your chipset driver version quickly and confidently. We’ll walk you through multiple methods, from beginner-friendly approaches using Device Manager to slightly advanced tools like PowerShell or manufacturer utilities, so you can verify your installed chipset driver without guesswork.
Understanding Chipset Drivers: What They Are and Why Your System Needs Them
Before diving into how to check your chipset driver version, it’s important to understand what a chipset driver actually is and why it plays a crucial role in your PC’s performance.
A chipset driver acts as a translator between your operating system and the hardware on your motherboard. Think of it as a traffic controller that ensures your CPU, memory, storage devices, and peripheral components communicate efficiently. Without the correct driver, your system might misinterpret signals, which can lead to slower performance, connectivity issues, or even hardware errors.
Why Knowing Your Chipset Driver Version Matters
Your current chipset driver version isn’t just a number — it’s a reflection of your system’s stability and compatibility. Newer driver versions often include fixes for bugs, performance enhancements, and compatibility updates for the latest hardware or software. For instance, a minor chipset update can resolve a frustrating connectivity issue with SSDs or improve memory stability in demanding applications.
Checking your chipset driver version also allows you to verify installed updates and confirm whether your system is using the latest release from the manufacturer. This can prevent common problems like unexpected crashes or system slowdowns and ensures your PC operates at peak efficiency.
Chipset Drivers Across Brands
Whether your system uses Intel or AMD chipsets, the principle remains the same: the driver is the bridge connecting your CPU and motherboard. Intel drivers often come with utilities like the Intel Driver & Support Assistant, while AMD provides tools such as the AMD Software Installer. Each brand may have slight variations in how drivers are updated or installed, but the underlying importance of keeping them current is universal.
Methods to Check Chipset Driver Version: Step-by-Step Approaches for Every User
Knowing your chipset driver version is one thing, but actually finding it can feel tricky if you’re not familiar with Windows tools or manufacturer utilities. Fortunately, there are several reliable methods that cater to beginners and advanced users alike.
Each approach gives you a clear picture of your installed drivers and allows you to verify installed chipset versions for both Intel and AMD systems.
1. Using Device Manager: The Classic Windows Approach
The Device Manager is the most straightforward method to check chipset drivers. It’s a built-in Windows tool that lists all hardware components and their associated drivers, making it ideal for confirming your current chipset driver version.
Steps to follow:
- Open the Start menu and type Device Manager.
- Click to open it. You’ll see a structured list of all hardware categories.
- Scroll to System Devices and expand it. This section usually includes entries like Intel Chipset, AMD SMBus, or PCI Express Root Complex.
- Locate the chipset driver related to your CPU brand. Right-click it and select Properties.
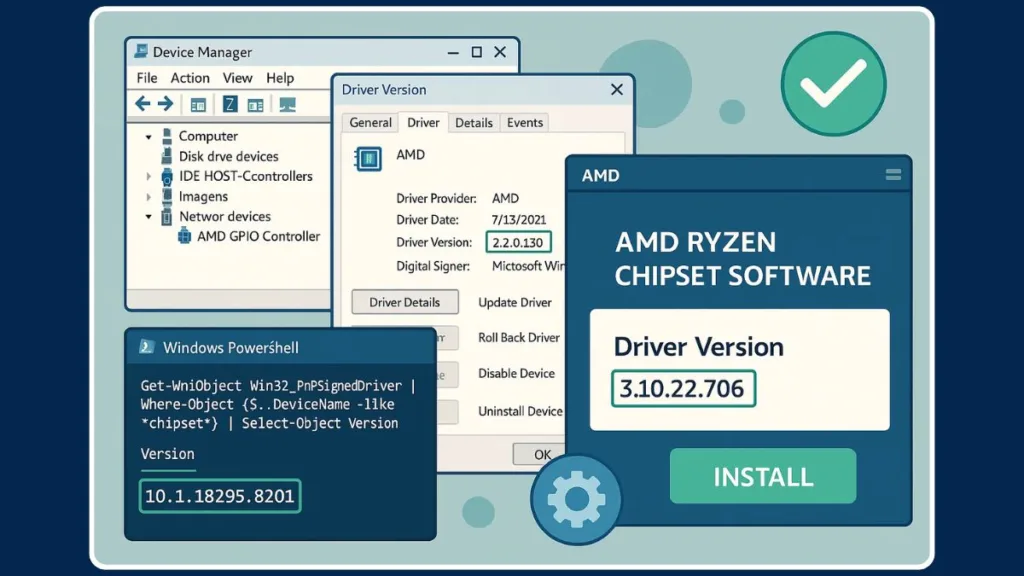
- In the Driver tab, you’ll find the Driver Version and Driver Date, offering a complete snapshot of your installed chipset software.
This method is perfect for users who want a quick check without installing any additional tools. It also helps you spot outdated drivers and prepare for updates.
2. Settings App and Control Panel: Windows 10 & 11 Options
For those using Windows 10 or 11, you can also check drivers through the Settings app or Control Panel, particularly useful for AMD users. These methods provide a user-friendly interface to find installed programs and software details.
Settings App: Navigate to Apps > Installed Apps and locate AMD Chipset Software. The version will be displayed right below the app name, allowing for an easy verification of the installed driver.
Control Panel: Open Programs and Features from the Control Panel. Scroll through the list to locate your chipset driver. You’ll find the version number listed alongside the program name. This method works for both Intel and AMD software that may be installed as a standalone program.
These approaches are ideal for users who prefer a graphical interface over technical tools, providing a clear way to see driver versions without digging into system files.
3. PowerShell and Command Prompt: Advanced Verification
For users comfortable with command-line tools, PowerShell and Command Prompt offer detailed ways to check chipset drivers, listing every driver installed on your system.
PowerShell: Open it as Administrator and use the command: Get-WmiObject Win32_PnPSignedDriver
This displays a comprehensive list of all installed drivers, including chipset drivers with their exact version.
Command Prompt: Use the driverquery command or WMIC queries to list devices and driver versions.
These tools are powerful for troubleshooting or auditing multiple systems, giving a complete overview of installed driver versions beyond what Device Manager shows.
4. Manufacturer Utilities: Intel, AMD, and OEM Tools
Both Intel and AMD provide official utilities that simplify the process:
Intel Driver & Support Assistant: Automatically detects Intel chipset drivers, reports the installed version, and notifies you if updates are available.
AMD Software Installer: Scans your system for installed AMD drivers and shows the version. It also allows for easy updates directly from AMD’s servers.
OEM Tools: Some manufacturers, like ASUS with Armoury Crate, include utilities that display chipset driver versions and other system details.
Using these tools ensures you’re referencing the official driver versions and minimizes the risk of errors from third-party sources.
Third-Party System Information Tools
If you prefer a more comprehensive system overview, programs like CPU-Z or HWiNFO can reveal detailed information about your chipset, including SMBus controllers, IDE ATA/ATAPI controllers, and driver versions. These tools are especially useful for tech enthusiasts or anyone needing to document or audit multiple system components quickly.
Key Takeaways for Choosing the Right Method
Beginners: Device Manager or Settings app methods provide simplicity and clarity.
Intermediate Users: Control Panel and manufacturer utilities offer an accessible yet detailed overview.
Advanced Users: PowerShell, Command Prompt, and third-party tools deliver full system insights and allow auditing multiple drivers at once.
By understanding and using these methods, you’ll have complete control over checking your chipset driver version, whether your goal is verification, troubleshooting, or preparing for updates. Knowing the exact version and date of your chipset driver is the foundation for maintaining a stable, high-performing PC.
How to Check Intel vs AMD Chipset Driver: Tailored Methods for Every System
When it comes to verifying your chipset driver version, the steps can vary slightly depending on whether your PC is running Intel or AMD hardware. Understanding these differences helps you identify drivers accurately, avoid confusion, and ensure your system runs at its best.
Checking Intel Chipset Drivers
Intel chipsets are common in many desktops and laptops, and the drivers are often installed automatically with Windows or through Intel’s official utilities. Knowing your Intel chipset driver version is essential for keeping your system compatible with motherboard features, CPU optimizations, and memory performance.
Device Manager is the most direct method. Open Device Manager from the Start menu, then expand System Devices to look for entries like Intel Chipset, PCI Express Root Complex, or Intel SMBus Controller. Once located, right-click the entry and select Properties → Driver tab to view the driver version and date.
Another approach is using the Intel Driver & Support Assistant (DSA). This official tool scans your system for Intel components, identifies the installed chipset drivers, and highlights the current version while recommending updates if needed. Using DSA ensures you’re getting official, up-to-date drivers directly from Intel, reducing the risk of compatibility issues.
For advanced users, the Command Line Verification method is highly effective. Open PowerShell or Command Prompt as Administrator and run driverquery or Get-WmiObject Win32_PnPSignedDriver to list all installed drivers. By filtering for Intel-specific entries, you can check the chipset driver version accurately. This method is particularly useful for IT professionals managing multiple systems.
Intel driver utilities also often include features like automatic updates, which simplify ongoing maintenance and reduce the risk of using outdated drivers.
Checking AMD Chipset Drivers
AMD chipsets are widely used in desktops and gaming laptops, and their drivers are crucial for communication between your CPU, motherboard, and connected devices. AMD drivers are updated frequently, so knowing your AMD chipset driver version helps prevent performance hiccups or stability issues.
A beginner-friendly approach is through the Settings App (Installed Apps). Open Settings > Apps > Installed Apps, then locate AMD Chipset Software, where the driver version is displayed directly under the program name. This provides a quick and simple way to verify your driver without navigating more technical menus.
The Control Panel > Programs and Features method is also effective. Open Control Panel, go to Programs and Features, and scroll through installed programs to locate the AMD chipset entry. The version number is listed alongside the program name. This method is useful if multiple AMD components are installed and you want to confirm the driver for your motherboard specifically.
You can also use Device Manager, similar to Intel. Expand System Devices in Device Manager, identify AMD-specific entries such as AMD SMBus or PCI Express Root Complex, and check the Driver tab for version information.
Another reliable option is the AMD Software Installer. Download and run it from the official AMD website. The tool automatically detects installed drivers, shows the current version, and offers updates. This ensures you are using the latest official driver without manually searching for updates.
For advanced verification, open PowerShell as Administrator and run Get-WmiObject Win32_PnPSignedDriver. Scan the list for AMD chipset entries to confirm the exact version number, which is particularly useful for troubleshooting or validating updates after a Windows upgrade.
Comparing Intel vs AMD Approaches
For Intel, Device Manager is often sufficient, but Intel DSA provides added convenience with automatic scanning and update notifications.
AMD offers more varied options, including Settings App, Control Panel, and software installer, giving flexibility for both beginners and advanced users.
Advanced users on both platforms can leverage PowerShell and command-line verification, which is ideal for auditing drivers on multiple devices or performing detailed troubleshooting.
Key Takeaways for Both Intel and AMD Users
Always verify driver version and date before updating, regardless of brand. Use official manufacturer utilities whenever possible to reduce the risk of installing incorrect drivers.
Keeping chipset drivers updated ensures system stability, performance, and compatibility with the latest applications. Combining graphical tools with advanced verification methods provides the most complete picture of your installed chipset drivers.
Understanding these platform-specific methods empowers you to check your Intel or AMD chipset drivers confidently, maintain optimal system performance, and take control of updates in a proactive way.
Tips for Verifying and Maintaining Your Chipset Drivers: Keep Your System Running Smoothly
Once you know how to check your chipset driver version, the next step is learning how to verify and maintain it effectively. Proper maintenance ensures your system performs optimally, avoids hardware conflicts, and stays compatible with new software updates.
Verify Driver Versions Before Updating
Before updating any chipset driver, it’s crucial to confirm the current version and driver date. This allows you to compare it with the latest release from your CPU or motherboard manufacturer. Knowing your current chipset driver version ensures that you only update when necessary and can revert to a previous version if an update causes unexpected issues.
Windows tools like Device Manager provide a reliable way to check this information. For more detailed verification, PowerShell or system information utilities can confirm the exact version and provide insights into other installed drivers that may interact with your chipset.
Use Official Manufacturer Sources for Updates
Whether your system is running Intel or AMD, downloading drivers from official sources is essential. Manufacturer websites and utilities, such as Intel Driver & Support Assistant or the AMD Software Installer, guarantee that the drivers are compatible with your motherboard and system configuration. Relying on third-party downloads can expose your system to incompatible drivers or malware, which can compromise stability and performance.
Regularly visiting the motherboard manufacturer website is also helpful for accessing latest chipset driver updates, BIOS recommendations, and system-specific instructions.
Schedule Regular Driver Maintenance
Chipset drivers are foundational to your system’s communication between the CPU, memory, and peripherals. To maintain stability and prevent conflicts, it’s a good idea to schedule regular checks, ideally every few months or before installing major system updates. By routinely verifying the installed chipset driver version, you can anticipate potential issues, maintain performance, and ensure compatibility with new software or hardware.
Keeping a simple driver log or note of installed versions can save time and frustration when troubleshooting or planning updates.
Restart and Monitor After Updates
After installing a new chipset driver, always restart your system. Many driver changes require a reboot to take effect fully, enabling your system to properly recognize the updated components.
Post-update, monitor your system for a few days to ensure stability and performance improvements. Look for smoother memory access, faster boot times, or improved peripheral communication. If any issues arise, having recorded the previous driver version allows you to roll back safely.
Leverage Tools for Easier Maintenance
Using built-in utilities and trusted software tools simplifies driver verification and maintenance. For Intel users, the Driver & Support Assistant automatically checks for updates. AMD users can rely on the AMD Software Installer, which detects installed drivers and recommends updates.
Advanced users may also utilize system information tools like HWiNFO or CPU-Z to track chipset properties, driver versions, and system performance metrics. These tools help maintain a comprehensive view of your system and reduce the risk of overlooked updates.
Key Takeaways
Verifying and maintaining chipset drivers is not just about updating; it’s about proactive care for your system. Always confirm the driver version before updating, rely on official sources, schedule regular maintenance, and monitor performance post-update. Combining these practices with reliable tools ensures your system remains stable, responsive, and ready for the latest applications and hardware.
Frequently Asked Questions: Everything You Need to Know About Chipset Drivers
After learning how to check and maintain your chipset driver version, it’s normal to have a few lingering questions. This section addresses the most common queries, helping you understand your system better and make informed decisions.
How Do I Find My Chipset Model?
Finding your chipset model is the first step to verifying or updating drivers. The easiest approach is through Device Manager: expand System Devices and look for entries related to your CPU brand. Intel systems typically list Intel Chipset components, while AMD systems display entries like AMD SMBus or PCI Express Root Complex.
For more detailed information, tools like CPU-Z or HWiNFO can reveal the exact chipset model along with motherboard details, memory specifications, and other system properties. Knowing your chipset model ensures you download the correct driver versions and maintain system stability.
Is It Important to Update Chipset Drivers?
Absolutely. Chipset drivers are the backbone of your PC, connecting the CPU to memory, storage, and peripherals. Updated drivers often include bug fixes, performance enhancements, and compatibility improvements for the latest software and hardware.
Failing to update can lead to slow system performance, hardware conflicts, or even unexpected crashes. Verifying your current chipset driver version before updates allows you to track improvements and ensures that your system benefits from each new release.
How Do I Check My AMD Chipset Driver Version on Windows?
For AMD users, there are multiple methods to verify your driver version. You can open the Settings app → Installed Apps to locate the AMD Chipset Software and see the version listed. Alternatively, check Programs and Features in the Control Panel.
Advanced users may prefer Device Manager or PowerShell commands, which display detailed driver information, including version and installation date. Using the AMD Software Installer is also a safe and convenient way to verify and update drivers automatically.
Where Are Chipset Drivers Located in Device Manager?
Chipset drivers are typically located under System Devices in Device Manager. Depending on your system, you may see multiple entries such as Intel Chipset, PCI Express Root Complex, SMBus Controller, or AMD-specific entries.
Right-clicking on any of these entries and selecting Properties → Driver tab provides a full view of the driver version, driver provider, and installation date, giving you all the information needed for verification or troubleshooting.
How Often Should I Update My Chipset Drivers?
There’s no strict schedule, but a good practice is to check for updates every few months or before installing major software updates. If you encounter system instability, crashes, or performance issues, verifying and updating your chipset driver should be among the first steps.
Using manufacturer tools like Intel DSA or the AMD Software Installer can automate this process, making it easy to maintain the latest version without manual checks.
What Happens If I Don’t Install Chipset Drivers?
Without proper chipset drivers, your operating system cannot communicate efficiently with the motherboard and connected components. This can result in hardware malfunctions, slow performance, unstable system behavior, or incompatibility with software updates.
Installing and maintaining the correct chipset drivers ensures your PC runs smoothly, reliably, and at full potential, while also extending the life of your hardware.
Conclusion: Ensuring Your System is Up-to-Date by Knowing Your Chipset Driver Version
Keeping your chipset driver version current is more than a routine check—it’s a key step in maintaining a stable, efficient, and high-performing system. From understanding what a chipset driver does to learning the practical ways to verify it, knowing your driver version empowers you to take control of your PC’s health and performance.
Verifying your current chipset driver version using tools like Device Manager, manufacturer utilities, or even advanced methods like PowerShell ensures you always have accurate information about your system. Whether you’re running Intel or AMD hardware, these steps help you confirm that your drivers are up-to-date, which is essential for compatibility, stability, and performance.
Maintaining your drivers also means practicing proactive system care. Regular checks, relying on official sources for updates, and monitoring performance after updates prevent common issues such as system slowdowns, hardware conflicts, or unexpected crashes. By following these steps, you not only protect your PC from potential problems but also ensure it performs at its full potential.
Ultimately, knowing how to check and maintain your chipset driver version is about giving yourself confidence and control over your technology. With this knowledge, your system remains ready for the latest applications, demanding workloads, and future hardware upgrades—keeping your computing experience smooth, reliable, and efficient.
Visit Our Post Page: Blog Page