
Learn how to create a Facebook payout account in 2025 with this complete step-by-step guide. Follow our easy instructions to start receiving your earnings smoothly. From setting up your bank and tax information to managing and updating your payouts.
If you’re a creator looking to earn money from your Facebook content, setting up a payout account is your first step toward turning your creativity into real earnings. A payout account acts as the bridge between your content and the money you make, allowing you to receive payments from various monetisation tools, like in-stream ads, Stars, subscriptions, and bonuses.
Getting started might feel a little overwhelming at first, but the process is straightforward once you know what information you’ll need and where to go. From linking your bank or PayPal account to submitting your tax information, every step ensures your earnings reach you securely and on time.
For official guidance on the entire setup process and eligibility requirements, you can check out Facebook’s official payout account help page.
Whether you’re just starting with Facebook monetisation or looking to streamline your payout setup, this guide will walk you through everything you need to know—step by step—so you can focus on what you do best: creating content.
Who Is Eligible to Create a Facebook Payout Account? (Eligibility, Requirements & Earning Limits)
Not every Facebook creator automatically qualifies for a payout account. Eligibility depends on the type of content you create and the monetisation tools you use. To receive payments, you need to meet Facebook’s requirements, which ensures your account is set up properly and your earnings are secure.
Only eligible creators can receive payouts on Facebook. This includes creators using monetisation tools such as in-stream ads, Stars, subscriptions, live ads, Ads on Reels, and bonuses.
It’s important to understand that without a payout account, your earning potential is limited. For example:
- You can earn up to USD 500 per monetisation tool without a payout account.
- The maximum across three tools is capped at USD 1,500.
- If you don’t complete your account setup within five months of onboarding, you will not be able to earn more money until the setup is complete.
- After six months, any unpaid earnings are forfeited.
This ensures that creators stay on track with the proper financial and tax information, and it protects both creators and Facebook from potential payment delays or errors.
For a complete list of eligibility requirements and guidance on monetisation tools, you can refer to Facebook’s official payout eligibility page.
In addition to content eligibility, your account must be in good standing. This means:
- Following Facebook’s monetisation policies and community standards.
- Avoiding limited originality monetisation issues, which can affect your payout eligibility.
- Maintaining accurate contact and business information, which is crucial for linking your payout method and tax verification.
Even if your content is eligible, creators must provide accurate bank or PayPal details, submit their tax information, and complete the Meta payout onboarding to receive payments. This process helps avoid delays and ensures that your earnings are deposited correctly into your account.
For guidance on starting the onboarding process and linking your account, check out Facebook’s detailed payout setup guide.
Understanding eligibility is the foundation for successful monetisation. By ensuring that your account qualifies and that you meet all requirements, you can confidently move forward with setting up your payout account and accessing your earnings from Facebook monetisation tools.
Preparing to Set Up Your Facebook Payout Account (Essential Documents, Details & Readiness Steps)
Before you start creating your Facebook payout account, it’s important to make sure you have everything ready.
A smooth setup experience begins with preparation — from verifying your identity to confirming that your bank account and tax information are accurate and up to date.
“Setting up your payout account is not just about getting paid — it’s about proving you’re a verified creator ready to monetise responsibly.”
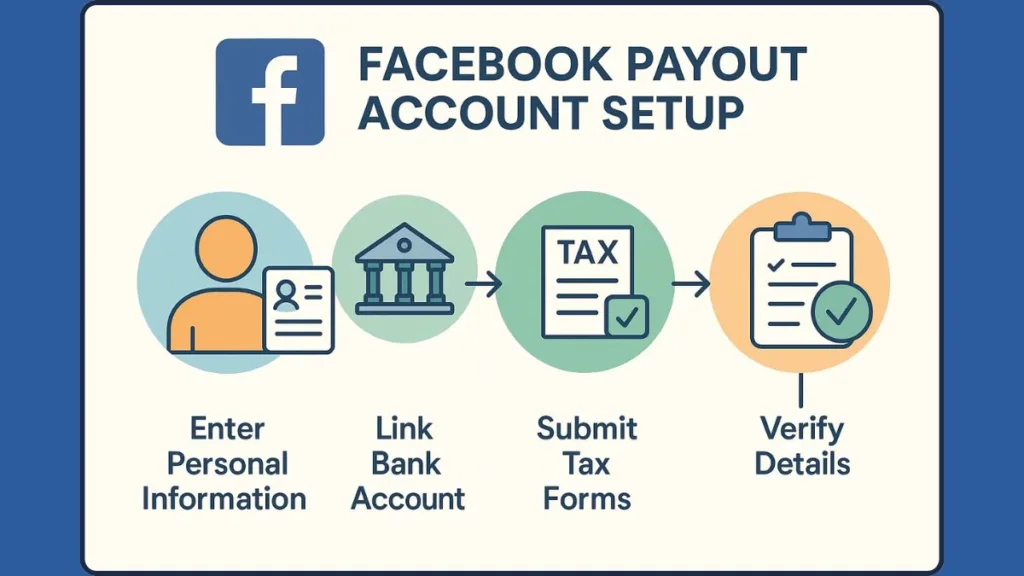
Step 1: Confirm Eligibility and Access the Professional Dashboard
First, log in to your Professional Dashboard on Facebook. This is where your monetisation tools and payout setup options appear. You’ll typically find this by visiting your Page settings under the Monetisation tab.
Make sure your Page or profile is already approved for monetisation programs like In-stream Ads, Stars, Subscriptions, or Ads on Reels. If not, check the eligibility and onboarding section in the Facebook Monetisation Help Center.
You’ll only see the option to set up payouts if your account is monetisation-approved. This helps ensure your payment details are tied to an eligible and compliant Facebook Page.
Step 2: Gather Legal and Business Information Before Setup
Facebook requires accurate personal or business information to process payments. Before starting the setup, collect these details:
- Full legal name (must match the name on your bank or tax records)
- Date of birth and country of residence
- Primary address and contact email or phone number
- Business name (if applicable) and registered business address
If you’re an individual creator, you’ll be setting up your payout account using your personal details. However, if you’re operating as a business entity, you’ll need to provide verified business ownership information and, in some cases, details for the legal representative associated with your business.
Facebook cross-verifies this information with tax and banking data, so make sure the name and tax ID match exactly. Any mismatch may result in payment delays or a verification lock on your account.
For a full breakdown of the information required for onboarding, refer to Meta’s payout setup guide.
Step 3: Select and Prepare the Right Payout Method (Bank, PayPal, or Direct Sign-In)
Facebook allows creators to receive payments in a few different ways:
- Bank account (using SWIFT, IBAN, or local routing details)
- PayPal
- Direct bank sign-in through your financial institution
Make sure your bank supports international deposits if you’re outside the U.S. For creators in countries like India, Nigeria, or the Philippines, having a domiciliary or USD account often ensures smooth payouts.
Tip: Use a bank account or PayPal account that matches your legal name on Facebook and tax forms. This helps avoid payout errors or rejections due to name mismatches.
You can learn more about payment compatibility and supported payout regions from Facebook’s payment setup help article.
Step 4: Complete and Verify Tax Information (W-9 / W-8BEN Forms)
Depending on your country, you’ll be required to complete tax verification during the payout setup:
- U.S. residents: Fill out the W-9 form, including your SSN or EIN.
- Non-U.S. residents: Submit the W-8BEN or W-8BEN-E form with your country’s tax identification number (TIN).
Facebook uses this information to comply with international tax laws and avoid withholding issues. If you skip tax verification, your payout setup remains incomplete, and earnings can’t be deposited.
“Tax verification isn’t optional — it’s the final step that unlocks your payouts.”
If you’re unsure which form applies to you, visit the Facebook Tax Information Help Page.
Step 5: Understand Monetisation Thresholds and Payout Deadlines
Facebook imposes earning and setup thresholds to ensure creators complete onboarding on time. For instance:
- You can earn up to USD 500 per monetisation tool before setting up payouts.
- You have five months to complete your payout setup after onboarding begins.
- After six months, unclaimed earnings are forfeited automatically.
This timeline is crucial — missing it could mean losing the money you’ve already earned.
You can find additional information on thresholds, eligibility, and deadlines in Meta’s payout policy guide.
Being well-prepared before setting up your Facebook payout account makes the entire process faster and error-free. Once you have your personal details, bank account, and tax information ready, you’re all set to move forward to the next stage — actually creating your payout account and linking it to your monetisation tools.
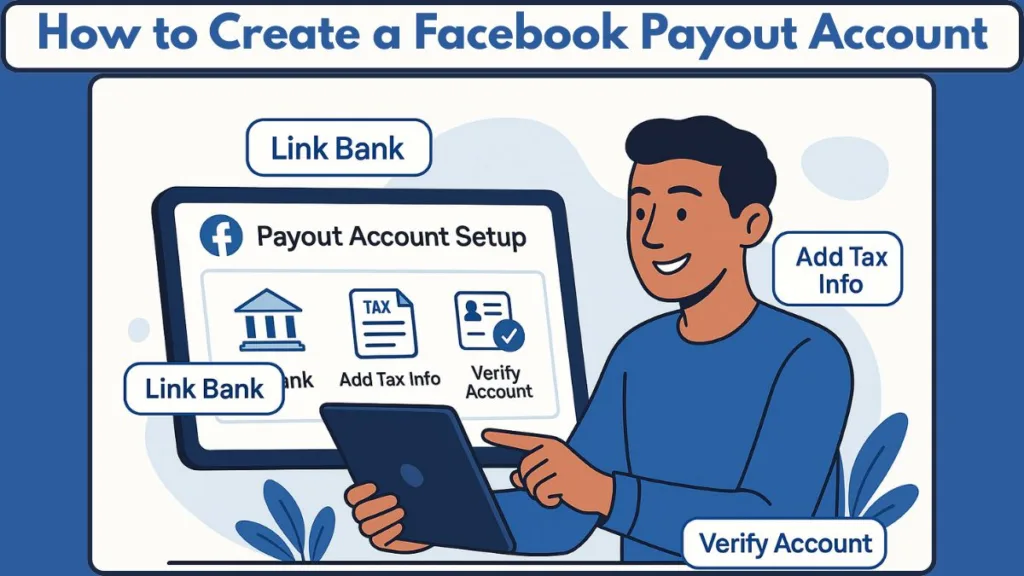
Step-by-Step Guide: Creating Your Facebook Payout Account (From Dashboard to Verification)
Setting up your Facebook payout account might feel technical at first, but once you understand the flow, it’s a straightforward process. Every step is designed to ensure your earnings go directly and securely to your chosen bank or payment account.
The following detailed guide walks you through everything — from accessing your payout setup to verifying your information and confirming your payout method.
“This is where your Facebook monetisation turns into real-world earnings — accuracy and patience will make the process seamless.”
Step 1: Access the Payouts Section in Your Professional Dashboard
Begin by logging into your Facebook account that’s linked to your monetised Page or profile. Navigate to:
Professional Dashboard → Monetisation → Payouts.
Here, you’ll find all your payout and earnings-related information. If this tab isn’t visible, it usually means your Page isn’t monetisation-enabled yet. You can check your eligibility in the Monetisation Eligibility Overview section.
The Meta Help Center provides the most updated guidance on who can access payout features, especially for creators using In-stream Ads, Stars, or Subscription-based monetisation.
Tip: If you see an “Update pending: Complete onboarding” banner, it means Facebook needs you to complete your payout setup before releasing any funds.
Step 2: Initiate the Payout Setup Process
Once inside the Payouts section, click “Add Payout Details” or “Set Up Payout Account.” Facebook will redirect you to a secure Meta Payouts portal, where you’ll link your payment method and provide necessary verification details.
Depending on your region, you’ll either be prompted to:
- Sign in directly with your bank using Facebook’s integrated banking verification system, or
- Manually add your bank details, such as account number, IBAN, SWIFT code, and bank name.
You can find step-by-step guidance on this stage in the official Facebook payout setup page.
“Ensure your bank details exactly match your Facebook payout profile name — mismatched names can trigger verification holds or rejected payouts.”
Step 3: Choose and Add Your Preferred Payment Method
After providing your initial payout details, Facebook lets you select your preferred payout method. The platform supports:
Bank Account Transfers: Ideal for direct deposits in your local currency or via USD domiciliary accounts.
PayPal: A convenient option for creators in countries where PayPal payouts are supported.
Wire Transfers (limited regions): For users who prefer receiving international payments.
If you already have a payout method set up but wish to modify it later, visit your Facebook payout settings from the Professional Dashboard or Meta Business Suite. The Facebook Business Help guide provides specific instructions for updating payout preferences.
You can change or update your payout method anytime, but Facebook will verify new details before activating them — so always plan updates ahead of payout dates.
Step 4: Submit Tax Information for Verification
To stay compliant with tax laws, Facebook requires you to submit valid tax forms based on your country:
- U.S. creators fill out W-9 forms with their Social Security Number (SSN) or Employer Identification Number (EIN).
- International creators submit W-8BEN (individuals) or W-8BEN-E (businesses) with their country-specific Tax Identification Number (TIN).
During this process, Facebook may prompt you to upload supporting documents to confirm your identity. Visit the Facebook Tax Information Help Center for region-specific tax form assistance.
“Adding tax info to get paid on Facebook is not optional — it’s a critical verification step that ensures your earnings are processed correctly and reported legally.”
If your name or tax number doesn’t match, the system may pause your payout setup until corrections are made. Always double-check spelling, format, and identification numbers before submitting.
Step 5: Review and Confirm Your Payout Setup
Once your bank and tax details are entered, review your payout summary page carefully. Check for:
- Correct account number and SWIFT/IBAN codes
- Matching names between bank, Facebook, and tax form
- Valid email address and country settings
You’ll then be asked to confirm your payout setup by completing a two-step verification process. Facebook may send a confirmation email or small test deposit to verify your account connection.
The Meta Business Help article on verification explains how this process works and what to do if the test deposit doesn’t appear.
Tip: If your account remains unverified after submission, don’t panic — review the entered data or contact Meta’s Creator Support team for assistance.
Step 6: Wait for Approval and Activation of Your Account
After submitting all required information, Facebook reviews your payout account. This process can take anywhere between 3 to 10 business days, depending on your region and bank type.
You’ll receive a notification once your account is approved. Only then will payouts begin processing. The first transfer may take a little longer as Facebook confirms everything is accurate, but subsequent deposits usually follow your region’s payout schedule.
The Facebook Payouts FAQ outlines expected processing times and how to track your payment once it’s released.
Your first successful payout is a milestone — it confirms your monetisation setup is complete and your earnings are on the way.
Step 7: Post-Setup Maintenance and Monitoring
Once your account is active, it’s essential to keep your payout settings updated.
Visit your Meta Business Suite > Payouts section regularly to:
- Check your payment history and upcoming payout schedule
- Update tax forms if your business structure or residency changes
- Monitor for notifications like “Update pending” or “Verification required”
To avoid payment interruptions, make sure your bank account remains active, and your business information matches Meta’s current records. If you encounter any issues such as payout not showing or setup errors, refer to the troubleshooting section in the Facebook Business Help Center.
Consistency is key — keeping your payout details up-to-date ensures you never miss a payment from your Facebook monetisation efforts.
By following these seven detailed steps, you’ll successfully create your Facebook payout account, verify your tax information, and link your preferred payment method.
This setup ensures every dollar you earn from your creative work — whether through Reels, Stars, or Ads — reaches your account securely and on time.
Tax Verification: Ensuring Your Facebook Payouts Are Compliant and Secure
Tax verification is a critical step in the Facebook payout setup process. It ensures that all earnings from your monetisation tools — whether In-stream ads, Stars, Reels bonuses, or Subscriptions — are processed securely and in compliance with regional tax regulations. Completing this step accurately prevents delays in receiving your payments and avoids potential compliance issues with local tax authorities.
Think of tax verification as the safety net for your earnings — it protects both you and Facebook while keeping your payouts smooth and uninterrupted.
Why Tax Verification Is Crucial for Facebook Payouts
Facebook is required to collect tax information from all creators to comply with government regulations. Without verified tax information:
- Payouts may be temporarily withheld.
- Certain monetisation tools may stop releasing funds until verification is complete.
- Earnings may be forfeited if verification is not completed within the platform’s specified timeframe.
Creators can learn more about tax verification requirements in the Meta Tax Information Help Center.
Submitting accurate tax information ensures that your hard-earned revenue reaches you without unnecessary delays.
Required Tax Documents for Different Regions
Depending on your location and business type, Facebook requires different forms to verify your taxes:
- For U.S. Individual Creators: Submit a W-9 form including your Social Security Number (SSN).
- For U.S. Businesses: Provide your Employer Identification Number (EIN) via W-9.
- For Non-U.S. Creators (Individuals): Submit a W-8BEN form with your country-specific Tax Identification Number (TIN).
- For Non-U.S. Businesses: Use a W-8BEN-E form including your business’s tax details.
Tip: Ensure the name on your tax documents matches the legal name you used during your Facebook onboarding. Mismatches can lead to verification holds or rejected payouts.
Step-by-Step Tax Verification Process on Facebook
- Access Tax Verification Screen
- Navigate to Professional Dashboard → Monetisation → Payouts.
- Click Add Tax Info to start the verification process.
- Select Your Tax Classification
- Choose whether you are an individual creator or a business entity.
- Confirm your residency status (U.S. resident or non-resident).
- Enter Personal or Business Tax Details
- Provide full legal name, business name (if applicable), and tax ID number.
- Enter your address exactly as it appears on your latest tax records.
- Consent and Certify Information
- Agree to the electronic signature terms.
- Enter your full name and select the verification date from the drop-down menu.
- Review and Submit
- Double-check all information for accuracy.
- Submit the form. You’ll receive a confirmation once Facebook has verified your tax information.
For detailed guidance, visit the official Facebook tax verification documentation.
Every detail matters — even minor discrepancies in tax ID, name, or address can delay your payout verification.
Common Issues Encountered During Tax Verification
- Name Mismatch: The name on your tax form doesn’t match your Facebook account.
- Incorrect Tax ID Format: Ensure your SSN, EIN, or TIN is entered correctly.
- Incomplete Information: Missing address or classification can result in verification rejection.
If you encounter any issues, check the Facebook Business Help Center for troubleshooting, or contact Meta Creator Support for assistance.
Timing and Impact of Tax Verification on Payouts
Once your tax verification is submitted, Facebook typically reviews your information within 3–10 business days. After approval:
- Your payout account becomes fully active.
- All eligible earnings will be released according to your payout schedule.
- You’ll receive notifications confirming successful verification.
Completing tax verification promptly ensures uninterrupted access to your Facebook earnings — a vital step for any serious creator.
Pro Tips for Smooth Facebook Tax Verification
- Keep your legal documents and tax records handy before starting.
- Always double-check spelling and number formats.
- Ensure your bank details match your tax verification info to avoid delays in payout processing.
- If needed, use Meta Business Suite → Payouts to track the verification status and address any pending actions.
By completing tax verification accurately, you not only comply with regulations but also secure timely and reliable access to your Facebook monetisation earnings, making your creative work financially rewarding.
Managing & Updating Your Facebook Payout Account: A Comprehensive Guide for Creators
Once your Facebook payout account is active and verified, managing it effectively becomes essential to ensure that your monetisation earnings are received on time and without any issues.
Facebook allows creators and business admins to update payout details, tax information, and bank accounts — but only financial admins have full control over these changes. Staying on top of your account settings helps prevent delays, failed transfers, or compliance issues.
Managing your payout account isn’t just administrative work — it’s about safeguarding your earnings and making sure every dollar you earn reaches you seamlessly.
Accessing Payout Account Settings via Desktop and Mobile
To make changes, start by navigating to your Professional Dashboard or Meta Business Suite:
- On Facebook (Desktop): Go to Professional Dashboard > Tools > Payouts > Settings.
- On Mobile: Open the Professional Dashboard > Tools > Payouts > Settings.
Here, you’ll find all linked payout accounts, your payout methods, tax info, and account administrators. Selecting an account brings up options to edit, update, or add new payout details.
Tip: Only users with financial admin privileges can make updates. If you’re unsure about your role, check the Payout Account Admins section.
Updating Your Bank Account or Payment Method Securely
Your payout method is the core of your earnings setup. Facebook allows you to:
- Link a new bank account directly through secure verification.
- Update an existing account if details like account number, IBAN, or SWIFT code change.
- Switch to PayPal if you prefer digital payments over direct bank deposits.
Any changes to your payout method trigger a verification process — plan updates a few days ahead of your payout schedule to avoid delays.
For step-by-step guidance, refer to the Facebook Payout Method Update Help Page.
Maintaining Accurate Tax Information Post-Setup
It’s important to keep your tax details current, especially if your legal name, business type, or residency status changes:
- Update tax forms to reflect any changes in legal or business names.
- Resubmit verification if your country or tax identification number changes.
- Check for reminders — Facebook often shows an “Add tax info” banner if verification is incomplete.
Quote: “Keeping tax information up-to-date ensures your payments continue without interruption and keeps your account compliant with local regulations.”
Adding or Removing Payout Account Administrators
Financial admins can manage team access to payout accounts:
- Add a new admin: Enter their full name and email to grant access.
- Remove an admin: Click the X next to the admin’s name to revoke permissions.
Tip: Limit the number of admins to trusted team members. Each admin has the ability to modify payout and financial details, which directly impacts your account security.
Understanding Payout Delays and Verification Holds
Facebook may place temporary holds on payouts in the following situations:
- Updating payout method or bank details — usually a 5-day hold applies.
- Incomplete tax verification or mismatched bank/tax information.
- Security checks triggered by unusual account activity.
If a hold occurs, your scheduled payout will be released in the next available payout cycle after verification completes. You can monitor the status through Meta Business Suite → Payouts.
Delays aren’t errors — they’re protective measures to keep your account and funds secure.
Monitoring Your Payout Activity Efficiently
Regular monitoring ensures everything runs smoothly:
- Check the upcoming payout schedule and deposit dates.
- Review transaction history for discrepancies.
- Ensure your bank details, name, and tax info match across all sections.
- Address notifications promptly to avoid blocked payouts.
The Facebook Business Help Center provides detailed guidance for monitoring and troubleshooting your payout account.
Pro Tips for Effective Facebook Payout Management
- Regularly review your account settings to prevent errors or outdated information.
- Keep supporting documents handy for tax verification and bank updates.
- Respond promptly to notifications like “Update pending” or verification reminders.
- Plan payout method updates ahead of scheduled payments to avoid delays.
A well-managed payout account is the backbone of smooth monetisation — staying proactive ensures your earnings are secure, verified, and deposited on time.
By actively managing and updating your Facebook payout account, you maintain control over your financial setup, protect your revenue streams, and make sure that your creative work continues to be rewarded reliably
Handling Incomplete Payout Accounts: Ensuring No Earnings Are Left Behind
Even after starting the Facebook payout setup, it’s common for some accounts to remain incomplete.
An incomplete payout account can prevent your earnings from being released, block access to certain monetisation tools, or trigger compliance reminders.
Understanding how to identify, complete, and monitor an incomplete account ensures your revenue flows without disruption.
An incomplete payout account is like leaving money on the table — the sooner you finish setup, the sooner your earnings reach you.
Why Payout Accounts May Remain Incomplete
Several reasons can cause an account to remain incomplete.
Partial tax verification is one common cause, where creators may start adding tax information but do not finish submitting all required forms.
Another reason is an unlinked or pending bank account — if your bank details aren’t fully verified, payouts cannot be processed.
Incomplete personal or business information, such as missing legal name, address, or business details, can also block completion.
Finally, skipping steps during onboarding can leave a payout account unfinished if creators exit the setup before completing all required fields.
Tip: Facebook displays reminders and notifications if your payout account setup is unfinished. Paying attention to these helps prevent lost earnings.
Identifying an Incomplete Payout Account
You can easily spot an incomplete payout account by checking your Professional Dashboard or Meta Business Suite.
Notification banners often appear, prompting you with messages like “Add tax info” or “Finish your payout setup.”
Status indicators may show accounts as “Pending verification” or “Incomplete” in the payout settings.
Restricted access is another sign, as certain monetisation tools may prevent payouts until all account requirements are met.
For detailed tracking and troubleshooting, visit the Facebook Business Help Page on Payout Setup.
Steps to Complete an Incomplete Payout Account
Step 1: Access the Account
Navigate to Professional Dashboard > Tools > Payouts and select the account marked as incomplete.
Step 2: Complete Tax Verification
Submit all required tax forms, such as W-9, W-8BEN, or W-8BEN-E, depending on your location and business type.
Ensure that names and tax ID numbers match your legal documentation accurately.
Step 3: Verify Bank or Payment Method
Link your bank account or PayPal account and complete all verification processes, including confirming IBAN, SWIFT codes, or routing numbers.
Step 4: Update Missing Information
Fill in any missing personal or business details. Confirm that your address, email, and phone number are accurate and match your official records.
Step 5: Submit for Review
Once all steps are complete, submit your account for verification. Facebook will review your information, typically within 3–10 business days, before unlocking your payouts.
Completing all missing information promptly ensures your account is fully activated and ready to receive earnings from every monetisation tool.
Using Notifications and Reminders Effectively
Facebook proactively reminds creators of incomplete accounts through email notifications if the account remains unfinished for an extended period.
Dashboard banners provide direct links to the exact steps needed to complete the setup.
Additionally, when onboarding new monetisation tools, Facebook will guide you to finish existing payout accounts before releasing any earnings.
Tip: Treat every notification as actionable — delays can result in forfeited earnings if setup isn’t completed within the specified timeframes.
Completing an Incomplete Account During Onboarding to New Tools
If you start a new monetisation tool while having an unfinished payout account, Facebook allows you to continue the setup directly from the new tool onboarding process.
You can select the existing payout account to finish setup, rather than creating a new account unnecessarily.
Follow the remaining steps to complete tax verification, link bank accounts, and confirm all personal or business details.
For additional guidance, refer to the official Facebook Business Help Guide.
Pro Tips to Avoid Incomplete Accounts
Always complete each step immediately rather than leaving the setup halfway.
Keep your tax documents, bank details, and personal information ready before starting the process.
Regularly monitor dashboard notifications to catch pending items early.
Using Meta Business Suite → Payouts allows you to track the status and ensure no accounts are overlooked.
By proactively completing your payout account, you unlock the full potential of Facebook monetisation tools and guarantee timely access to every dollar you earn.
Handling incomplete payout accounts efficiently ensures your earnings are never delayed, your monetisation tools remain active, and your creative work continues to generate revenue seamlessly.
Best Practices & Tips for a Smooth Facebook Payout Experience
Setting up a payout account on Facebook is just the first step in ensuring your monetisation journey runs smoothly. To make the most of your earnings and avoid delays, adopting best practices and following some key tips can save time, prevent errors, and keep your revenue flowing consistently.
Maintain Accurate Personal and Business Information
One of the most important practices is to maintain accurate personal and business details. Ensure that your legal name, address, email, and phone number are current. Any discrepancies can lead to payment delays or verification issues.
For creators operating businesses, double-check that the business name, registered address, and contact information match your legal documents. Facebook requires this alignment to process payments successfully.
Pro Tip: Regularly review your payout settings in Meta Business Suite or the Professional Dashboard to catch any outdated information early. For guidance, visit Facebook Business Help: Payouts.
Verify Bank or Payment Methods Promptly
Before expecting payouts, verify your bank account or PayPal account completely. This includes confirming IBAN, SWIFT codes, or routing numbers depending on your region and payment method.
Incomplete or pending verification is a leading reason why creators see “Update Pending” messages or delays in their payouts. Always double-check that the account holder name matches the information provided during onboarding.
Tip: If you experience issues connecting your bank account, refer to Facebook Creator Payout Help to troubleshoot and ensure everything is correctly linked.
Submit Tax Information Carefully and Early
Tax verification is a critical step in receiving payouts. Submit all required tax forms according to your residency and business type, whether it’s a W-9 for U.S. residents, W-8BEN for non-U.S. individuals, or W-8BEN-E for non-U.S. businesses.
Ensure your name, business name, and tax ID number match your official records. Any mismatches can delay payments and may require additional documentation.
Pro Tip: Keep your tax information handy before starting payout setup to avoid repeated submissions and delays. Check Facebook Tax Info Guidelines for up-to-date instructions.
Monitor Notifications and Dashboard Reminders Consistently
Facebook provides proactive notifications and reminder banners if your payout account or tax verification is incomplete. Treat every notification as actionable and resolve issues promptly.
Even small overlooked details, like a missing phone number or outdated email, can prevent your payout from being processed on schedule. Regularly accessing Meta Business Suite → Payouts helps you stay ahead of any pending actions.
Tip: Enable email notifications for payouts and account updates to catch issues early, especially during monetisation onboarding periods.
Plan Around Facebook Payout Schedules
Understanding Facebook’s payout cycles can help you manage your cash flow. Payments may take a few days after verification to process, and any updates to bank or tax information close to the payout date can result in delays.
Tip: Avoid making last-minute changes to your payout method within five days of scheduled payouts to prevent funds being delayed to the next cycle.
Check Your Payout Account Before Onboarding New Monetisation Tools
When you onboard a new monetisation tool, review your existing payout account for completeness. This ensures you don’t run into issues like limited originality monetisation errors or blocked payouts.
Verify tax and bank information, confirm that the legal name matches the bank account, and make sure the professional dashboard reflects the correct payout account.
A quick review of your payout account before onboarding new monetisation tools can save you time and prevent unnecessary delays in your earnings.
Use Meta Business Suite to Manage Payouts Efficiently
Using Meta Business Suite allows you to consolidate all your payout accounts in one place. You can manage multiple Pages, track incomplete accounts, and update payout methods without confusion.
Pro Tip: Accessing Payout Settings through Meta Business Suite ensures you have a single source of truth for all your monetisation earnings and avoids missed payments.
Stay Updated with Official Facebook Resources
Finally, staying informed is key. Facebook regularly updates policies, payment methods, and tax requirements. Bookmark official help pages like:
- Facebook Business Help: Payout Setup
- Facebook Tax Info Submission Guide
- Meta Business Suite Payout Overview
By following these best practices, you ensure that your payout account is always ready, your earnings are protected, and your monetisation journey on Facebook is smooth and efficient.
Proper preparation, regular monitoring, and timely updates are the secret ingredients to unlocking consistent and hassle-free payouts on Facebook.
Conclusion: Unlock Your Facebook Earnings with a Complete Payout Account
Setting up and managing your Facebook payout account is essential for turning your content into real earnings. By following each step carefully—from accurate personal and business details, to bank verification, tax submission, and monitoring notifications—you ensure that your revenue flows smoothly without delays.
Quote: “A fully completed payout account is the key to accessing all your monetisation earnings on time.”
Regularly reviewing your payout settings in the Professional Dashboard or Meta Business Suite helps prevent errors and keeps your account ready for any new monetisation tools.
By staying proactive, keeping your details updated, and following best practices, you can focus on creating content while Facebook handles your payouts reliably and efficiently.
Visit Our Post Page: Blog Page