
Wondering how to cure a zombie villager in Minecraft? Learn the steps, items needed, and mistakes to avoid so you can cure it safely and unlock discounted trades.
Listen, if you’re still paying full price for Mending books or Diamond gear, you’re doing it wrong. In the current 2026 meta, letting a villager stay a zombie is just leaving infinite emeralds on the table. Curing these guys isn’t just a “cool trick”—it’s the backbone of any serious trading hall or survival world.
Since the recent 1.21+ balance changes, the way discounts work has shifted, but the core mechanic is still the most brokenly powerful strategy in the game. If you want to stop the grind and start actually playing the late game, you need to master the cure. I’m going to break down the exact step-by-step process, the math behind the trading nerfs, and how to avoid the “noob mistakes” that get your villagers killed.
Today, we are going to explore every single pixel of the curing process. Whether you are playing on a massive multiplayer server or a lonely hardcore world, this is the definitive guide to turning the undead into your most loyal business partners.
Minecraft Zombie Villager Cure Checklist
Don’t be the player who starts a cure and then realizes they forgot the apple while the sun is coming up. In the high-stakes world of villager trading, preparation is the difference between a 1-emerald trade and a dead Librarian. Get your inventory sorted first.
| Item | Why you need it | Pro Tier |
| Splash Potion of Weakness | The mandatory debuff to “soften” them up. | Essential |
| Golden Apple (Standard) | The actual catalyst for the cure. | Essential |
| Solid Roof / Enclosure | Keeps them from spawning-in and burning instantly. | Essential |
| Iron Bars & A Bed | Actually speeds up the timer in the game code. | Pro Strat |
| Name Tag or Boat | Stops the “despawn” timer so they don’t vanish. | Pro Strat |
| Shield & Armor | Prevents you from being 2-shotted during the capture. | Safety First |
| Brewing Stand | Required for making the Weakness potions from scratch. | Infrastructure |
Before you even step out into the night, you should have a “Curing Kit” chest ready. Curing isn’t just about the transformation; it’s about the logistics of keeping a hostile mob contained while its DNA literally rewrites itself.
Zombie Villager Spawn Mechanics and Locations
Think of a zombie villager as a regular NPC that’s caught a nasty case of “death.” They keep their profession’s look (like the Librarian’s hat or the Butcher’s apron), but they turn into hostile mobs that want to end your hardcore run. Understanding where they come from is the first step to farming them effectively.
Natural Spawning Rates and Structure Locations
In the wild, zombie villagers are a rare sight, but there are fixed locations where you can almost always find them.
- Natural Spawns: Every time a zombie spawns in a dark cave or at night, there is a 5% chance it will be a villager variant. They follow the same spawning rules as regular zombies, meaning light levels of 0 are their playground.
- Igloo Basements: If you find an Igloo in a snowy biome, check under the carpet. There’s a hidden trapdoor leading to a basement. Every single one of these contains a Priest Villager and a Zombie Villager behind iron bars. This is the game’s “tutorial” for curing.
- Abandoned (Zombie) Villages: These are eerie versions of regular villages where the doors are missing and the houses are covered in cobwebs. Every inhabitant here is a zombie villager. It’s a goldmine for starting a trading hall, provided you can clear the area without accidentally killing them all.
Villager Infection Chances Based on Game Difficulty
If you want to force a discount on a specific villager, you have to let a zombie attack them. This is called “Zombification,” and it is the standard pro-player move for late-game economy. But listen: difficulty settings are everything here.
- Easy Mode: 0% chance of conversion. If a zombie kills your villager on Easy, they simply vanish. You just lost your villager. Don’t do this.
- Normal Mode: 50% chance. This is a coin toss. Half the time you get a zombie villager, half the time you get a dead villager. Pro gamers don’t like those odds.
- Hard Mode: 100% guaranteed conversion. This is why every technical Minecraft player plays on Hard. It turns a risk into a controlled mechanic.
Pro Tip: If you aren’t playing on Hard Difficulty when you start zombifying your villagers, you’re playing a dangerous game of “delete my Librarian.” Switch it over in the settings before you let that zombie through the door.
Minecraft Brewing Guide: Potion of Weakness Recipe
You can’t just throw an apple at a zombie and hope for the best. The game logic requires a specific “Softening” phase. You need to apply the Weakness effect first. If you don’t see those swirling gray particles, you’re just wasting expensive gold fruit.
Brewing Stand Steps for Splash Potion of Weakness
You’ll need a Brewing Stand, which means you’ve already visited the Nether and taken down a Blaze. Here is the exact chemical breakdown:
- Fermented Spider Eye: This is the most important ingredient. You don’t “brew” a regular spider eye; you have to ferment it. Combine a Spider Eye, a Brown Mushroom, and Sugar in a crafting table. This eye is the “reversal” agent for many potions.
- Weakness Potion: Place three Water Bottles in the stand. Add the Fermented Spider Eye. You don’t need Nether Wart for this one! Weakness is one of the few potions that starts directly from a water bottle.
- The Splash Factor: Once you have the Potion of Weakness, add Gunpowder. This turns the drinkable bottle into a throwable “Splash” version. This is critical—you cannot “force feed” a potion to a zombie; you have to break the bottle over their head.
Alternative Weakness Sources: Witches and Tipped Arrows
Sometimes you don’t have a brewing stand. Maybe you’re on Day 2 of a new world.
- The Witch Method: If you stand near a zombie villager and a Witch, the Witch will try to throw debuffs at you. If you position yourself correctly, she will throw a Splash Potion of Weakness. If it hits the zombie, you just got a free brew.
- Arrows of Weakness: If you have a Fletcher villager at a high enough level, they might sell Tipped Arrows of Weakness. Shooting a zombie villager with one of these (use a weak bow so you don’t kill them!) applies the effect instantly.
- Lingering Potions: If you’re truly late-game, Lingering Potions of Weakness create a cloud that can cure multiple villagers at once.
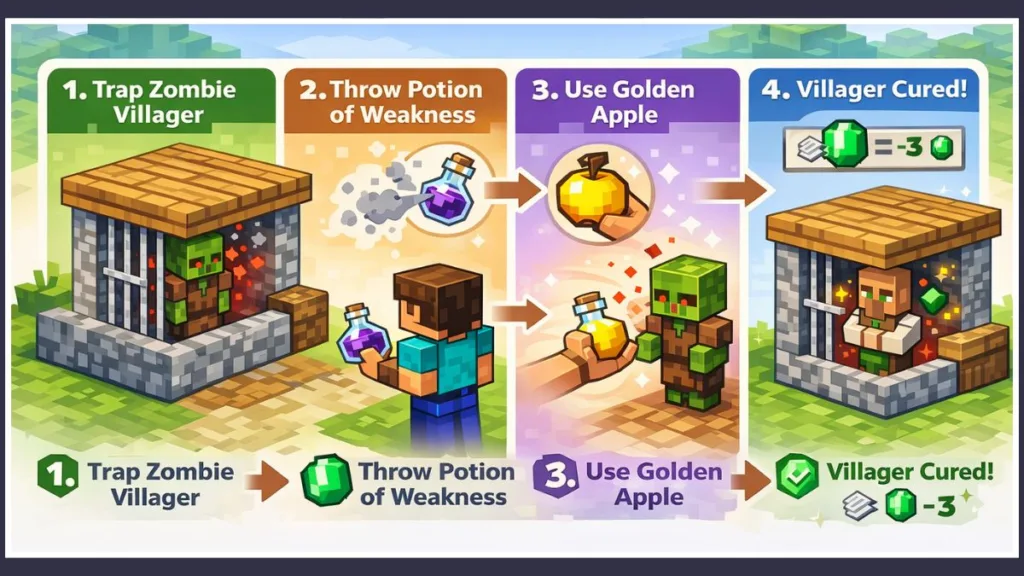
Step-by-Step Zombie Villager Curing Tutorial
Now that we have the gear, let’s get into the actual operation. This is where most players lose their villagers to the sun, to iron golems, or to accidental clicks.
Securing and Trapping the Zombie Villager Safely
Secure your subject immediately. A loose zombie villager is a liability.
- The Boat Trick: Place a boat near the zombie. They will hop in and become completely stationary. This is the easiest way to prevent them from chasing you while you prep.
- The 2×1 Hole: Dig a two-block deep hole and lure them into it.
- The Roof Requirement: This is non-negotiable. If the sun touches a zombie villager, they burn. Build a 3×3 roof of slabs or solid blocks above them. Do not use glass—UV light passes through and will fry your patient.
Applying the Weakness Debuff Correctly
Hit them with the Splash Potion of Weakness.
- Pro Tip: Aim at the feet or a nearby block to ensure the splash radius hits them.
- Visual Cue: Look for the gray, swirling spirals. This means the debuff is active. You usually have about 1 minute and 30 seconds to feed them the apple, so don’t panic, but don’t dawdle either.
Using the Golden Apple to Trigger Transformation
While the particles are active, hold a Standard Golden Apple and right-click (or your platform’s “Use” button) on the zombie villager.
- The Sound of Success: You will hear a loud, distinct shimmering thunderclap sound.
- The Visual Change: The gray particles will immediately turn bright red.
- Note: Do NOT use the Enchanted (Notch/God) Apple. It doesn’t work for curing in modern versions and it’s a massive waste of rare loot.
Shaking Animation and Curing Speed Factors
Once the red particles appear, the zombie will start shaking violently. At this point, the transformation is “locked in.” You just have to wait.
- Standard Time: Usually 3 to 5 minutes.
- The Speed Hack: Did you know you can actually shorten this? The Minecraft source code checks for Iron Bars and Beds within a 9x9x9 area centered on the villager. Every iron bar and bed (up to a limit) slightly increases the chance of the cure ticking forward. This can speed up the process by roughly 4%. In a massive trading hall, those seconds add up.
Bonus: The Automated Zombification Station Layout
Manually zombifying villagers is risky and tedious. Pro players automate the process to ensure 100% safety and efficiency. This blueprint will help you build a station that handles the infection, separation, and curing process with the pull of a lever.
This layout is designed for maximum control. Let’s break down the components of this professional setup:
1. The Infection Chamber (The Heart of the System)
This is a secure 2×1 area divided by a piston door.
- Villager Input: A minecart track brings a fresh villager into the left side.
- The Zombie: A name-tagged zombie is kept permanently in the right side. The name tag prevents it from despawning.
- The Infection Mechanism: When you pull the “Infection Control” lever, the piston door retracts, allowing the zombie to attack the villager. Remember, this must be done on Hard Difficulty for a 100% success rate. Once the villager turns into a zombie villager, you flip the lever again to separate them.
2. The Curing Station (Medical Bay)
Once infected, the zombie villager is moved to the curing section.
- Dispenser: A dispenser in the ceiling is loaded with Splash Potions of Weakness. A button press (not shown, but implied) will dispense the potion directly onto the zombie villager.
- Player Station: This is where you stand. It’s a safe spot to manually feed the Golden Apple to the weakened zombie villager.
- Curing Speed Boosters: Nearby Iron Bars and a Bed are placed within range to slightly speed up the 3-5 minute curing process.
3. Safety and Logistics
- Sunlight Shield Roof: A solid roof of stone slabs covers the entire operation to prevent the undead from burning.
- Safety Perimeter Wall: This wall keeps unwanted guests like Iron Golems or other hostile mobs from interfering with the delicate process.
- Cured Villager Output: Once cured, the minecart track whisks the newly discounted villager away to their permanent trading stall.
This system allows you to process dozens of villagers efficiently, creating a powerful trading hall without the risk of manual handling.
Understanding Villager Trade Discounts and Game Version Differences
This is the “Why” behind the “How.” Why go through all this trouble? Because of the massive price cuts. However, you need to be aware of the 2026 meta changes.
The 1.20.2+ One-Cure Discount Cap
If you’re watching old 2020 tutorials, ignore the part about “curing them five times.” In the old days, you could cycle a villager through zombification 5 times until a 64-emerald book cost only 1 emerald. Mojang nerfed this.
- Current Meta: You now get the maximum discount after the first cure.
- Diminishing Returns: While you can cure them again, the price drop is negligible. The goal is now to get that first, powerful discount and stop there.
Java Edition Specific Trading Mechanics
In Java Edition, the discount is personal. If you cure a villager, you get the cheap prices. If your friend joins the server, they will see the standard, expensive prices. This makes curing a solo rite of passage for every player on a server.
Bedrock Edition Gossip System and Price Spread
Bedrock is a bit more social. It uses a “Gossip” system. When you cure a villager, they broadcast “Major Positive Gossip” to every other villager in the area.
- The Result: Nearby villagers who weren’t even zombies might lower their prices slightly because they “heard” you were a hero.
- Temporary vs. Permanent: The direct discount for the cured villager is permanent, but the “gossip” prices for the neighbors will eventually fade back to normal.
Common Curing Mistakes and Troubleshooting Guide
Curing is a delicate process. Here is the “Wall of Shame”—the mistakes that have cost players thousands of emeralds.
Despawning Issues and Name Tag Solutions
Imagine you go to get more apples and come back to an empty cage.
- The Rule: Most hostile mobs despawn if you move more than 128 blocks away.
- The Solution: Name Tags. If you give a zombie villager a name, they become a permanent part of the world.
- Alternative: If they have picked up an item (like a piece of armor or a sword you dropped), they also won’t despawn.
Hostile Mob Interference (Iron Golems and Wolves)
- Iron Golems: These guys are programmed to protect villagers by killing zombies. They don’t care that you’re trying to perform medical surgery. They will smash your zombie villager into the ground in one hit.
- The Solution: Keep your curing station at least 16 blocks away from any Iron Golem spawning spots.
- Dogs (Wolves): If your pet wolf is on “aggressive” or you accidentally hit the zombie, your dog will finish them off. Keep your pets sitting far away.
Accidental Damage and Healing Interactions
This is the most common way to fail.
- Fire Aspect: If you hit a villager with a Fire Aspect sword to “nudge” them into a hole, the fire damage might kill them during the 3-minute wait.
- Healing Potions: CRITICAL: In Minecraft, “Instant Healing” potions damage undead mobs. “Instant Damage” potions heal them. If you throw a Splash Potion of Healing at a zombie villager to “help” them, you will kill them. Stick to the Golden Apple.
Frequently Asked Questions About Curing
Can I cure a baby zombie villager?
Yes, and they stay tiny after the cure. Baby villagers are actually a nightmare to capture because they are faster, have a smaller hitbox, and don’t burn in sunlight. But if you manage to cure one, they work exactly like a regular villager—they just look hilarious.
Do they keep their trades and levels?
Yes! This is the most important part of the 2026 meta. If you find a Librarian with Mending and you’ve already traded with them to lock it in, they will 100% keep that Mending trade after being cured. This is how you get Mending books for 1 emerald.
Is it worth it for Nitwits?
No. Nitwits (the guys in green coats) are the “unemployed” of the Minecraft world. They cannot take a profession, and they cannot trade. Unless you are playing on a “Save the Villagers” roleplay server, don’t waste your gold apples on Nitwits.
Can a cured villager be turned back into a zombie?
Yes, and in Hard Mode, they will always convert. While you don’t get stacking discounts anymore, you might need to re-zombify them if you want to move them safely (since zombies don’t run away from you like villagers do).
Maximizing Your Minecraft Trading Hall Economy
Mastering the cure is how you move from “surviving” to “thriving.” In the early game, you are a slave to the emerald. You spend hours mining or farming pumpkins just to get a single piece of enchanted gear.
Once you master the Zombie Villager Cure, the power dynamic flips.
- The Emerald Loop: Cure a Fletcher. Sell him one stick for one emerald.
- The Gear Loop: Cure an Armorer. Buy a full set of Diamond Armor for 4 emeralds.
- The Enchants: Cure a Librarian. Buy every high-level book in the game for the price of a single sugar cane.
A single Gold Apple and a Weakness Potion can turn a 64-emerald book into a 1-emerald steal. Once you’ve got your first cured Librarian, you’ve essentially unlocked infinite power. You stop worrying about losing your gear because you can replace it in five minutes.
Visit Our Post Page: Blog Page