
Want to record more than 30 seconds on Xbox? Learn how to easily change clip length in Xbox Game Bar on your PC. Follow simple steps to extend your gameplay recordings, capture key moments, and optimize your settings for smooth, high-quality clips.
Make Your Xbox Game Bar Clips Longer on PC
The Xbox Game Bar is a powerful tool built right into Windows, designed to help gamers capture gameplay, take screenshots, and even stream without installing extra software. By default, it’s set to record only the last 30 seconds of your gameplay, which is great for quick highlights—but what if you want to save longer sessions or epic moments that unfold over several minutes or hours?
In this guide, we’ll walk you through how to extend your clip length, adjust recording settings, and make the most of Game Bar’s features on Windows 11. You’ll learn practical ways to manage recording duration, background captures, and storage, so you can focus on playing while Game Bar takes care of capturing every moment.
Whether you’re a casual gamer, a content creator, or just looking to save memorable gameplay, this tutorial will help you customize your recordings, avoid unexpected cutoffs, and optimize performance for longer clips.
Understanding Xbox Game Bar Max Recording Length PC
Before diving into changing clip lengths, it’s helpful to understand the default behavior and limitations of Xbox Game Bar recordings.
How “Record What Happened” Works by Default
By design, the Game Bar is set to capture the last 30 seconds of gameplay when using the “Record what happened” feature. This is perfect for quick highlights, but it can feel restrictive if you want to save longer sessions or key moments that unfold over several minutes.
Standard Recording Maximum Duration
For standard recordings, the maximum built-in length is 2 hours. This means if you’re trying to capture an extended gameplay session or a full tutorial, recordings will automatically stop once the limit is reached, unless you adjust the settings.
The Game Bar allows you to increase this limit up to 4 hours through the Settings app or Registry tweaks. Understanding these limits upfront ensures that you can plan your recording strategy, avoid cutoffs, and manage storage space effectively.
Understanding Background Recording and Its Limits
It’s also important to note how background recording works. When enabled, it continuously monitors gameplay so that you can capture recent moments on the fly. However, background recording has its own time limit—by default, it records up to 30 minutes.
While it’s a convenient feature for capturing spontaneous highlights, it can use system resources, so longer gameplay sessions or high-quality settings may affect your PC’s performance.
Manual vs. Automatic Capture: Choosing the Right Recording Mode
Finally, knowing the difference between standard recording and background capture will help you decide how to adjust the clip length.
- Standard recording is manual: you start and stop it as needed.
- Background recording is automatic, keeping recent gameplay ready to save at a moment’s notice.
Being aware of these behaviors ensures that you can capture every important moment without surprises.
Why Knowing Game Bar Limits Is Essential
By understanding these limits, you’re setting the foundation to confidently extend recording lengths, choose the right settings, and make the most out of Game Bar for both casual gaming and content creation.
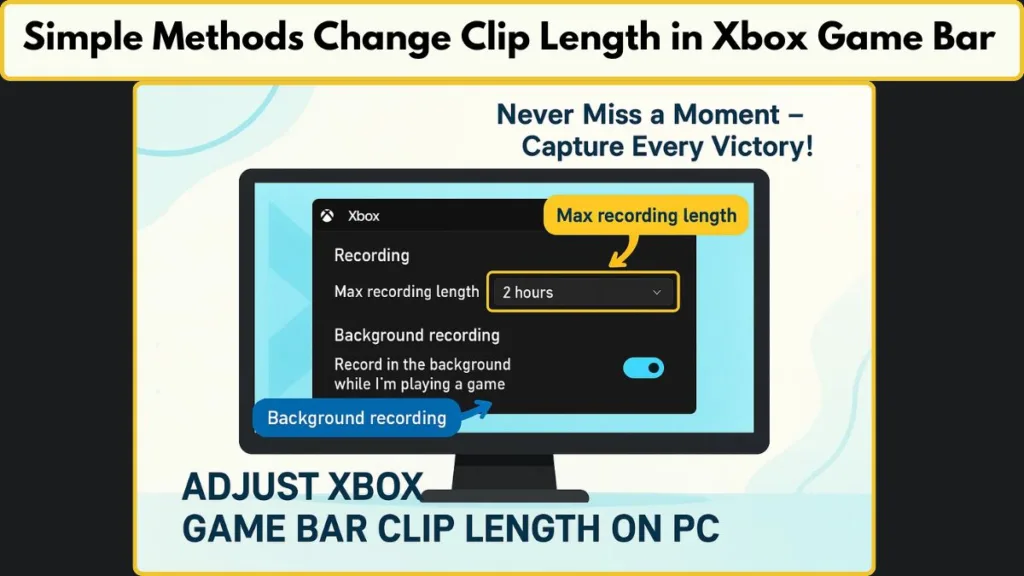
Method 1: Change Clip Length via Settings App
Adjusting the maximum recording length using the Settings app is the most straightforward and user-friendly way to make your Xbox Game Bar clips longer.
This method is ideal for gamers who want to extend recordings without dealing with more technical steps, ensuring all important gameplay moments are captured.
Launching the Settings App for Gaming Adjustments
Start by pressing the Windows logo key + I to open the Settings app directly. Alternatively, you can click the Start Menu and select the Settings icon (gear-shaped).
Once inside, navigate to the Gaming section. This area centralizes all game-related features on your PC, including recording preferences, streaming options, and capture management.
Navigating to Captures Settings
Within the Gaming section, select Captures from the left-hand menu. Here, you can adjust every setting related to recording gameplay, saving screenshots, and managing video clips.
At the top of the Captures screen, you’ll see the folder location where all clips and screenshots are saved. Being aware of this location is helpful if you need to manage storage or move the folder to a different drive to free up space.
Selecting the Maximum Recording Length
Under Recording preferences, find the dropdown menu labeled Max recording length. Click it to see the available options: 30 minutes, 1 hour, 2 hours, or 4 hours.
Choose a duration that fits your gameplay style:
- 30 minutes is suitable for shorter sessions or casual play.
- 1–2 hours works well for extended matches or content creation.
- 4 hours is the maximum built-in limit, ideal for long tutorials or uninterrupted gameplay.
Setting the right length ensures recordings stop automatically, preventing accidental loss of important footage.
Considering System Performance and Storage Impact
Increasing the recording length can affect your PC’s performance, particularly during resource-intensive games. Longer recordings also take up more storage, so it’s important to check your available hard drive space before starting long sessions. Proper planning prevents interruptions and ensures smooth recording experiences.
Optional Step: Enabling Background Recording
To capture unexpected highlights, enable Record what happened. This feature allows Game Bar to continuously monitor gameplay, saving the last few minutes when needed.
Remember that background recording has its own time limit, and using it for extended sessions may slightly impact system resources. It’s a helpful tool for capturing spontaneous moments without manual intervention.
Benefits of Using the Settings App for Clip Length Adjustment
Using the Settings app is safe, visual, and beginner-friendly, making it the preferred method for most users. Key advantages include:
- Extending clip lengths up to 4 hours.
- Adjusting background recording preferences.
- Managing the Captures folder location.
- Avoiding more complicated registry edits.
By following these steps, you can confidently customize your clip lengths, optimize performance, and ensure Xbox Game Bar captures every significant gameplay moment.

Method 2: Change Clip Length via Registry Editor (Advanced)
For users who want full control over their Xbox Game Bar recordings, the Registry Editor provides an advanced method to adjust the maximum clip length beyond what the Settings app allows.
This approach is ideal for tech-savvy gamers or those looking to customize recording durations precisely.
Opening Registry Editor Safely to Edit Game Bar Settings
Start by pressing Windows + R to open the Run dialog, type regedit, and hit Enter. This launches the Registry Editor, a powerful tool that stores system and application configurations.
Important: Editing the registry can impact system behavior. It’s recommended to create a backup before making any changes. This ensures you can restore your system if something goes wrong.
Locating the Game DVR Path in Registry
In the Registry Editor, browse to the following path:
HKEY_CURRENT_USER\Software\Microsoft\Windows\CurrentVersion\GameDVR
Here, you’ll find settings that control how the Game Bar handles recording durations.
Creating or Editing the MaximumRecordLength Key for Custom Duration
Look for the key named QWORD MaximumRecordLength. If it doesn’t exist, you’ll need to create it manually:
- Right-click the right-hand pane → New → QWORD (64-bit) Value.
- Name it
MaximumRecordLength.
Double-click the key to open the Edit QWORD (64-bit) Value dialog. Select Decimal as the base so you can enter a readable number corresponding to the recording duration.
Entering Decimal Values for Desired Clip Length
Enter one of the following Decimal values to set your preferred maximum recording length:
- 30 minutes →
18000000000 - 1 hour →
36000000000 - 2 hours →
72000000000 - 4 hours →
144000000000
These values correspond to the number of 100-nanosecond units, which the system uses internally to define recording limits.
Tip: Choosing 4 hours sets the maximum built-in duration. If you need recordings longer than this, consider using third-party software.
Applying Changes and Restarting the System
After entering the value, click OK and close the Registry Editor. For the changes to take effect, you may need to restart your PC or log out and back in. Once applied, Xbox Game Bar will respect the new maximum recording length you set.
Why Using the Registry Editor Is Beneficial
Editing the registry gives you precise control over clip lengths beyond standard interface options. It’s especially useful when:
- You need a custom duration not available in the Settings dropdown.
- You want to ensure consistent recording behavior across sessions.
- You are troubleshooting situations where Game Bar stops recording early due to default limits.
Precautions and Best Practices for Registry Editing
While this method is powerful, it’s considered advanced:
- Avoid changing unrelated keys in the registry.
- Double-check numeric values to prevent incorrect recording limits.
- Combine this with proper background recording settings and folder management for optimal results.
By following these steps, you can fully customize Xbox Game Bar’s clip length, ensuring longer gameplay sessions are captured without interruptions while maintaining control over system performance.
How Do You Adjust Xbox Game Bar Frame Rate, Quality, and Audio Settings?
Once you’ve set the maximum recording length in Xbox Game Bar, it’s equally important to optimize other capture settings.
These adjustments ensure that your recordings look and sound great, and that your system continues to run smoothly while gaming.
Managing Clip Storage Location
By default, Game Bar saves all clips and screenshots in the Videos\Captures folder. This location is displayed at the top of the Captures settings page, and you can access it quickly by clicking Open folder.
If you prefer to save clips on a different drive or folder, you can move the Captures folder using File Explorer. Windows will automatically continue saving clips to the new location, keeping your recordings organized and helping you manage storage more efficiently.
Configuring Background Recording
Background recording allows Game Bar to capture gameplay automatically, so you can save important moments even if you weren’t actively recording. To enable this feature, turn on Record what happened in the Captures settings.
Keep in mind: Background recording is resource-intensive, and by default, it captures up to 30 minutes. Adjusting the length carefully helps prevent performance issues, especially during high-intensity games.
Customizing Audio Settings
Audio is a crucial part of your recordings. In the Captures settings, you can:
- Enable recording of game audio, microphone input, or both.
- Adjust the audio quality by selecting a suitable bitrate.
- Use sliders to balance system and mic volume, or mute one completely by setting it to 0.
These settings allow you to capture clear commentary and in-game sounds, giving your clips a professional feel without overwhelming system resources.
Optimizing Video Quality and Frame Rate
You can also customize the video quality of your recordings. Higher settings improve clarity and resolution but require more from your PC. Experiment with frame rates and quality settings to find a balance between visual fidelity and performance that works for your system.
Additionally, there’s an option to include the mouse cursor in recordings, which is helpful for tutorials or instructional content.
Synchronizing Game Bar and Windows Settings
Changes made in Game Bar’s settings are mirrored in Windows Settings, and vice versa. This ensures consistency, so you don’t have to worry about conflicting configurations.
Practical Tips for Smooth Captures
- Always monitor system performance when increasing recording duration or quality.
- Consider adjusting background recording duration based on available resources.
- Organize clips in the Captures folder to prevent storage clutter.
- Test different audio and video settings to identify the best combination for your gameplay style.
By taking the time to fine-tune these capture settings, you ensure that your recordings are not only the right length but also look and sound exactly how you want them, while keeping your PC running smoothly during extended gaming sessions.
For detailed guidance directly from Microsoft, check out how to adjust capture settings in Windows.
What Are the Xbox Game Bar Keyboard Shortcuts for Recording?
Using keyboard shortcuts is one of the fastest and most efficient ways to capture gameplay without disrupting your flow. Xbox Game Bar offers several key combinations that allow you to start, stop, and save clips instantly, helping you capture every important moment effortlessly.
Opening the Game Bar Overlay Anytime
To access the Game Bar overlay while playing, press Windows key + G. This interface provides quick access to recording controls, audio settings, performance monitoring, and more—all without exiting your game.
Starting and Stopping Recordings Instantly
When you’re ready to record a gameplay session, press Windows key + Alt + R. This shortcut immediately starts or stops recording, giving you direct control over your session duration. Using this combination ensures you don’t miss any critical moments during gameplay.
Capturing the Last Few Minutes of Gameplay
One of Game Bar’s most useful features is the ability to record recent gameplay on demand. Press Windows key + Alt + G to save the last few moments of play, depending on your configured duration (e.g., 30 seconds, 1 minute, or up to 10 minutes).
This is especially handy for capturing unexpected highlights, key wins, or dramatic moments without having to record continuously. Pairing this with background recording ensures you can preserve spontaneous action effortlessly.
Taking Quick Screenshots
To capture a still image of your gameplay, press Windows key + Alt + Print Screen. The screenshot is immediately saved in your Captures folder, allowing you to document memorable moments, create content for social media, or review gameplay without interrupting your session.
Customizing Shortcuts for Personal Comfort
Not every default shortcut is ideal for every player. Game Bar allows you to customize key combinations to suit your preferences:
- Open the Game Bar overlay (Windows key + G).
- Click the Settings (gear icon).
- Navigate to Shortcuts to assign new keys for recording, saving recent gameplay, or taking screenshots.
Custom shortcuts help maintain a smooth gaming experience by reducing the risk of accidental interruptions and letting you capture content exactly when you want.
Tips for Efficient Use of Shortcuts
- Regularly practice Win + Alt + R and Win + Alt + G to make them second nature.
- Use shortcuts in combination with background recording to maximize coverage of important gameplay moments.
- Combine screenshot and clip shortcuts to quickly create content for reviews, tutorials, or social media highlights.
- Ensure your chosen shortcuts do not conflict with in-game controls to prevent accidental triggers.
By mastering these keyboard shortcuts, you can seamlessly record gameplay, capture spontaneous highlights, and maintain full control over your content creation workflow, all without taking your focus off the game.
Can You Use Alternative Tools to Record Longer Xbox Game Bar Clips?
While the Xbox Game Bar is convenient and built into Windows, it might not suit every gamer’s needs—especially for longer sessions, high-quality streams, or advanced recording features.
Fortunately, there are several alternative recording methods that give you more control, flexibility, and performance options.
Nvidia ShadowPlay for GPU-Accelerated Recording
For gamers using Nvidia graphics cards, ShadowPlay is an excellent alternative. It allows you to capture gameplay with minimal impact on performance thanks to GPU-accelerated recording.
Key benefits include:
- Instant replay mode to save recent gameplay highlights.
- Ability to record at high resolution and frame rates without significant FPS drops.
- Integrated streaming options to platforms like Twitch or YouTube.
ShadowPlay is ideal if you want a smooth, high-quality recording experience without relying on CPU-intensive processes, making it perfect for competitive or resource-heavy games.
OBS Studio for Professional-Level Recording and Streaming
OBS Studio is a free, open-source tool widely used by streamers and content creators. It offers extensive customization options that Game Bar does not:
- Choose specific windows or full screens to capture.
- Adjust bitrate, resolution, and frame rate for optimal recording quality.
- Add overlays, webcam feeds, and audio sources for professional-level streams.
While OBS can be more complex to set up, its flexibility and control make it an excellent choice for users who want to record longer sessions or produce polished content for YouTube, tutorials, or game reviews.
Other Third-Party Software Options for Custom Recording Needs
There are numerous other programs available, each with unique features:
- Bandicam: Lightweight and easy to use, great for high-quality recordings.
- Action!: Provides smooth gameplay capture and live streaming with minimal lag.
- Fraps: Classic tool for recording high-frame-rate gameplay, particularly for benchmarking or older games.
These tools often include advanced settings for audio, video, and encoding, giving you the ability to fine-tune recordings for your specific setup and storage capabilities.
When to Consider Alternative Recording Tools
You might want to explore alternative recording methods if:
- You need recording durations longer than 4 hours.
- You want higher resolution or frame rate than Game Bar supports.
- You require built-in streaming features alongside recording.
- You’re encountering performance issues with Game Bar during high-intensity gaming.
Tips for Choosing the Best Recording Solution
- Assess your PC’s hardware capabilities and choose software that won’t overburden your system.
- Consider storage requirements, especially for long or high-quality recordings.
- Test a few tools to find the one that balances ease of use, performance, and recording quality for your needs.
Using these alternative methods ensures you can capture every detail of your gameplay without being limited by Game Bar’s built-in restrictions, while also giving you more creative freedom for content creation and streaming.
Conclusion: Make Longer and Better Xbox Game Bar Clips
Adjusting your Xbox Game Bar settings gives you full control over gameplay recording, from clip length to audio and video quality. Whether you choose the Settings app for simplicity or the Registry Editor for advanced customization, understanding these options ensures you capture every key moment without interruptions.
Pairing this with background recording, optimized capture settings, and handy keyboard shortcuts makes recording effortless and efficient. For extended sessions or professional-quality content, exploring alternative recording tools can provide even more flexibility.
By combining these strategies, you can confidently create high-quality, perfectly timed gameplay clips, maintain smooth system performance, and enjoy a seamless recording experience every time.
Visit Our Post Page: Blog Page