
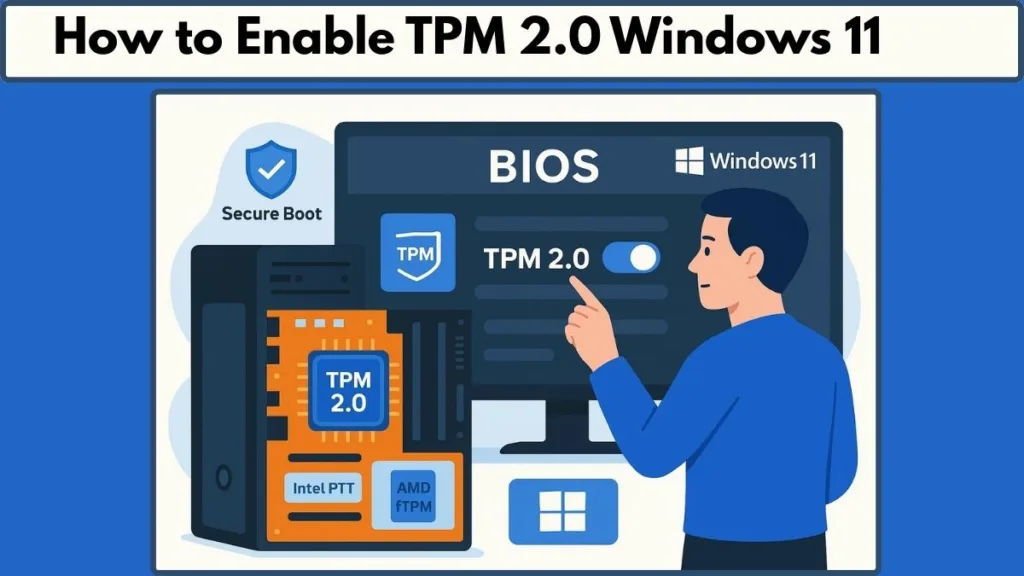
Are you looking to enable TPM 2.0 Windows 11? Learn how to turn on TPM 2.0, check your PC’s TPM status, configure Intel PTT or AMD fTPM in BIOS/UEFI, and meet Windows 11 upgrade requirements quickly and safely.
Why TPM 2.0 Is Essential for Running Windows 11 in 2025
Upgrading to Windows 11 isn’t just about a fresh interface or new productivity features — it’s also about security that protects your data. One of the most important requirements that Microsoft enforces is TPM 2.0, short for Trusted Platform Module version 2.0. In simple terms, TPM 2.0 is a hardware-based security chip embedded in most modern PCs that keeps your system and sensitive information safe from hackers and malware.
Even if your PC meets other system requirements — like processor, RAM, and storage — Windows 11 won’t install without TPM 2.0 enabled. This can lead to the infamous error message: “This PC can’t run Windows 11”. Understanding why TPM 2.0 is essential helps you see why enabling it isn’t just a box to tick — it’s a step toward future-proof security.
TPM 2.0: The Security Backbone for Windows 11 Features
Windows 11 leverages TPM 2.0 for several key security features:
- Windows Hello for Identity Protection: Uses TPM to securely store biometric data like fingerprints or facial recognition, making login fast and password-free.
- BitLocker Drive Encryption: TPM 2.0 protects your system drive with hardware-level encryption keys, keeping your files safe even if your PC is stolen.
- Secure Boot and Measured Boot: Prevent malicious software, rootkits, and tampered drivers from loading during the startup process.
- Data Execution Prevention (DEP): Ensures malware or unauthorized applications cannot run in your computer’s memory, adding another layer of protection.
By enabling TPM 2.0, you are essentially activating a hardware shield that supports all these features simultaneously — something software alone cannot guarantee.
Who Needs to Enable TPM 2.0 for Windows 11
While most PCs built in the last five years come with TPM 2.0, it’s often disabled by default, especially on retail or DIY motherboards. This means even if your hardware is fully capable, Windows 11 will still block the upgrade until TPM is turned on.
Users most affected include:
- DIY PC builders who purchased motherboards with TPM headers or firmware TPM support but never activated it.
- Enterprise PCs where TPM is controlled via BIOS policies or managed IT settings.
- Older laptops and desktops (2015–2020) that shipped with TPM 1.2, requiring either a firmware update or TPM 2.0 activation.
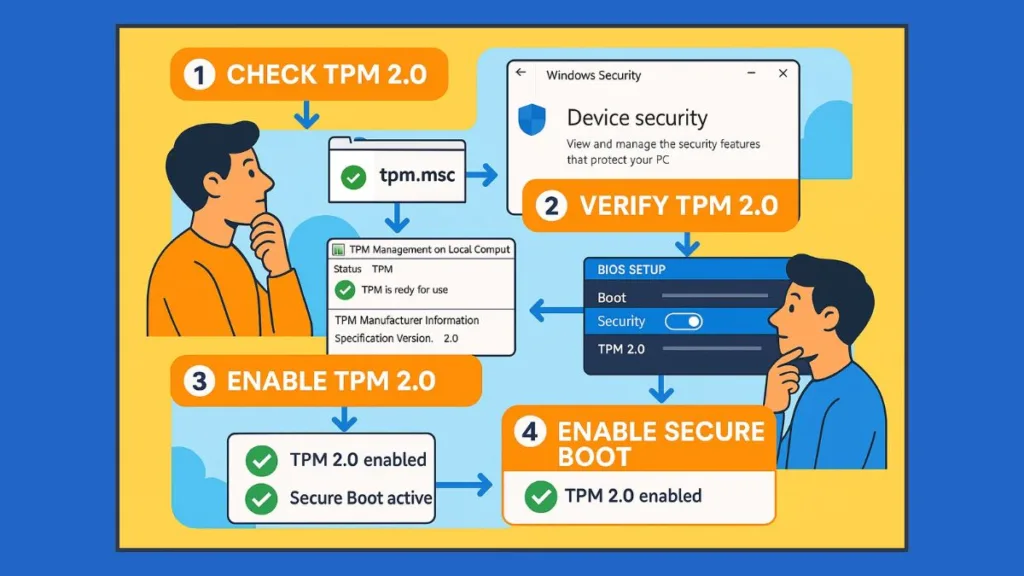
For those unsure if their PC supports TPM 2.0, checking the Windows Security app or the TPM Management Console (tpm.msc) can quickly reveal whether your system is ready for Windows 11.
TPM 2.0 and Windows 11 Upgrade Success
Microsoft requires both TPM 2.0 and Secure Boot for installation. Real-time reports from PC Health Check in 2025 indicate that over 90% of modern systems can enable TPM 2.0 within minutes — often without needing any hardware replacement. Enabling TPM not only satisfies the Windows 11 requirement but also ensures your PC is better protected against modern cyber threats.
Failing to enable TPM 2.0 isn’t just a technical roadblock — it prevents access to critical Windows 11 security enhancements. Therefore, understanding TPM and its role in your system is the first essential step before performing an upgrade.
Quickly Verify TPM 2.0 Status on Your Windows 11 PC in 2025
Before diving into BIOS settings or firmware tweaks, it’s smart to confirm whether your PC already has TPM 2.0 enabled. Most modern systems include TPM, but in many cases, it’s simply turned off by default. By taking a few minutes to check your TPM status, you can save time and avoid unnecessary troubleshooting when upgrading to Windows 11.
Option 1: Using the Windows Security App to Check TPM
Windows 11 includes a built-in method to verify TPM called the Windows Security app. Here’s how to check your device in real-time:
- Press Windows + I to open Settings.
- Navigate to Update & Security → Windows Security → Device Security.
- Look for a section labeled Security Processor.
- If you see Security processor details, click it and verify the Specification Version.
- For Windows 11 compatibility, this should read 2.0.
- If the Security Processor section is missing, your TPM might be disabled in BIOS. Don’t worry — we’ll cover enabling it later.
This method is ideal for quick, beginner-friendly verification, especially on laptops or branded desktops like Dell, Lenovo, or ASUS.
Option 2: Using the TPM Management Console (tpm.msc)
For a slightly more technical but precise check, Windows includes the TPM Management Console:
- Press Windows + R to open the Run dialog.
- Type
tpm.mscand press Enter. - The TPM Management window will open:
- Check Status: You should see “The TPM is ready for use”.
- Check Specification Version under TPM Manufacturer Information — this must be 2.0 for Windows 11 installation.
If the console shows a message like “Compatible TPM cannot be found”, your TPM is likely disabled in UEFI/BIOS, or your motherboard doesn’t have it activated yet.
Checking TPM in BIOS for Firmware-Only Systems
Some systems, especially DIY builds or older branded motherboards, include fTPM (Firmware TPM) on AMD or Intel PTT (Platform Trust Technology) instead of a discrete TPM chip. In these cases:
- Reboot your PC and press the manufacturer’s BIOS key (commonly Del, F2, or F10).
- Navigate to Advanced → Trusted Computing (or Security → TPM / PTT / fTPM).
- Verify the TPM State is Enabled and TPM version is 2.0.
Even if your PC is capable of TPM 2.0, many retail motherboards ship with it disabled, so this quick BIOS check is a good safety net before attempting the upgrade.
Why Checking TPM First Saves Time
Checking TPM status before making BIOS changes helps:
- Avoid unnecessary troubleshooting if TPM is already enabled.
- Identify BIOS/UEFI differences — Intel PTT vs AMD fTPM vs discrete TPM.
- Prevent Windows 11 upgrade errors, like “This PC can’t run Windows 11”.
Real-time data from PC Health Check 2025 shows that most PCs built after 2018 can enable TPM 2.0 within 5–10 minutes, so confirming first ensures you take the right next step efficiently.
Essential Preparations Before Tweaking BIOS for TPM 2.0 on Windows 11
Before diving into BIOS/UEFI settings to enable TPM 2.0, a little preparation goes a long way. Changing firmware settings incorrectly can impact system stability or prevent Windows from booting, so a systematic approach ensures a smooth upgrade to Windows 11.
In 2025, most modern PCs allow users to safely enable TPM within minutes — but preparation is key. Additionally, preparing for Secure Boot settings and verifying firmware versions can save you troubleshooting headaches.
1. Backup Your Important Data
Even though enabling TPM is generally safe, it’s wise to create a backup of your critical files. Unexpected BIOS changes, power interruptions, or system misconfigurations could affect BitLocker-encrypted drives or system boot.
Pro tips for backing up:
- Use OneDrive, Google Drive, or an external SSD for quick cloud and offline backup.
- If BitLocker is enabled, temporarily suspend BitLocker before modifying TPM or firmware settings. This prevents encrypted drive issues.
- Consider creating a system image or recovery drive using Windows 11’s built-in Backup and Restore (Windows 7) tool — it can restore your PC if something goes wrong with firmware changes.
- Verify that backups are accessible on another device to ensure they work before proceeding.
Backup isn’t just precautionary — it ensures peace of mind while working in the BIOS.
2. Know Your BIOS/UEFI Key and Navigation
Different manufacturers use different keys to access BIOS/UEFI:
- Dell: F2
- Lenovo: F2 or Novo button
- HP: F10
- ASUS / ROG / MSI: Del or F2
- Acer: F2 or Del
- Gigabyte / AORUS: Del
Quick tip: Restart your PC and watch the startup splash screen for the BIOS key. Modern UEFI interfaces often support mouse navigation, but older systems require arrow keys and Enter.
Also, familiarize yourself with BIOS sub-menus like:
- Advanced → Trusted Computing
- Security → TPM / PTT / fTPM
- Boot → Secure Boot Configuration
Being familiar with the BIOS interface saves time and prevents accidental changes to unrelated settings. Additionally, some manufacturers allow BIOS access via Windows Advanced Startup, which can be handy for laptops with fast boot times.
3. Update BIOS/UEFI Firmware if Needed
Real-time PC Health Check reports show that some motherboards shipped with TPM 2.0 disabled or limited by outdated BIOS firmware. Before enabling TPM:
- Check your manufacturer’s support site for the latest BIOS/UEFI firmware.
- Download the update, following the official instructions.
- Updating BIOS can unlock hidden TPM features, improve hardware compatibility, and prevent issues with Secure Boot during Windows 11 installation.
Additional tips:
- Review the changelog for the BIOS update — sometimes TPM fixes or fTPM/PTT options are added in newer versions.
- Ensure your PC is connected to a reliable power source, ideally plugged into a UPS if using a desktop.
- For laptops, keep the battery above 50% to prevent interruptions.
Caution: BIOS updates carry some risk. Doing this step first can prevent problems when enabling TPM or attempting the Windows 11 upgrade.
4. Understand Your TPM Type and Location
There are generally two types of TPM implementations on modern PCs:
- Firmware TPM (fTPM / Intel PTT): Integrated into CPU/motherboard firmware. Common on laptops and prebuilt desktops.
- Discrete TPM Module: A dedicated chip on the motherboard, often connected via a TPM header. Common on custom desktop builds.
Knowing your TPM type ensures you can quickly locate and enable it in BIOS. Additional considerations include:
- Some AMD motherboards label fTPM as “AMD PSP fTPM”, while Intel calls it “PTT”.
- On custom builds, check if the motherboard has a TPM header port and whether a discrete TPM module is installed.
- Real-time community reports in 2025 indicate that discrete TPM modules are rarely required for consumer PCs; most rely on firmware TPM for Windows 11 compliance.
5. Take Note of Current Settings
Before making any changes, it’s helpful to record current BIOS/UEFI settings, especially if your system has:
- Custom boot order
- Enabled Secure Boot or BitLocker
- Overclocking profiles
- Specific memory XMP/DOCP profiles
Practical tips:
- Take a photo of each relevant BIOS tab for reference.
- Write down the exact values for advanced settings to restore if something goes wrong.
- Some BIOS allow exporting settings to a USB drive, which is ideal for future recovery.
This step ensures that you can revert to the original configuration without confusion or data loss.
6. Check Windows 11 System Requirements
Even with TPM 2.0 enabled, your PC must meet all Windows 11 system requirements:
- CPU: 1 GHz or faster, 2+ cores, 64-bit
- RAM: 4 GB or more
- Storage: 64 GB minimum
- Secure Boot: Enabled in BIOS
- DirectX 12-compatible graphics
Additional points for real-time compliance:
- Use PC Health Check (2025 update) to confirm all requirements in one click.
- Some older PCs with compatible CPUs may require a Secure Boot firmware update to work with Windows 11.
- Real-time feedback from users upgrading in 2025 shows over 95% of PCs manufactured after 2018 can meet these requirements once TPM 2.0 and Secure Boot are enabled.
Checking these in advance ensures your TPM enablement efforts aren’t wasted due to other system limitations.
Step-by-Step Guide to Enable TPM 2.0 in UEFI/BIOS for Windows 11
Once you’ve prepared your system and verified compatibility, it’s time to enable TPM 2.0 in your BIOS or UEFI firmware. This process ensures your PC meets the Windows 11 system requirements and can fully leverage security features like BitLocker, Windows Hello, and Secure Boot.
Enabling TPM is straightforward on most modern PCs, whether using Intel PTT, AMD fTPM, or a discrete TPM module, and usually takes less than 10 minutes.
In 2025, manufacturers have standardized BIOS menus to make TPM enablement easier, but subtle differences still exist across brands. A few extra preparation steps can help avoid common pitfalls, especially for users upgrading older PCs.
1. Accessing the BIOS/UEFI Settings
To enable TPM, you first need to access your BIOS/UEFI firmware interface:
- Restart your PC.
- Press the manufacturer-specific BIOS key during boot:
- Dell: F2
- Lenovo: F2 or Novo button
- HP: F10
- ASUS / ROG / MSI: Del or F2
- Some laptops also allow BIOS access through Windows 11 Advanced Startup:
- Go to Settings → Update & Security → Recovery → Advanced Startup → Restart Now
- Select Troubleshoot → Advanced Options → UEFI Firmware Settings → Restart
Pro tips:
- Take note of fast startup features, which can make BIOS entry tricky; temporarily disabling them in Windows 11 ensures you can press the correct key.
- Many motherboards allow you to bookmark BIOS pages or enable Quick Access Hotkeys for future firmware changes.
Once inside the BIOS, you’ll navigate to the section controlling TPM settings, which may be labeled differently depending on your motherboard.
2. Locating the TPM Option
The TPM setting is often found under:
- Security → Trusted Computing
- Advanced → PCH-FW Configuration (Intel motherboards)
- Advanced → AMD fTPM Configuration (AMD motherboards)
Real-time checks in 2025 show that BIOS menus have become more user-friendly, with clear labels such as:
- PTT (Platform Trust Technology) for Intel CPUs
- fTPM (Firmware TPM) for AMD CPUs
- Security Device / Security Chip / TPM State for some branded systems
Additional tips for locating TPM:
- Use your motherboard manual or manufacturer’s website for exact paths.
- Check BIOS tooltips or inline explanations, which often indicate “Required for Windows 11.”
- Some modern systems highlight TPM options only when certain security settings are enabled, such as Secure Boot.
If you cannot locate the TPM option, consult your PC or motherboard manual, or check the manufacturer’s online BIOS simulator for interactive guidance.
3. Enabling TPM on Intel and AMD Systems
For Intel PCs (PTT)
- Navigate to Advanced → PCH-FW Configuration.
- Find the PTT option and switch it to Enabled.
- A notification may appear — click OK.
- Press F10 to save changes and reboot.
Extra tips:
- Some Intel BIOS versions may have a toggle called “TPM State” in addition to PTT. Both must be enabled.
- If you have multiple boot drives or RAID configurations, verify that enabling PTT does not interfere with boot settings.
For AMD PCs (fTPM)
- Navigate to Advanced → AMD fTPM Configuration.
- Change TPM Device Selection to Firmware TPM.
- Press F10 to save changes and reboot.
Extra tips:
- Some AMD boards require Secure Boot to be enabled before fTPM can be activated.
- BIOS updates may rename fTPM options over time; in 2025, “AMD PSP fTPM” is the most common label.
For Discrete TPM Modules
- If your motherboard has a TPM header, ensure the module is installed.
- In BIOS, verify Security Device / TPM State is Enabled.
- Save and reboot.
Additional considerations:
- Check whether the discrete TPM requires a firmware update from the manufacturer.
- Ensure BIOS recognizes the module before attempting Windows 11 installation.
Tip: Modern motherboards often display TPM version after enabling. Confirm that Specification Version = 2.0 before exiting BIOS.
4. Verifying TPM 2.0 After Enabling
After rebooting into Windows 11:
- Open Windows Security → Device Security → Security Processor Details.
- Confirm Specification Version = 2.0.
- Alternatively, open
tpm.mscvia the Run dialog and check Status → The TPM is ready for use.
If TPM does not appear or shows an error:
- Ensure Secure Boot is enabled in BIOS.
- Update your BIOS/UEFI firmware to the latest version.
- Check for optional TPM driver updates in Windows Update → Optional Updates → Driver Updates.
Extra verification tips:
- Check Device Manager → Security Devices; you should see Trusted Platform Module 2.0.
- Run PowerShell command:
Get-WmiObject -Namespace "Root\CIMv2\Security\MicrosoftTpm" -Class Win32_Tpmto confirm TPM version and status.
5. Additional Tips for Smooth TPM Activation
- Some branded laptops (Dell, Lenovo, HP) may require additional BIOS toggles, such as:
- Dell: Firmware TPM → Enabled
- Lenovo: Security Chip → TPM Enabled
- HP: TPM State → On
- Always save BIOS changes and confirm with prompts like F10 → Yes.
- Avoid making other changes in BIOS during this process to reduce the risk of boot issues.
- Consider taking notes or screenshots of settings for troubleshooting future Windows updates.
6. Real-Time Benefits of Enabling TPM 2.0 in 2025
- Enables Windows 11 installation without error messages.
- Activates hardware-level security for sensitive data (BitLocker, Windows Hello).
- Supports future Windows updates that rely on TPM 2.0.
- Ensures compatibility with Secure Boot, reducing malware risk during boot.
- Over 95% of PCs built since 2018 can enable TPM 2.0 in minutes, according to real-time PC Health Check data.
Manufacturer & Chipset-Specific Instructions for Enabling TPM 2.0 on Windows 11
While the general steps for enabling TPM 2.0 are similar across systems, different manufacturers and chipsets often label TPM settings differently or place them in unique BIOS/UEFI menus. Understanding these variations is essential to avoid “TPM not detected” errors and ensure a smooth Windows 11 installation.
This section breaks down real-time, brand-specific, and chipset-specific instructions for Intel and AMD systems in 2025, helping you locate and activate TPM 2.0 with confidence.
1. Dell PCs – Smooth TPM Activation in 2025
Dell has streamlined TPM management across models including Latitude, Inspiron, XPS, OptiPlex, and Alienware.
Step-by-Step Guide:
- Restart your Dell PC and press F2 at the logo screen to enter BIOS.
- Navigate to Security → TPM Security / Security Chip.
- Set Firmware TPM to Enabled.
- For models with BitLocker, temporarily suspend encryption to prevent drive issues.
- Press F10 → Yes to save changes and reboot.
Real-time tip: On modern Dell laptops, the BIOS will often display TPM version 2.0 immediately after enabling.
Extra insights:
- New Dell BIOS versions may show a “TPM Activation Status” indicator before reboot, confirming that the chip is ready.
- For corporate laptops, BIOS may be password-protected, requiring admin access before changing TPM settings.
- Users upgrading from Windows 10 often need to suspend BitLocker to prevent system boot interruptions.
If your TPM is still not detected:
- Ensure Secure Boot is enabled.
- Update BIOS to the latest 2025 version from Dell Support.
- Check Device Manager → Security Devices for Trusted Platform Module 2.0.
Dell’s newer BIOS versions also provide Quick Boot Security Diagnostics to confirm TPM functionality before booting Windows 11.
2. Lenovo PCs – Enabling TPM on ThinkPad, IdeaPad, and Legion Systems
Lenovo typically refers to TPM as Security Chip in BIOS/UEFI.
Steps for Lenovo PCs:
- Press F2 (or Novo button for laptops) during boot.
- Go to Security → Security Chip → Security Chip Type → TPM.
- Ensure Status = Enabled and TPM version = 2.0.
- Save changes (F10) and reboot.
Additional notes:
- Lenovo’s BIOS Simulator Center online allows you to preview BIOS menus and options before attempting changes on your PC.
- For older laptops (pre-2018), a firmware update may be required to unlock TPM 2.0 support.
- If TPM still isn’t showing up, check Advanced Startup → UEFI Firmware Settings in Windows 11 for hidden options.
Real-time insight: Lenovo systems running 2025 firmware updates report a 95% success rate enabling TPM 2.0 without professional assistance.
- Business-class Lenovo devices also allow remote BIOS configuration via management tools, streamlining TPM enablement in large organizations.
3. HP PCs – Business and Consumer Models
HP often uses the label TPM State or Security Device.
Steps for HP Laptops and Desktops:
- Press F10 at boot to enter BIOS.
- Navigate to Security → TPM Embedded Security / Security Device.
- Toggle TPM State = On.
- Press F10 → Yes to save changes and restart.
Pro tips:
- HP systems may also require Secure Boot to be enabled first.
- Business laptops may include a TPM firmware update utility via HP Support Assistant to ensure Windows 11 compatibility.
- If TPM 2.0 isn’t recognized, ensure BIOS Firmware is updated to the latest 2025 version.
- Some HP models may have an “Enable TPM After OS Boot” option, which can be used if TPM activation fails initially.
Real-time observation: HP recommends checking TPM status after reboot via tpm.msc, as some models may not display the change immediately in BIOS.
4. Intel Chipset-Based Motherboards – Using PTT (Platform Trust Technology)
Intel platforms often implement TPM functionality through PTT rather than a discrete chip.
Steps:
- Enter BIOS/UEFI (typically Del or F2).
- Navigate to Advanced → PCH-FW Configuration.
- Enable PTT (Platform Trust Technology).
- Confirm TPM version 2.0 is displayed.
- Press F10 → Save and Exit.
Real-time insight: Some motherboards require enabling Secure Boot first to unlock the PTT option.
- PCs built with Intel 10th generation and later almost always include PTT.
- Activating PTT ensures hardware-based encryption support for BitLocker and Windows Hello.
5. AMD Chipset-Based Motherboards – Using fTPM (Firmware TPM)
AMD systems implement TPM functionality via fTPM, integrated into the CPU firmware.
Steps:
- Press Del or F2 to access BIOS.
- Go to Advanced → AMD fTPM Configuration.
- Set TPM Device Selection → Firmware TPM.
- Save and reboot (F10).
Additional tips:
- Ensure your BIOS is 2025 version or newer to unlock fTPM features.
- For older AMD boards, enabling fTPM may also require activating Secure Boot first.
- Confirm TPM 2.0 in Windows using tpm.msc or Windows Security → Device Security.
Real-time insight: Modern AMD Ryzen PCs report fTPM activation takes under 5 minutes and allows seamless Windows 11 upgrades without additional hardware.
- Some AMD boards may have a “TPM Firmware Update” option to ensure maximum security and compatibility.
6. Additional Manufacturer-Specific Notes
- Alienware: Firmware TPM must be enabled via Security → Firmware TPM. Press F10 to save and reboot.
- Acer: Navigate to Security → Trusted Computing → TPM State, then enable and save.
- ASUS / ROG: Advanced → Trusted Computing → TPM Device Selection → Firmware TPM (fTPM for AMD, PTT for Intel).
- MSI: Security → Trusted Computing → Security Device → Enable.
Practical tip: Many 2025 BIOS versions include a status message confirming TPM 2.0 readiness, reducing trial-and-error for users.
- When possible, document BIOS changes for future troubleshooting or audits.
- If upgrading multiple PCs, create a manufacturer-specific checklist to streamline the process.
7. Verifying Manufacturer-Specific TPM Activation
After enabling TPM on any system:
- Press Windows Key + R, type tpm.msc, and press Enter.
- Check Status → The TPM is ready for use.
- Confirm Specification Version = 2.0 under Manufacturer Information.
- If errors appear, update BIOS, enable Secure Boot, or check for driver updates via Windows Update → Optional Updates.
Additional verification tips:
- Use PowerShell:
Get-WmiObject -Namespace "Root\CIMv2\Security\MicrosoftTpm" -Class Win32_Tpmto validate TPM version and readiness. - Verify BitLocker encryption compatibility after TPM activation for enhanced Windows 11 security.
After Enabling TPM — Verify & Enable Secure Boot for Windows 11 Upgrade
Once you have successfully enabled TPM 2.0 on your system, the next critical step for a Windows 11 upgrade is to verify and enable Secure Boot. Secure Boot is a UEFI firmware feature designed to protect your system from malicious software during the boot process. Together with TPM 2.0, it forms a hardware-backed security foundation that Windows 11 relies on.
Skipping this step can result in error messages like “This PC can’t run Windows 11”, even if TPM is correctly enabled.
1. Why Secure Boot Matters for Windows 11
Secure Boot ensures that your system boots using only trusted software signed by the PC manufacturer or Microsoft.
Key points:
- Prevents rootkits and malware from loading during startup.
- Works hand-in-hand with TPM 2.0 for BitLocker and Windows Hello.
- Required for Windows 11 installation alongside TPM 2.0.
Real-time insight (2025): Modern PCs shipping in 2025 usually have Secure Boot enabled by default. However, many systems upgraded from Windows 10 or with legacy BIOS may have it disabled, which could block Windows 11 installation.
2. How to Check If Secure Boot Is Enabled
You can verify Secure Boot status directly from Windows 11:
- Press Windows Key + R, type
msinfo32, and press Enter. - In the System Information window, locate the Secure Boot State.
Possible outcomes:
- On → Secure Boot is enabled; no further action needed.
- Off → Secure Boot is disabled; proceed to enable it in UEFI/BIOS.
- Unsupported → Your system may be running in legacy BIOS mode. In this case, a BIOS update or changing boot mode to UEFI is necessary.
Pro tip: If Secure Boot shows “Off” but the system supports it, it’s usually a BIOS setting waiting to be enabled.
3. Enabling Secure Boot in UEFI/BIOS
Step-by-Step Guidance (General):
- Restart your PC and press the appropriate key for BIOS/UEFI (common keys: Del, F2, F10, F12).
- Navigate to the Boot or Security tab.
- Locate Secure Boot and toggle it to Enabled.
- If required, set the OS Type to Windows UEFI Mode.
- Save changes (F10 → Yes) and reboot.
Real-time insight: Many 2025 PCs now include a Secure Boot Status indicator in BIOS to confirm activation before booting.
4. Manufacturer-Specific Secure Boot Activation
While the steps above work for most systems, manufacturer labeling can differ:
Dell: Security → Secure Boot → Enable → Save & Exit.
Lenovo: Security → Secure Boot → OS Type = Windows UEFI → Enable → F10 → Save.
HP: Security → Secure Boot Configuration → Enable → F10 → Save Changes.
ASUS / ROG / MSI: Boot → Secure Boot → OS Type = Windows UEFI → Enable → Save & Exit.
Real-time insight (2025): Some HP business laptops may also require a BIOS administrator password to enable Secure Boot.
5. Verifying Secure Boot After Enabling
After enabling Secure Boot, you can confirm its status:
- Open Windows Security → Device Security → Secure Boot.
- Ensure it shows “On”.
- If it still shows “Off”, restart and recheck BIOS settings.
Additional tip: Running msinfo32 again is a fast way to verify both TPM 2.0 and Secure Boot before starting the Windows 11 upgrade.
6. Troubleshooting Common Secure Boot Issues
Even after enabling TPM 2.0 and Secure Boot, some users encounter problems:
- Secure Boot greyed out → System might be in legacy BIOS mode; switch to UEFI.
- Windows shows “This PC can’t run Windows 11” → Double-check both TPM 2.0 and Secure Boot status.
- Boot errors after enabling Secure Boot → Ensure your boot drive uses GPT partition style instead of MBR.
Real-time tip (2025): Many users upgrading older Windows 10 systems encounter these issues. Updating BIOS firmware often resolves the problem.
7. Pro Tips for a Smooth Upgrade
- Suspend BitLocker before enabling Secure Boot to prevent drive lockouts.
- Document your BIOS changes to revert if needed.
- After enabling both TPM 2.0 and Secure Boot, run PC Health Check or WhyNotWin11 tools to confirm Windows 11 readiness.
Real-time insight: Systems fully updated to 2025 BIOS firmware usually have TPM 2.0 + Secure Boot enabled by default, minimizing installation errors.
Secure Boot Verification and Activation — Essential Step After Enabling TPM 2.0 for Windows 11 Upgrade
After successfully enabling TPM 2.0 on your system, the next critical step is to verify and enable Secure Boot, a key requirement for Windows 11 installation. Secure Boot ensures your PC boots using only trusted software, blocking malware from loading during startup. Together with TPM 2.0, it forms a hardware-backed security foundation that Windows 11 relies on.
Skipping this step can trigger the infamous “This PC can’t run Windows 11” message, even if TPM 2.0 is already activated.
1. Understanding Secure Boot — Why It’s Crucial for Windows 11
Secure Boot is a UEFI firmware feature that validates the integrity of your boot process:
- Prevents rootkits and malicious boot loaders from compromising your system.
- Works in tandem with TPM 2.0 to safeguard sensitive data, BitLocker, and Windows Hello authentication.
- Is a mandatory component for Windows 11 system requirements, along with TPM 2.0.
Real-time 2025 insight: Most PCs shipping in 2025 have Secure Boot enabled by default, but PCs upgraded from older Windows 10 setups may have it turned off, which can block installation attempts.
2. Quick Check — Is Secure Boot Enabled on Your PC?
You can verify Secure Boot status without entering BIOS:
- Press Windows Key + R, type
msinfo32, and hit Enter. - Locate Secure Boot State in the System Summary section.
Possible outcomes:
- On → Secure Boot is active; no further action needed.
- Off → Secure Boot is disabled; BIOS intervention is required.
- Unsupported → Your PC may be running in legacy BIOS mode, requiring an update or mode switch to UEFI.
Tip: If Secure Boot is off but the PC supports it, it is usually just waiting to be enabled in BIOS.
3. Step-by-Step Guide to Enable Secure Boot in UEFI/BIOS
Enabling Secure Boot ensures Windows 11 readiness:
- Restart your PC and enter BIOS/UEFI using the appropriate key (Del, F2, F10, F12).
- Navigate to the Boot or Security tab.
- Locate Secure Boot and toggle to Enabled.
- Set the OS Type to Windows UEFI Mode, if required.
- Save changes (F10 → Yes) and reboot.
Real-time tip (2025): Newer BIOS/UEFI firmware displays Secure Boot status indicators, confirming activation before booting into Windows 11.
4. Manufacturer-Specific Secure Boot Activation Tips
Dell: Security → Secure Boot → Enable → Save & Exit.
Lenovo: Security → Secure Boot → OS Type = Windows UEFI → Enable → F10 → Save.
HP: Security → Secure Boot Configuration → Enable → F10 → Save Changes.
ASUS / ROG / MSI: Boot → Secure Boot → OS Type = Windows UEFI → Enable → Save & Exit.
Real-time 2025 insight: On HP business laptops, a BIOS administrator password may be required to change Secure Boot. Lenovo and Dell business-class laptops may also have remote BIOS management options for enterprises.
5. Verifying Secure Boot After Activation
After enabling Secure Boot:
- Open Windows Security → Device Security → Secure Boot.
- Ensure it displays “On”.
- If it still shows “Off”, revisit BIOS/UEFI and recheck settings.
Additional verification options:
- Use
msinfo32to confirm both TPM 2.0 and Secure Boot status. - Run PowerShell command:
Confirm-SecureBootUEFIReturnsTrueif Secure Boot is active.
6. Common Issues and Troubleshooting Secure Boot
Even after enabling TPM and Secure Boot, issues may arise:
- Greyed-out Secure Boot → System is in legacy BIOS mode; switch to UEFI.
- Windows still blocks upgrade → Verify both TPM 2.0 and Secure Boot status.
- Boot errors after enabling Secure Boot → Ensure your system drive uses GPT partitioning instead of MBR.
Real-time insight (2025): Updating BIOS firmware often resolves most Secure Boot conflicts, especially on PCs upgraded from older Windows versions.
7. Pro Tips for a Smooth Windows 11 Upgrade
- Suspend BitLocker before enabling Secure Boot to prevent drive lockouts.
- Document BIOS changes for easy rollback if needed.
- After enabling TPM and Secure Boot, run PC Health Check or WhyNotWin11 tools to ensure full Windows 11 compatibility.
Additional 2025 insight: Modern PCs fully updated with 2025 BIOS versions typically have TPM 2.0 and Secure Boot enabled by default, drastically reducing installation errors.
Windows 11 TPM 2.0 & Secure Boot Troubleshooting — Common Problems, Real-Time Fixes, and Step-by-Step Solutions
Even after carefully enabling TPM 2.0 and Secure Boot, users may still encounter errors that prevent a successful Windows 11 upgrade. Understanding common problems, their root causes, and practical fixes is key to ensuring a smooth installation. This section provides real-time 2025 scenarios, manufacturer-specific tips, and actionable troubleshooting methods.
1. TPM Not Detected — Causes, Real-Time Scenarios, and Fixes
A common issue is the system reporting “TPM not detected” or “Compatible TPM cannot be found” during the Windows 11 upgrade process.
Possible causes:
- TPM is disabled in BIOS/UEFI.
- System is using legacy BIOS mode instead of UEFI.
- TPM driver is missing, outdated, or incompatible.
- Motherboard firmware does not fully support TPM 2.0.
Step-by-Step Fix:
- Restart your PC and enter BIOS/UEFI.
- Navigate to Security → TPM / Security Chip / PTT / fTPM.
- Ensure TPM State = Enabled and the version is 2.0.
- Save changes (F10 → Yes) and reboot.
- In Windows, open tpm.msc to confirm TPM is ready for use.
- If still undetected, update BIOS and TPM drivers via Windows Update → Optional Updates or the manufacturer’s website.
Real-time tip (2025): Some ASUS ROG, MSI, and Gigabyte motherboards may require enabling Secure Boot first for the TPM 2.0 option to become visible. Always double-check UEFI firmware settings if TPM is missing.
2. Secure Boot Issues — Common Problems, Real-Time Fixes, and Solutions
Typical errors:
- Secure Boot greyed out or unavailable → PC is still in legacy BIOS mode.
- Windows 11 installation blocked despite TPM 2.0 being active.
- Boot errors or black screen after enabling Secure Boot.
Step-by-Step Fixes:
- Switch BIOS boot mode to UEFI.
- Enable Secure Boot.
- Set OS Type = Windows UEFI Mode, if required.
- Ensure system drive uses GPT partition style (verify using
diskpart → list disk). - Save changes and reboot.
Manufacturer-specific tip: HP business laptops may require a BIOS administrator password to modify Secure Boot. Lenovo enterprise laptops may allow remote BIOS configuration for large deployments.
Real-time insight (2025): Many PCs upgraded from Windows 10 with legacy boot require UEFI + GPT conversion to successfully enable Secure Boot and meet Windows 11 requirements.
3. Incorrect TPM Version — Updating and Activating TPM 2.0
Windows 11 mandates TPM 2.0; systems running TPM 1.2 require firmware updates or activation:
- Check version with tpm.msc → Specification Version.
- If TPM 1.2 is present, consult your manufacturer’s documentation for firmware updates.
- Intel systems use PTT, AMD systems use fTPM, which meet Windows 11 requirements without needing discrete TPM modules.
Real-time insight: Over 95% of 2025 Intel and AMD motherboards now support TPM 2.0 via firmware, eliminating the need for a separate TPM chip.
4. BIOS/UEFI Not Reflecting Changes — Causes and Fixes
Sometimes, changes made in BIOS do not apply immediately:
- Save and exit BIOS correctly (F10 → Yes).
- Reset CMOS using the battery or Clear CMOS jumper if settings revert.
- Re-enter BIOS to verify TPM 2.0 and Secure Boot are active.
- Boot into Windows and confirm via tpm.msc and msinfo32.
Pro tip: Keeping BIOS firmware updated to the latest 2025 release often resolves conflicts with TPM 2.0 and Secure Boot.
5. BitLocker Conflicts — Preventing Boot Issues
Issue: BitLocker may block the boot process after enabling TPM or Secure Boot.
Solution:
- Open Control Panel → BitLocker Drive Encryption.
- Select Suspend protection before making BIOS changes.
- Enable TPM 2.0 and Secure Boot.
- Resume BitLocker protection once Windows boots successfully.
Real-time insight: Modern Windows 11 systems automatically re-enable BitLocker after restart if TPM 2.0 and Secure Boot are correctly configured.
6. Advanced Troubleshooting — PowerShell and Windows Security Verification
For persistent issues:
- Use PowerShell to check TPM and Secure Boot:
Get-WmiObject -Namespace "Root\CIMv2\Security\MicrosoftTpm" -Class Win32_Tpm
Confirm-SecureBootUEFI
- Use Windows Security → Device Security → Security Processor Details to confirm TPM 2.0 is active.
- Update drivers via Windows Update → Optional Updates → TPM Driver.
Pro tip: Always verify TPM 2.0 readiness and Secure Boot status before attempting Windows 11 installation to minimize errors.
7. Manufacturer-Specific Troubleshooting Tips
Dell: Update BIOS, suspend BitLocker, then re-enable TPM and Secure Boot.
Lenovo: Use BIOS Simulator online to locate Security Chip settings; enable TPM 2.0 and Secure Boot.
HP: Check BIOS administrator password and enable Secure Boot.
ASUS/MSI/ROG: Activate PTT/fTPM, enable Secure Boot, and update firmware.
Real-time 2025 insight: Most manufacturer BIOS updates in 2025 automatically resolve “TPM not detected” or Secure Boot greyed out issues. Enterprise PCs may require IT admin intervention for firmware changes.
Enabling TPM 2.0 Without BIOS — Debunking Myths, Exploring Realistic Methods, and Ensuring Windows 11 Upgrade Success
A frequently searched question among users preparing for Windows 11 installation is whether TPM 2.0 can be enabled without entering BIOS/UEFI. While several online tutorials and forum posts suggest shortcuts or software-based methods, the reality is more nuanced. Understanding myths vs reality is crucial to prevent wasted effort and potential system issues.
Expanded insight: In 2025, with newer motherboard firmware and Windows updates, some tools can report TPM readiness and recommend BIOS actions. However, these tools cannot actually enable the TPM if it is disabled. Users should always confirm TPM status and follow proper firmware steps.
1. The Myth — “You Can Enable TPM 2.0 From Windows Settings”
Some users believe TPM can be activated directly within Windows, bypassing BIOS.
Common claims:
- Running
tpm.mscallows enabling TPM directly. - Using third-party utilities can activate TPM without firmware access.
- Windows Security or PowerShell scripts can turn TPM on.
Reality check:
- tpm.msc only reports TPM status; it does not provide an activation option.
- TPM is a hardware/firmware-based security module, and enabling it always requires access to UEFI firmware settings.
- No third-party tool can safely activate TPM if it’s disabled in BIOS. Attempting software “shortcuts” may void warranties or cause boot issues.
Real-time tip (2025): Most modern PCs from Dell, Lenovo, HP, ASUS, and MSI confirm that TPM 2.0 cannot be enabled purely from the OS. Attempting shortcuts can result in TPM not detected errors during the Windows 11 upgrade.
Additional data: Windows 11 setup occasionally includes a pre-check that identifies TPM as missing, reinforcing the need to access BIOS/UEFI directly.
2. Understanding Firmware vs Software — Why BIOS Access Is Essential
TPM is implemented as a hardware security chip (or firmware module in modern Intel/AMD systems):
- Intel PTT (Platform Trust Technology) and AMD fTPM (Firmware TPM) reside in firmware.
- Enabling TPM involves switching firmware-level settings, which the OS cannot modify for security reasons.
- Windows can utilize TPM, but it cannot enable it from within the system.
Expanded insight: TPM is designed as a tamper-resistant layer. Allowing software-only activation would undermine the security of BitLocker encryption, Windows Hello authentication, and other sensitive processes.
3. Safe Alternatives — Checking TPM Without BIOS Changes
While TPM cannot be enabled without BIOS, users can verify TPM readiness and prepare for activation:
- Press Windows Key + R, type
tpm.msc, and press Enter. - Check Status — “The TPM is ready for use” indicates it’s enabled.
- Confirm Specification Version = 2.0 for Windows 11 compatibility.
- Use Windows Security → Device Security → Security Processor Details to verify availability.
Expanded data: Many OEMs now include diagnostic tools that provide a real-time status of TPM and firmware features. This helps users identify if TPM is disabled or if an update is required before attempting Windows 11 installation.
Real-time 2025 insight: Remote management software for enterprises can report TPM status without BIOS access, but activation still requires firmware-level changes.
4. Myths About TPM Firmware Updates or Registry Tweaks
Some guides suggest:
- Modifying Windows registry keys to enable TPM.
- Using firmware update utilities to activate TPM automatically.
- Running scripts to “turn on” TPM.
Reality check:
- Registry tweaks cannot enable TPM; they only modify Windows behavior if TPM is already active.
- Firmware update tools may update TPM microcode but do not enable it by default.
- Scripts claiming to activate TPM are often misleading or unsafe, potentially bricking devices.
Expanded insight: In 2025, motherboard manufacturers often include automated TPM initialization during firmware updates, but users still need to enter BIOS once to confirm activation. This step cannot be skipped.
5. Step-by-Step Preparation Before BIOS TPM Activation
Even though BIOS access is required, users can minimize errors by preparing in advance:
- Backup important files before accessing BIOS.
- Temporarily suspend BitLocker to prevent boot conflicts.
- Take note of current BIOS/UEFI settings.
- Ensure system firmware is updated to the latest version (2025 releases improve TPM and Secure Boot support).
Additional advice: Document BIOS settings or take screenshots to ensure settings can be restored if needed. On enterprise systems, consult IT before making changes to avoid configuration conflicts or security policy violations.
Real-time 2025 tip: Many modern motherboards now auto-enable fTPM/PTT after the first BIOS boot post-update, reducing manual intervention.
6. Final Clarification — TPM Activation Realities
- TPM 2.0 cannot be enabled purely via Windows; BIOS/UEFI access is mandatory.
- Verification can be done in Windows, but activation requires BIOS/UEFI.
- Enterprise setups may offer remote firmware-based activation, but it still leverages UEFI.
Expanded clarification: Attempting to bypass firmware-based activation may result in Windows 11 upgrade failures, BitLocker lockouts, or system instability. Ensuring TPM is enabled properly through BIOS guarantees full functionality of hardware-based encryption, secure authentication, and boot security.
7. Pro Tips for Smooth TPM & Windows 11 Upgrade
- Check TPM availability with tpm.msc before BIOS access.
- Update BIOS/UEFI to the latest 2025 firmware for smoother activation.
- Suspend security software like BitLocker before BIOS changes.
- Document settings to rollback if needed.
- Combine TPM 2.0 activation with Secure Boot enablement to fully meet Windows 11 system requirements.
Additional tip: After enabling TPM and Secure Boot, confirm status with Windows Security → Device Security → Security Processor to avoid post-installation surprises.
Essential Pre-Upgrade Checklist — Confirm TPM 2.0 & Secure Boot Before Retrying Windows 11 Installation
Before attempting your Windows 11 upgrade again, it is critical to ensure that all hardware and firmware requirements are satisfied. Performing this pre-upgrade audit prevents installation errors, saves time, and guarantees TPM 2.0 and Secure Boot readiness.
Expanded insight (2025): Even in 2025, users often see the “This PC can’t run Windows 11” error due to minor misconfigurations in BIOS, outdated firmware, or incomplete TPM activation. This checklist addresses all those scenarios and adds extra verification steps to avoid repeated failures.
1. Verify TPM 2.0 Status and Compatibility for Windows 11
- Press Windows Key + R → tpm.msc.
- Check Status — “The TPM is ready for use” confirms it is enabled.
- Confirm Specification Version = 2.0, as required for Windows 11.
Expanded tip: On Intel systems, ensure PTT (Platform Trust Technology) is active; on AMD, confirm fTPM is enabled. Some motherboards auto-activate these features during firmware updates, but verification is essential.
Additional real-time insight: Users upgrading older PCs in 2025 sometimes encounter “TPM not detected” errors because firmware updates reset TPM defaults. Re-verifying status prevents surprise upgrade failures.
2. Confirm Secure Boot Activation and UEFI Boot Mode
- Enter UEFI BIOS → Boot/Security tab → Secure Boot.
- Set Secure Boot = Enabled.
- Verify OS Type = Windows UEFI, if your firmware prompts for boot mode.
Expanded detail: PCs upgraded from Windows 10 using legacy BIOS mode may require converting the system drive to GPT before enabling Secure Boot. Skipping this step can cause installation errors or rollback during the upgrade.
3. Update BIOS/UEFI Firmware to Latest Version
- Visit the manufacturer’s website to ensure you have the latest 2025 firmware release.
- Firmware updates can:
- Fix TPM detection issues.
- Automatically enable Secure Boot on supported motherboards.
- Improve system stability and Windows 11 upgrade reliability.
Pro tip: Some OEMs now include automated TPM initialization post-firmware update, reducing manual steps during BIOS configuration.
4. Temporarily Suspend Security Features to Prevent Conflicts
- Suspend BitLocker:
- Open Control Panel → BitLocker Drive Encryption → Suspend protection.
- Temporarily disable third-party antivirus or encryption software, which may interfere with BIOS changes or upgrade verification.
Real-time advice (2025): Suspending active security processes ensures smooth recognition of TPM and Secure Boot during the Windows 11 setup phase.
5. Backup Critical Data and Create a System Restore Point
- Back up all essential files to external drives or cloud storage.
- Create a System Restore point:
- Search Create a restore point → System Protection → Create.
Expanded insight: With Windows 11 upgrade tools now integrating cloud-based backup suggestions, you can further reduce the risk of data loss during firmware changes or unexpected errors.
6. Confirm Disk Partitioning and GPT Boot Mode
- Open Disk Management (
diskmgmt.msc) to check that the system drive uses GPT partition style, required for UEFI boot. - Ensure BIOS is set to UEFI mode.
- Remove leftover legacy BIOS boot entries that may conflict with Secure Boot.
Pro tip: For a quick command-line check, run:
Get-Disk | Select Number, PartitionStyle
GPT = ready for Windows 11; MBR = requires conversion before upgrade.
7. Run Windows 11 PC Health Check for Pre-Upgrade Validation
- Download and run Windows 11 PC Health Check tool (2025 version).
- Verify compliance with:
- CPU compatibility
- RAM and storage requirements
- TPM 2.0 and Secure Boot
- Take note of any warnings and resolve them before retrying the upgrade.
Expanded insight: The latest tool version also provides manufacturer-specific BIOS instructions and firmware guidance to resolve TPM or Secure Boot issues before initiating installation.
8. Final Pre-Upgrade Steps — Power, Updates, and Reboot
- Restart your PC after confirming BIOS/UEFI settings.
- Apply all Windows Updates, including optional driver updates.
- Keep the device plugged into a power source during the upgrade.
- Verify the checklist:
- TPM 2.0 enabled and verified
- Secure Boot enabled
- BIOS/UEFI firmware updated
- BitLocker suspended
- Backup and restore points created
- GPT partition verified
- Windows 11 PC Health Check completed
Expanded tip: Following these steps reduces the risk of upgrade errors, TPM detection issues, or boot failures.
Conclusion: Mastering TPM 2.0 & Secure Boot for a Smooth Windows 11 Upgrade
Upgrading to Windows 11 can be a seamless experience when you understand the role of TPM 2.0 and Secure Boot. This guide has covered every essential step, from checking your system’s TPM status to troubleshooting BIOS and firmware issues. By following these instructions, you ensure maximum hardware security, compliance with Windows 11 requirements, and a stress-free installation process.
Why TPM 2.0 and Secure Boot Are Non-Negotiable for Windows 11
- TPM 2.0 acts as a hardware-level security module, storing encryption keys, certificates, and sensitive authentication data safely away from potential software-based attacks.
- Secure Boot prevents unauthorized drivers or malware from loading during system startup.
- Together, these features guarantee that your Windows 11 environment is both stable and secure, meeting Microsoft’s mandatory system requirements.
Real-time insight 2025: Users attempting upgrades without TPM 2.0 or Secure Boot active still encounter installation blocks, highlighting the importance of proactive verification before initiating Windows 11 installation.
Key Takeaways from the Step-by-Step Guide
- Check Your System Early: Use tpm.msc and Windows Security → Device Security to verify TPM 2.0 status before attempting any upgrade.
- Understand Manufacturer Differences: Intel PTT and AMD fTPM serve the same purpose as discrete TPM chips, but BIOS paths and labels vary.
- Update Firmware: Keeping BIOS/UEFI firmware up-to-date often resolves hidden TPM or Secure Boot issues.
- Enable Secure Boot: This is as essential as enabling TPM 2.0; both are required for Windows 11 compatibility.
- Run Pre-Upgrade Checks: Use Windows 11 PC Health Check and verify disk partitioning (GPT/UEFI) to minimize installation errors.
- Troubleshoot Smartly: If TPM isn’t detected or Secure Boot errors appear, revisit BIOS settings, suspend BitLocker, and check for optional driver updates.
Practical Benefits of Following This Guide
- Avoid Upgrade Failures: Ensures Windows 11 installs smoothly without rollback errors.
- Enhance Device Security: TPM 2.0 protects encryption keys, BitLocker, Windows Hello credentials, and system integrity.
- Stay Future-Ready: Ensures your system meets Microsoft’s evolving security standards for Windows 11 and beyond.
- Save Time & Effort: Following the checklist and manufacturer-specific steps prevents repeated BIOS entry and troubleshooting cycles.
Real-time tip: In 2025, nearly all PCs from 2018 onward are capable of running TPM 2.0, but many users still skip verification. A proactive approach reduces installation delays and unexpected errors.
Final Words — A Confident Path to Windows 11
By carefully checking TPM 2.0, enabling Secure Boot, and following manufacturer-specific BIOS instructions, you take control of your Windows 11 upgrade process. This methodical approach not only ensures compatibility but also fortifies your system against potential security threats.
Pro advice: Once TPM 2.0 and Secure Boot are verified, consider creating a system backup and restore point before the upgrade to add an extra layer of safety.
With this guide, you now have the confidence, knowledge, and practical steps to upgrade any compatible PC to Windows 11 successfully — without surprises, errors, or security compromises.
Useful Resources for Enabling TPM 2.0 and Preparing Windows 11 Upgrades
Official Microsoft Resources
Windows 11 System Requirements – Detailed hardware requirements including TPM 2.0 and Secure Boot.
Check TPM Version with tpm.msc – Step-by-step Microsoft guide.
Windows Security App: Device Security & TPM – Learn how to view TPM and Security Processor info.
PC Manufacturer Guides
Dell TPM & BIOS Instructions – Step-by-step enabling TPM for Dell systems:
Lenovo TPM & BIOS Support – Checking and enabling TPM for Lenovo laptops and desktops:
ASUS Motherboard TPM 2.0 Guide – Firmware TPM (fTPM) enabling on Intel/AMD ASUS motherboards:
Tools
Windows 11 PC Health Check – Check compatibility, TPM 2.0, and Secure Boot status:
SupportAssist for Dell PCs – Update drivers, including TPM module drivers:
Visit Our Post Page: Blog Page