
Learn how to encrypt email in Outlook with this easy step-by-step guide. Send secure, confidential messages effortlessly while keeping your communication private, protected, and fully under your control.
Introduction to Encrypting Emails in Outlook
Protecting sensitive information in emails has become more important than ever, especially when you’re sharing details that shouldn’t fall into the wrong hands. Microsoft Outlook makes this easier by offering built-in ways to add an extra layer of security to your messages—so your conversations stay private from start to finish.
Whether you’re sending personal details, business files, or anything that needs controlled access, Outlook gives you practical tools to keep your message encrypted, readable only by the intended person. The best part? You don’t need complicated setups or third-party tools if you’re using a compatible Microsoft 365 account. Outlook includes simple options—like the Encrypt button, Do Not Forward, and other protection features—that help you send secure messages without slowing down your workflow.
When you choose encryption, your message is transformed from plain text into cipher-text, meaning only the recipient with the correct decryption key can unlock it. This goes beyond basic connection security—so even when your message is stored or forwarded, it remains protected.
In this guide, you’ll learn how Outlook’s encryption works, what you need to enable it, and how to start sending protected emails confidently. The goal is to give you a clear, friendly, and hands-on walkthrough so you can secure your messages with just a few clicks.
Understanding How Outlook Email Encryption Works (and Why It Protects Your Messages)
Outlook uses encryption to make sure your message is readable only by the person you’re sending it to. Instead of sending your text as normal, Outlook converts it into cipher-text, which looks like scrambled characters to anyone who tries to intercept or view it without permission. The moment the intended recipient opens the email, their account automatically unlocks the message using a matching decryption key.
It’s important to understand that Outlook uses two layers of protection:
- Connection-level encryption, which protects the path between your device and the mail server using protocols like TLS/SSL.
- Content-level encryption, which protects the message itself, keeping the data secure both during transit and after it arrives.
The second layer is what truly keeps your sensitive details safe. With supported Microsoft 365 plans, Outlook can keep the entire message inside its secure environment, ensuring that your email doesn’t leave the protected Microsoft ecosystem without proper authorization. This means attachments, private notes, and other details remain secured, even when a recipient is using a different email provider.
By encrypting your messages this way, Outlook not only guards your information but also gives you peace of mind—knowing your confidential communication stays private, protected, and accessible only to the right person.
To understand how Outlook handles encrypted messages across Microsoft 365, you can refer to the official guide on sending encrypted messages with a Microsoft 365 Personal or Family subscription
What You Need Before You Can Start Encrypting Emails in Outloo
Before you start sending protected messages in Outlook, it’s important to know what your account can or cannot do. Outlook’s encryption tools depend heavily on the type of Microsoft account you’re using and whether it includes a qualifying Microsoft 365 subscription. These requirements determine which security features are available to you.
If you’re using a personal Microsoft 365 plan—like Microsoft 365 Personal or Family—you can use Outlook’s built-in options such as Encrypt and Do Not Forward. These features help keep your message and attachments secure without needing any extra setup.
For those using a work or school account, your organization may offer additional protections. Features like IRM (Information Rights Management), S/MIME digital signatures, and sensitivity labels are often controlled by your IT admin. These tools are designed to support higher-level security policies, especially when handling more sensitive information.
If you’re using a regular Outlook.com account without a Microsoft 365 subscription, encryption options will be limited. You’ll still be able to open encrypted messages, but you won’t be able to send them unless your plan supports the feature.
Before sending your first encrypted email, make sure your account has:
- A supported Microsoft 365 subscription
- Access to Outlook’s Encrypt options
- Any required organization-based permissions (for work or school accounts)
Once these pieces are in place, you’ll be ready to send emails that stay private, protected, and accessible only to the right people.
Exploring Every Encryption Option Available in Outlook
Outlook gives you several ways to protect the contents of your message, and each option is designed for a different level of privacy and control. Understanding how these choices work helps you select the right one for your situation—whether you’re sharing everyday details or highly sensitive information.
Standard Email Protection with Encrypt
This is the standard protection method most users rely on. When you choose Encrypt, your email stays inside the secure Microsoft 365 environment, ensuring the message and attachments remain protected throughout their journey. Recipients using Outlook or Microsoft accounts can open the email seamlessly, while others may need a one-time passcode to access it.
Advanced Message Restrictions with Do Not Forward
For times when you want stricter control, Do Not Forward adds an extra layer of restriction. With this option, the recipient can read your message but can’t forward, copy, or print it. Documents like Word, Excel or PowerPoint files remain encrypted even after being downloaded—making this especially suitable for confidential sharing within or across organisations.
Certificate-Based Protection with S/MIME
If your environment supports it, S/MIME offers strong, certificate-based protection. Both the sender and the recipient need digital certificates for this method to work. Once set up, S/MIME provides end-to-end protection and verifies that the message truly came from the correct sender by using a digital signature. This is ideal for scenarios where identity confirmation and high-grade security are essential.
Users who rely on certificate-based protection can follow Microsoft’s step-by-step instructions onsending S/MIME or Microsoft Purview encrypted emails in Outlook to configure and manage their digital certificates.
Policy-Driven Control with Information Rights Management (IRM)
Organisations that use IRM can apply specific permission controls to emails. This might include preventing forwarding, blocking printing, or limiting access based on organisational policies. IRM is especially useful in workplaces that regularly handle sensitive data and need consistent compliance-driven protection.
Data Classification with Sensitivity Labels
Some work and school accounts allow you to apply sensitivity labels to emails. These labels help classify messages—such as Confidential, Private, or Public—based on your organisation’s guidelines. While these labels don’t encrypt content on their own, they help define how information should be handled and often work alongside other protection methods.
Encryption Without Microsoft 365 Using Third-Party Add-Ins
If you don’t have a Microsoft 365 plan but still want to protect your messages, third-party add-ins offer another path. These tools create a secure portal where recipients can view protected messages, giving you basic encryption capabilities even without Outlook’s built-in advanced features.
Each of these options plays a role in keeping your communication safe, controlled, and accessible only to the right people. By choosing the method that fits your needs, you ensure your messages stay protected from start to finish.
If you want to explore each protection method in depth—like Encrypt-Only, Do Not Forward, and S/MIME—Microsoft’s official page on Office 365 Message Encryption explains how these features work across devices and accounts.
How to Encrypt a Single Email in Outlook (Desktop and Web Made Simple)
Encrypting a single message in Outlook is a quick and practical way to protect information without changing your overall email settings. This option is especially helpful when you’re sharing confidential files, personal details, or anything you want viewed only by the intended recipient. Outlook gives you clear, built-in controls so you can apply protection exactly when you need it.
Encrypting a Single Email in the Outlook Desktop App (Windows & Mac)
To get started, open Outlook and create a new message just as you normally would. Once your blank email window appears, you’re ready to apply encryption:
- Open a New Email: Go to the Home tab and choose New Email. This gives you a fresh message window where you can enter your recipient, subject, and message.
- Access the Options Tab: At the top of the message window, select the Options tab. This is where Outlook keeps tools related to message permissions and security.
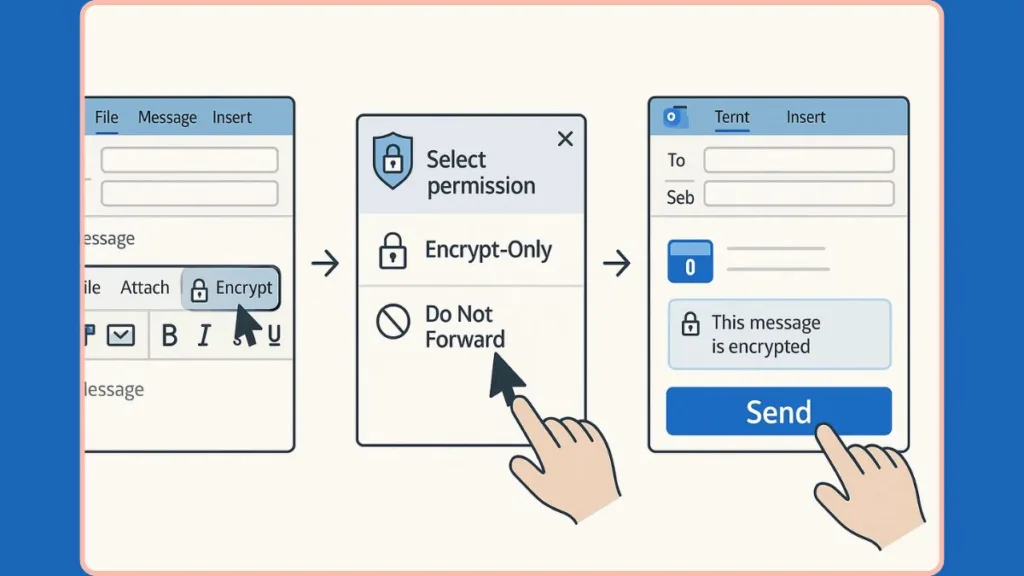
- Choose the Encryption Setting: Look for the Encrypt option or the small lock icon. Clicking this will open the permission settings available on your account.
- Select Your Protection Level: You’ll usually see choices like Encrypt or Do Not Forward.
- Encrypt ensures the message and attachments remain protected inside the Microsoft 365 environment.
- Do Not Forward adds stronger restrictions, blocking printing, copying, and forwarding.
- Write and Send Your Email: Once encryption is applied, a note appears above the address fields letting you know the message is protected. Now you can compose your message normally and click Send.
This simple process lets you add security instantly—without needing extra software or complex configuration. It gives your message a clear protective barrier that moves with it, even after it reaches the recipient’s inbox.
Encrypting a Single Email in Outlook on the Web
If you’re using Outlook.com or Outlook on the web, the steps are just as smooth:
- Select New Message.
- At the bottom or top toolbar, choose Encrypt.
- To adjust permissions, select Change permissions to switch between Encrypt or Do Not Forward.
- Compose your message and press Send.
Outlook on the web automatically applies the correct level of protection based on your selection, keeping the message secure no matter where the recipient opens it.
How You Know the Email Is Encrypted
Before sending, Outlook displays a clear security banner showing the selected protection level. This confirmation ensures your message is fully encrypted and ready to send safely.
Using this feature for individual emails gives you flexible, reliable control over what stays private—making it easy to protect sensitive communication exactly when it matters most.
For a deeper look at how to confirm whether your email is actually protected, you can follow this detailed guide on how to verify encrypted Outlook emails — your step-by-step walkthrough for checking encryption status in real time.
How to Automatically Encrypt Every Email You Send in Outlook
If you send sensitive information often and want every message to stay protected, Outlook allows you to enable automatic encryption for all outgoing emails. This approach removes the need to manually apply encryption each time, ensuring every message you send is consistently secure, private, and shielded from unauthorized access.
Automatic encryption is especially helpful for professionals who routinely handle business documents, financial data, or personal details. Once activated, Outlook applies content protection to every new email you send, giving you a dependable safety net without extra steps.
Enabling Automatic Encryption in Classic Outlook (Windows)
The option to encrypt all outgoing emails is found in the Trust Center, a dedicated area in Outlook that controls privacy, security, and compliance features. Here’s how to turn it on:
- Open Outlook and Access Settings: Start by launching Outlook, then go to the File menu in the top-left corner. From here, select Options to open the settings window.
- Open the Trust Center: In the left sidebar, choose Trust Center. This section manages Outlook’s security policies and protection tools.
- Go to Trust Center Settings: Click Trust Center Settings to open a new window where email security controls are located.
- Open Email Security Settings: From the left panel, select Email Security. This is where you’ll find all the options related to message protection and encryption.
- Enable Encryption for All Outgoing Messages: Under the Encrypted email section, check the option that says Encrypt contents and attachments for outgoing messages.
- This setting ensures that every email you send—including attachments—will be encrypted automatically.
- Outlook applies secure formatting in the background, so your outgoing messages stay protected regardless of the recipient’s email provider.
- Save and Apply Your Changes: Click OK to close the Trust Center Settings, and OK again to exit the Options menu. Your new protection settings will now take effect for all future emails.
Once enabled, every email you compose will have encryption applied automatically, helping you avoid accidental unprotected messages.
Benefits of Always-On Encryption
Turning on automatic encryption offers several long-term advantages:
- Consistent protection for every outgoing message without manual steps
- Reduced risk of sending confidential content without safeguards
- Better compliance with organizational policies or industry regulations
- Seamless sending, since Outlook applies encryption in the background
- Peace of mind, knowing every email leaves your inbox fully protected
This feature is especially valuable for legal teams, HR departments, finance professionals, and anyone who regularly handles sensitive information.
When You Should Use This Feature
Automatic encryption is most useful if:
- You deal with private or sensitive data daily
- You’re required to follow strict organizational security rules
- You prefer a set-it-and-forget-it approach to email protection
- You want a uniform layer of security across all communications
By enabling this setting, you ensure your messages maintain the same level of security and privacy every time you click send.
How Different Recipients Can Open Your Encrypted Outlook Emails
Once you send an encrypted email through Outlook, the experience for the recipient depends on the type of account and device they use. Outlook is designed to keep the process straightforward, but different email services and apps provide different levels of support. Understanding how recipients access your protected messages ensures nothing gets lost in translation and helps you guide others when needed.
Encrypted messages are built to stay private, secured, and accessible only to the intended person—so Outlook verifies the recipient before revealing the message. This verification can happen automatically or through a simple sign-in or passcode step, depending on the email service.
Reading Encrypted Emails in Outlook (Desktop, Web, and Mobile)
When recipients use Outlook—whether on the desktop app, Outlook.com, or the Outlook mobile app—the process is seamless:
- The encrypted email appears in the inbox just like any other message.
- A small lock icon indicates the message is protected.
- When they open the email, Outlook verifies their identity in the background.
- The message and attachments display normally once verification succeeds.
No extra steps are required, and the recipient can read, reply, and continue the conversation without losing encryption. Outlook handles the heavy lifting behind the scenes to keep the content secure.
Reading Encrypted Emails with Gmail or Yahoo Mail
For users on services like Gmail or Yahoo, Outlook provides a clear and guided access method:
- The recipient receives a message showing the subject line and a button such as “Read the message.”
- Clicking the button opens a secure Microsoft viewing page.
- The recipient must verify their identity using one of the following:
- Signing in with their Google or Yahoo account
- Using a one-time passcode sent to their email
Once verified, they can view the message and attachments inside the secure portal. They can also reply from within that portal, keeping the message protected throughout the exchange.
Reading Encrypted Emails in Other Email Clients (AOL, ISP Mail, Custom Domains)
Some recipients use email services that don’t support modern encryption features directly. Outlook handles these cases with a passcode-based system:
- The recipient receives a notification email with a secure link.
- They click the link to open the secure Microsoft viewing page.
- Since their provider doesn’t support identity sign-in, Outlook sends a temporary passcode to their inbox.
- They enter the passcode on the verification screen to unlock the message.
This method ensures the email stays private, even if the recipient uses a basic or older email provider.
How Restricted Emails Are Viewed (Do Not Forward)
If you use the Do Not Forward option, recipients still get the protected message—but the experience has extra safeguards:
- The message cannot be forwarded, printed, or copied.
- Only the intended account can open it; forwarding the email won’t work.
- For Office attachments, files remain encrypted even after download.
This ensures your sensitive content stays in the right hands, no matter what email service the recipient uses.
Common Reading Scenarios Explained
To help recipients understand what’s happening, here are some typical situations:
- Outlook user: Full access with no extra steps.
- Gmail user: Must verify through Google sign-in or a one-time code.
- Yahoo user: Similar verification options as Gmail.
- AOL or custom domain: Must use a temporary passcode.
- Someone forwarded the email: They won’t be able to open it if restrictions apply.
Across all these methods, the goal is consistent: ensure your message stays protected, verified, and accessible only by the correct person.
How Outlook Encryption Affects Email Attachments
Attachments often carry the most sensitive information, so understanding how Outlook protects them is just as important as securing the email itself. Outlook uses different rules depending on the encryption option you select, ensuring your files stay protected, controlled, and accessible only to the right person.
Each protection mode treats attachments in a unique way, especially when recipients use different email services or apps. Knowing these differences helps you choose the right setting for every situation.
attachment Behavior with the Standard Encrypt Option
When you choose the Encrypt option, the email and attachments stay within the secure Microsoft 365 environment, keeping them protected during transit and when stored. Here’s how attachments behave:
- Recipients using Outlook.com, Microsoft 365, or the Outlook app can download attachments normally without extra steps.
- Recipients using other email clients—like Gmail, Yahoo, or ISP mail—must use a one-time passcode or supported sign-in method to download the files securely.
- Attachments remain protected until the Microsoft portal verifies the recipient’s identity.
This mode offers strong protection while keeping the download process smooth for Outlook users.
Attachment Behavior with Do Not Forward (Enhanced Restrictions)
The Do Not Forward option provides stronger control over your files and message. This mode is ideal when you want to limit how your information can be shared, even after download.
Here’s what happens to attachments:
- Microsoft Office files: like Word, Excel, and PowerPoint—remain encrypted even after the recipient downloads them.
- If the recipient attempts to forward the file to someone else, the new person will not be able to open it, since they don’t have permission.
- Recipients using Outlook.com can open encrypted Office files through supported Windows apps.
- Users with Microsoft 365 accounts can access them across different platforms.
- Non-Office files, such as PDFs, images, and videos, can generally be downloaded without additional encryption, unless policy rules add restrictions.
This mode ensures your content stays tightly controlled, even beyond the original message.
When Recipients Use Third-Party Email Services
If the recipient uses email services like Gmail, Yahoo, AOL, or a custom-domain provider:
- They will often be redirected to a secure Microsoft portal to access attachments.
- Outlook may require the recipient to use their provider’s account or enter a temporary passcode.
- Once verified, the recipient can view or download files from within this protected space.
This ensures your attachments remain private, even when the recipient’s email service doesn’t support built-in encryption.
Why Attachment Behavior Varies Between Modes
Attachment rules differ because each encryption mode offers a different balance between flexibility and control:
- Encrypt maintains strong protection while offering easy access for Outlook users.
- Do Not Forward focuses on strict access control, preventing unauthorized sharing or reuse.
Both methods protect your files, but each applies different safeguards depending on how sensitive your content is.
By understanding how each mode handles attachments, you can confidently choose the protection level that best matches your communication needs.
FAQ About Encrypting Emails in Outlook
Here are some practical answers to common questions users often ask when working with encrypted emails in Outlook. These insights help clarify how the feature works and what to expect when sending or receiving protected messages.
Why don’t I see the Encrypt button in Outlook?
The Encrypt button may be missing if you’re not using a supported Microsoft 365 subscription, or if you’re on an account that doesn’t include content-level protection. In workplace accounts, your IT admin may control access to security features. Switching to the Classic Outlook interface can also reveal options that aren’t currently visible in the new experience.
Can I encrypt emails without a Microsoft 365 subscription?
You can still open encrypted messages without a subscription, but you cannot send encrypted emails unless your plan supports it. In this case, you may use a third-party add-in, but Outlook’s built-in encryption requires a qualifying Microsoft plan.
What’s the difference between Encrypt and Do Not Forward?
Encrypt protects the message and keeps it inside the secure Microsoft 365 environment.
Do Not Forward adds stronger restrictions, blocking forwarding, copying, printing, and keeping Office attachments encrypted after download. Choose it when you need tighter control over how your content is shared.
How does someone open an encrypted email if they don’t use Outlook?
Recipients using Gmail, Yahoo, AOL, or custom email services can open your message through a secure Microsoft portal. They verify their identity using a one-time passcode or by signing in with their email provider. This ensures the message stays private even outside Outlook.
Can I remove encryption after sending an email?
Once an encrypted email is sent, the protection cannot be removed from that copy. However, you can send a new unencrypted version if needed. Outlook restricts changes after sending to maintain message integrity.
Does encryption affect attachments?
Attachments behave differently depending on the protection type. Encrypt keeps content protected but easy to download for Outlook users. Do Not Forward keeps Office files encrypted even after download, preventing unauthorized access or sharing.
Is S/MIME better than regular Outlook encryption?
S/MIME offers strong, certificate-based protection and identity verification, but requires setup on both ends. Outlook’s built-in encryption is easier to use and works with more email services. Choose S/MIME if you need strict identity assurance; choose Encrypt or Do Not Forward for convenience and broad compatibility.
Final Thoughts on Sending Secure, Encrypted Emails Through Outlook
Securing your emails in Outlook doesn’t have to be complicated. With built-in tools designed to keep your messages private, protected, and accessible only to the right people, Outlook makes it easy to apply the right level of security for every situation. Whether you need quick, one-click protection using Encrypt, stronger control through Do Not Forward, or advanced options like IRM, sensitivity labels, or S/MIME, Outlook gives you the flexibility to safeguard your information with confidence.
By understanding how each encryption option works—and how recipients interact with protected messages—you can choose the method that fits your workflow while keeping your communication secure. Whether you’re sharing business details, personal information, or confidential attachments, Outlook helps you maintain the privacy, integrity, and security of every email you send.
If you’re ready to strengthen your digital communication, these tools give you everything you need to keep your messages in the right hands, every single time.
Visit Our Post Page: Blog Page