
Discover the fastest way to get Netherite armor in 2025 with this complete step-by-step guide. Explore the best mining methods, upgrade templates, required scraps, and expert tips to craft your full Netherite set.
Why Netherite Armor Matters
If you’ve ever imagined stepping into battle with gear that feels truly unstoppable, Netherite armor is your milestone. This upgrade isn’t just aesthetic — it’s about survival, durability, and dominance.
What sets it apart
- Items made of Netherite are more powerful and durable than Diamond.
- They don’t burn in fire or lava, so even if you fall into the Nether’s lava lakes, your gear survives.
- Netherite armor also provides valuable knockback resistance, helping you stay steady during intense fights.
Whether you’re gearing up for deep-Nether mining, preparing for a face-off with the Ender Dragon, or simply aiming for the strongest armor in your survival world, Netherite gives you the confidence to explore harder, dive deeper, and fight smarter.
In this guide, we’ll walk through each step of the journey — from tracking down rare resources to upgrading your Diamond set into a full Netherite powerhouse. No fluff, no guesswork — just clear, practical steps so you know exactly what to do and why it matters.
If you’re ready to level up your adventure and claim gear that truly matches your ambition, let’s get started.
What Makes Netherite Armor the Best in Minecraft?
When players talk about the strongest armor in Minecraft, they’re really referring to Netherite gear—and for very good reasons.
Key advantages
- Netherite items are more powerful and durable than Diamond gear.
- The armor provides +1 Knockback Resistance per piece, helping you stay steady during sudden hits or explosions.
- It’s immune to fire and lava, so even if you fall into a lava lake, your gear won’t be destroyed.
Even though Netherite armor offers the same base protection value as Diamond, its significantly higher durability, added knockback resistance, and lava-proof safety make it the superior choice for high-risk exploration and late-game battles.
With all these strengths combined, you’re not just equipping armor—you’re gearing up with protection that’s built for the toughest challenges Minecraft can throw at you.
Everything You Need Before Crafting Netherite Armor
Before you dive into the upgrade grind, it’s important to collect the key ingredients and tools you’ll need. This helps you avoid unnecessary back-and-forth trips and keeps the entire upgrade process smooth and efficient.
Here’s the complete checklist with accurate game mechanics:
- Full Diamond Armor Set – To craft Netherite armor, you must first have a Diamond Helmet, Diamond Chestplate, Diamond Leggings, and Diamond Boots.
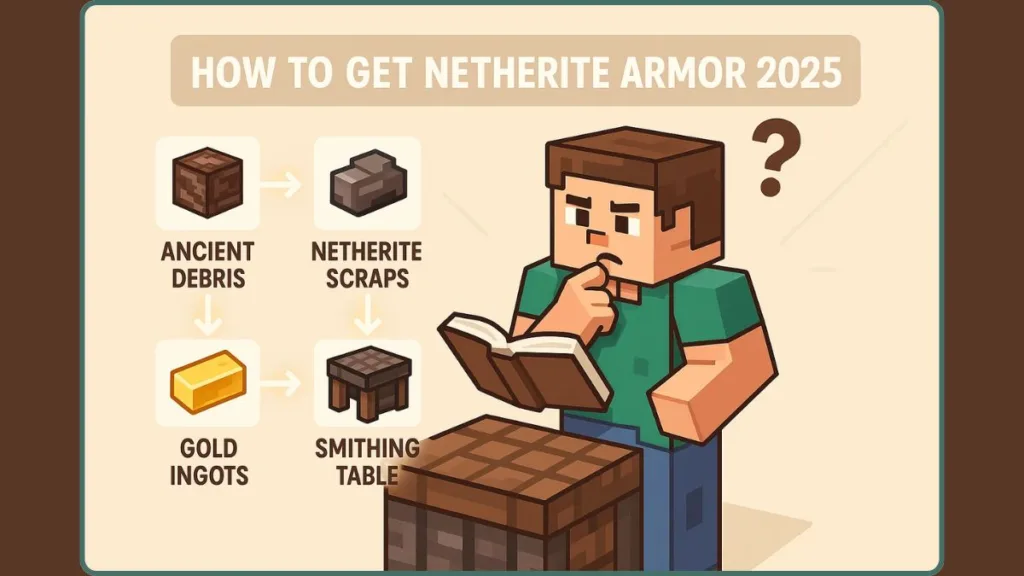
- 4 Netherite Ingots – Each ingot upgrades one armor piece. Netherite Ingots are crafted from four Netherite Scraps and four Gold Ingots using a shapeless recipe.
- 4 Netherite Upgrade Smithing Templates – Each upgrade consumes one template. These are found in Bastion Remnants and can be duplicated with the right materials.
- Smithing Table – The block used to convert Diamond armor into Netherite. It can be crafted with 2 Iron Ingots + 4 Wooden Planks or found naturally in a Toolsmith’s house.
Once you have everything ready, the rest of the journey becomes far more manageable, letting you focus on collecting rare resources and creating your Netherite armor without interruptions.
How to Get Netherite Armor (Complete Step-by-Step Guide)
Upgrading to Netherite armor is one of the biggest progression milestones in Minecraft, and reaching it requires careful planning, rare materials, and strategic exploration.
This guide walks you through the complete journey with clear steps so you always know what to do next.
Each stage builds on the previous one, helping you move confidently from basic preparation to crafting the most powerful armor set in the game.
Step 1: Prepare a Full Diamond Armor Set for Upgrading
The foundation of Netherite armor begins with a full set of Diamond armor. Netherite upgrades don’t replace recipes—you must enhance your existing pieces. Preparing this properly ensures your upgrade process is smooth and resource-efficient.
What you need to do:
- Craft the Diamond Helmet, Diamond Chestplate, Diamond Leggings, and Diamond Boots using your Crafting Table.
- Make sure these pieces are in good condition to reduce repair costs later.
- Carry a Diamond Pickaxe, which is essential for mining Ancient Debris.
- Bring food, blocks, torches, and backup tools—you’re headed into hostile terrain soon.
Tip: If your Diamond armor is heavily damaged, repair it beforehand to avoid wasting Netherite on worn-out gear.
Step 2: Mine Ancient Debris in the Nether for Netherite Materials
This stage is the heart of the grind. Ancient Debris is the core of Netherite upgrades and is found only in the Nether. It’s rare, dangerous to reach, and surrounded by lava-filled terrain.
Key details:
- Ancient Debris generates between Y-level 8 and 24, with Y=15 being the most efficient mining layer.
- It can only be mined with a Diamond or Netherite Pickaxe.
- Ancient Debris has extremely high blast resistance, so TNT, beds, or Respawn Anchors can safely expose it.
- Branch mining works well, but explosive mining reveals more terrain fast.
Tips for safety:
- Always carry Fire Resistance potions, as lava pockets are extremely common.
- Keep blocks in hand to quickly block flowing lava.
- Mine in small bursts and check surroundings before breaking more blocks.
Aim to gather 16 pieces of Ancient Debris, enough for the ingots you’ll craft later.
Step 3: Smelt Ancient Debris Into Netherite Scraps Efficiently
Turning raw Ancient Debris into usable material is simple but crucial. Smelting produces Netherite Scraps, the next ingredient in your upgrade chain.
How to do it:
- Use a Furnace or Blast Furnace to smelt each Ancient Debris block into 1 Netherite Scrap.
- A full set requires 16 Netherite Scraps.
- Setting up multiple furnaces allows you to process debris faster.
Tip: A Blast Furnace works twice as fast as a traditional Furnace—use it when possible to speed up the workflow.
Step 4: Craft Netherite Ingots Using Scraps and Gold
This is where everything begins to transform. Netherite Ingots are what directly upgrade your Diamond armor.
Recipe essentials:
- Combine 4 Netherite Scraps with 4 Gold Ingots.
- This shapeless recipe produces 1 Netherite Ingot, regardless of placement.
- Craft 4 Netherite Ingots—one for each piece of armor.
Tip: Gold is abundant in the Nether’s Basalt Deltas and Nether Wastes. Mine there to save time.
Step 5: Obtain and Duplicate Netherite Upgrade Smithing Templates
The Netherite Upgrade Smithing Template is mandatory for turning Diamond armor into Netherite armor.
Key requirements:
- Templates generate in Bastion Remnants, most reliably inside Treasure Rooms.
- You need 4 templates, one for each armor piece.
- Templates can be duplicated using:
- 1 Netherite Upgrade Template
- 7 Diamonds
- 1 Netherrack
Tip: Secure at least one template safely at your base before exploring more Bastions or attempting duplication.
Step 6: Craft or Locate a Smithing Table for Armor Upgrades
The Smithing Table is your workstation for upgrading Diamond armor.
How to get one:
- Craft it using 2 Iron Ingots + 4 Wooden Planks.
- Or find one in a Toolsmith’s house in a village.
Place it in a safe area near storage and crafting stations—you’ll use it repeatedly.
Tip: Keep your Smithing Table near your enchantment setup so you can enchant armor immediately after upgrading if needed.
Step 7: Upgrade Diamond Armor Into Netherite Armor at the Smithing Table
Now comes the final transformation—turning your well-prepared Diamond set into a full Netherite armor set.
Upgrade steps:
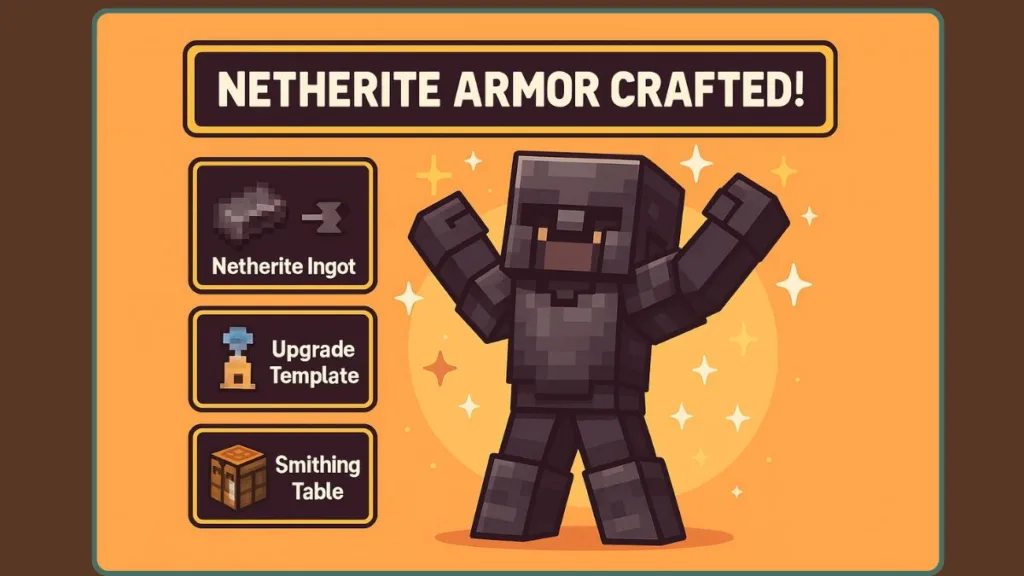
- Insert a Netherite Upgrade Smithing Template into the top slot.
- Place your Diamond armor piece in the middle slot.
- Add 1 Netherite Ingot in the right slot.
- Collect your upgraded Netherite Armor.
Repeat this process for all four pieces:
- Netherite Helmet
- Netherite Chestplate
- Netherite Leggings
- Netherite Boots
With each upgrade, you gain superior durability, powerful knockback resistance, and the signature lava-proof safety that makes Netherite the peak of Minecraft armor progression.
Tip: Upgrade your Chestplate and Leggings first—they offer the largest defensive benefit.
Each step brings you closer to a full armor set built for end-game survival, exploration, and combat. By staying prepared, mining efficiently, and using your resources wisely, you’ll reach the point where the Nether’s toughest challenges feel manageable—and the Ender Dragon feels like your next
Optional: Customize Your Netherite Armor With Trims
Once your full Netherite armor set is ready, you can elevate it even further with armor trims—a feature that lets you personalize your gear with patterns and colors while keeping all the strength and durability Netherite is known for. These trims don’t increase protection, but they add style, personality, and a strong visual reward for your hard work.
Where to Find the Best Armor Trim Templates
Each trim comes from a specific in-game structure, encouraging deeper exploration and rewarding players who venture into dangerous territories:
- Sentry Trim – Found in Pillager Outpost chests; a great early-game decorative option.
- Ward Trim – Discovered in Ancient City chests; perfect for players exploring the eerie Deep Dark.
- Silence Trim – One of the rarest trims in Minecraft, located in Ancient Cities but with significantly lower spawn chances.
Trim templates are single-use, meaning each application consumes one. To avoid losing your rare finds, you can duplicate any template using:
- 1 Armor Trim Template
- 7 Diamonds
- 1 matching block (such as Netherrack for certain templates)
This duplication method lets you preserve valuable trims while still applying them to your armor.
How to Apply Armor Trims to Netherite Gear
To customize your armor with trims:
- Place your Smithing Table where it’s safe and easy to access.
- Insert the Armor Trim Smithing Template into the first slot.
- Add your Netherite armor piece—Helmet, Chestplate, Leggings, or Boots.
- Insert a color-defining material such as Iron, Gold, Copper, Amethyst, Redstone, or Netherite.
- Collect your upgraded armor with its new visual design.
Once applied, the trim pattern replaces any previous one, so choose your design with intention.
Customization Tips for Stunning Netherite Armor
Use contrasting colors: Light materials like Iron, Gold, or Quartz stand out beautifully against Netherite’s dark tone.
Follow a consistent theme: Matching trim materials across all pieces creates a clean, unified aesthetic.
Duplicate rare trims before using: Especially trims like Silence, which are extremely difficult to obtain again.
Experiment with different materials: Each one gives your armor a unique accent color, letting you match your world’s theme or your personal playstyle.
With trims applied, your Netherite armor becomes more than just the strongest set in Minecraft—it becomes a reflection of your creativity and your achievements. Whether you’re battling bosses, exploring biomes, or simply showing off to your friends, your customized armor will make you stand out in every way.
Best Enchantments for Netherite Armor
Once your Netherite armor is fully crafted and customized, the next move is to unlock its full potential through carefully chosen enchantments. These upgrades turn your powerful set into a long-lasting, highly effective defense system—one built to handle everything from burning Nether tunnels to high-risk boss fights.
Essential Defense: Core Enchantments You Should Always Have
Protection IV — The All-Round Shield
Protection IV reduces most damage types (melee, ranged, fire, explosions, and fall damage). It’s the go-to enchantment for general survivability and should be on every armor piece if you want broad protection.
Unbreaking III — Make Your Gear Last
Unbreaking III greatly slows durability loss, keeping your Netherite set reliable during long expeditions and repeated combat. Pair this with Mending for near-permanent gear.
Mending — Self-Repairing Armor
Mending uses XP orbs to repair your armor automatically. With Mending, your Netherite set becomes almost self-sustaining—ideal for players who grind mobs or farms frequently.
Tip: Prioritize Mending and Unbreaking III early—these two together maximize long-term value and reduce repair overhead.
Specialized Protection: Enchantments for Specific Situations
Feather Falling IV (Boots) — Survival from Heights
If you spend time on cliffs, in mines, or around tall builds, Feather Falling IV drastically reduces fall damage—boots are the only place for this.
Tip: For exploration-heavy playstyles, enchant boots with Feather Falling IV before heading into large vertical builds or End raids.
Respiration III & Aqua Affinity (Helmet) — Master the Oceans
- Respiration III extends underwater breathing time.
- Aqua Affinity speeds up underwater mining and block placement.
Use these if you do ocean exploration, monument raids, or large underwater builds.
Depth Strider III or Frost Walker II (Boots) — Choose Your Mobility
- Depth Strider III improves underwater movement.
- Frost Walker II freezes water to ice as you walk—great for fast surface travel.
Choose one based on whether you explore oceans or prefer surface mobility.
Thorns III — Reactive Damage at a Cost
Thorns III damages attackers but accelerates durability loss. Useful in PvP or mob-dense encounters—use sparingly.
Tip: If you use Thorns, pair it with Unbreaking III and Mending to offset the extra wear.
Piece-by-Piece: What to Enchant on Each Armor Slot
- Helmet: Protection IV + Respiration III + Aqua Affinity + Unbreaking III + Mending
- Chestplate: Protection IV + Unbreaking III + Mending + (Optional: Thorns III)
- Leggings: Protection IV + Unbreaking III + Mending
- Boots: Protection IV + Feather Falling IV + (Depth Strider III or Frost Walker II) + Unbreaking III + Mending
Tip: Apply broad protection enchants (Protection IV, Unbreaking III, Mending) first on Diamond armor before upgrading to Netherite—it’s more XP-efficient.
Pro Tips for Smart, Cost-Effective Enchanting
- Combine books first, apply last: Use an anvil to merge enchanted books before applying them to armor—this saves XP and avoids “Too Expensive” issues.
- Enchant Diamond, then upgrade: Enchanting while the armor is still Diamond is cheaper; upgrade to Netherite afterward.
- Balance utility vs durability: Some enchants (like Thorns) add utility but speed up wear—choose them only if they match your playstyle.
- Prioritize survivability: For survival or hardcore runs, pick enchantments that boost protection and longevity over niche effects.
With these enchantment choices and placement strategies, your Netherite armor becomes a balanced, resilient system tailored to your playstyle—ready for deep exploration, brutal combat, and endgame challenges.
FAQ about netherite armor
As you work toward completing your Netherite armor set, it’s natural to have some common questions—especially with recent changes to how upgrades work.
How do you get Netherite armor in Minecraft?
You get Netherite armor by upgrading your Diamond armor at a Smithing Table. For each upgrade, you’ll need a Netherite Upgrade Smithing Template, the Diamond armor piece you want to improve, and a Netherite Ingot. Once everything is placed into the Smithing Table, the Diamond armor instantly turns into Netherite and keeps all its existing enchantments.
How many Netherite Scraps are needed for a full armor set?
A complete Netherite armor set requires 16 Netherite Scraps. These scraps combine with 16 Gold Ingots to create 4 Netherite Ingots, which is exactly what you need for upgrading every piece of Diamond armor.
What is the best level to find Ancient Debris?
The most reliable level for finding Ancient Debris is Y-level 15. While the block can generate anywhere from Y-levels 8 through 22, level 15 consistently provides the highest concentration and makes mining much more efficient.
Can Netherite armor burn in lava?
No. Netherite armor is completely immune to fire and lava. Even if it falls into lava, it will not burn or disappear. It also floats on lava, making recovery much safer.
Is Netherite armor better than Diamond armor?
Yes. Netherite armor offers higher durability, built-in knockback resistance, and lava/fire immunity, making it significantly more reliable in dangerous areas. While protection values stay the same as Diamond, the added durability and utility make Netherite the superior choice.
How do you use the Netherite Upgrade Smithing Template?
To use the template, place it in the top slot of the Smithing Table, add your Diamond armor piece in the center slot, and finally insert a Netherite Ingot in the last slot. The upgraded Netherite armor will appear instantly, keeping all enchantments and custom names.
What enchantments work best with Netherite armor?
The strongest enchantments for Netherite armor are Protection IV, Unbreaking III, and Mending, which together offer outstanding defense, durability, and self-repair. For boots, Feather Falling IV, Depth Strider III, or Frost Walker II provide excellent mobility and safety. For helmets, Respiration III and Aqua Affinity help when exploring underwater areas.
Final Thoughts: Why Netherite Armor Truly Matters
Reaching a full set of Netherite armor is more than just an upgrade—it’s a milestone that reflects your dedication, your survival skills, and your readiness to take on Minecraft’s toughest challenges. Netherite gear stands out because it is stronger and more durable than Diamond, offering unmatched protection for any biome or boss encounter. It also remains completely immune to fire and lava, ensuring your hard-earned gear survives even in the most hostile environments.
What makes this achievement satisfying isn’t just the armor’s exceptional durability or its lava-proof safety—it’s the journey you’ve taken to earn it. Gathering materials, navigating the Nether, mastering upgrades, and enhancing your armor with powerful enchantments all contribute to a genuine sense of progression. You’re not just wearing stronger gear—you’re wearing proof of your growth as a player.
Step Into Adventure With Confidence
Now that you know exactly how to gather, craft, upgrade, customize, and enchant your armor, you’re fully equipped for your next big adventure. Whether you’re venturing into new biomes, raiding dangerous structures, or preparing for a showdown with the Ender Dragon, your Netherite armor gives you the durability and security to explore without fear.
Tip: Keep a few Fire Resistance potions in your inventory when exploring the Nether—even though your armor won’t burn, you still can.
You’ve put in the work, you’ve gathered the resources, and you’ve mastered the process. Now it’s time to enjoy the rewards.
Step forward with confidence—your Netherite armor is ready, and so are you. Go make your adventures legendary.
Useful Official Resources
If you’d like to explore the technical details behind Netherite straight from official sources, these links will help you dive deeper. They offer reliable, up-to-date information directly from Minecraft’s creators and community-maintained documentation.
Mojang Studios – Taking Inventory: Netherite Ingot: A simple breakdown from the official Minecraft website explaining what Netherite is, why it matters, and how it upgrades your gear.
Minecraft Wiki – Netherite: A detailed look at Netherite’s stats, durability, upgrade system, and behavior in the world—including fire and lava immunity.
Visit Our Post Page: Blog Page