
Are you looking for a detailed guide to download and install Epson ScanSmart software on your PC? Learn how to install Epson ScanSmart on your computer for Windows and macOS quickly and efficiently.
Get Your Epson Scanner Up and Running Effortlessly
Setting up a new scanner can feel overwhelming, especially when the installation process involves multiple steps and software downloads. Epson ScanSmart is designed to simplify this process, offering a streamlined way to scan, save, and share documents without unnecessary complications.
Whether you’ve just purchased an Epson scanner or need to reinstall the software after upgrading your computer, having the right guidance ensures a smooth setup.
This guide walks you through each step, from locating the correct software on Epson’s official support site to completing the installation on your computer. By following these instructions, you’ll be able to start scanning with confidence, using all the features your Epson device has to offer.
Why Choose Epson ScanSmart for Your Scanning Needs
When it comes to managing documents efficiently, choosing the right software can make all the difference. Epson ScanSmart is more than just a scanning tool—it’s a comprehensive solution designed to streamline document workflows and enhance productivity.
Effortless Scanning in a Few Clicks
One of the standout features of ScanSmart is its ability to perform one-click scanning. Whether you’re saving files as PDFs, sending them via email, or uploading to a cloud storage service, the process is intuitive and fast. This eliminates the need for multiple steps or switching between different applications.
Built-In OCR for Searchable Documents
With Optical Character Recognition (OCR) integrated, ScanSmart converts scanned documents into searchable and editable text. This is particularly useful for business reports, contracts, and receipts, allowing you to find specific information quickly without manually scanning each page.
Optimized Interface for Productivity
The software features a clean, modern interface that organizes tools and options logically. This minimizes confusion, especially for first-time users, and ensures that every function—from adjusting scan quality to choosing file formats—is easily accessible.
Supports Multi-Page and High-Volume Scanning
For scanners equipped with an auto document feeder (ADF), ScanSmart efficiently handles multi-page documents. This is ideal for office environments or any scenario where scanning several pages at once is required, saving time and reducing manual effort.
Seamless Integration with Epson Devices
ScanSmart is specifically designed to work with a variety of Epson scanners and all-in-one printers, ensuring compatibility and stability. By using software tailored to your device, you can avoid common conflicts and enjoy a reliable scanning experience.
Verify System Requirements Before Installation
Before downloading or installing Epson ScanSmart, it’s essential to confirm that your computer and scanner meet the necessary system requirements. Ensuring compatibility beforehand prevents installation errors and guarantees a smooth scanning experience.
Supported Operating Systems
Epson ScanSmart is designed to work on multiple platforms, including:
- Windows 10 and Windows 11 (64-bit)
- macOS (latest versions supported by Epson)
Selecting the correct operating system during the download process ensures that the installer provides the appropriate drivers and utilities for your device.
Hardware Considerations
- Processor and Memory: Your computer should meet or exceed the minimum processing speed and RAM specified on the Epson support site. This allows the software to handle large or multi-page scans efficiently.
- Disk Space: Ensure sufficient free storage for the application and temporary scan files. Large scans, especially in PDF or high-resolution formats, can consume significant space.
Connection Requirements
- USB Connection: A direct cable connection may be required for certain Epson scanner models.
- WiFi or Network Connection: For wireless-enabled devices, verify that your computer is connected to the same network as your scanner to avoid connectivity issues.
Driver Dependencies
Some Epson scanners require installation via the Drivers and Utilities Combo Package, which includes ScanSmart along with necessary scanner drivers. Checking the support page for your specific printer model ensures you download the correct package and avoid compatibility conflicts.
Additional Recommendations
- Close other scanning applications before installation to prevent software conflicts.
- Ensure that your operating system is up to date, including security patches and updates, for a stable installation process.
How to Download Epson ScanSmart: A Step-by-Step Guide
Downloading Epson ScanSmart from the official source is the first crucial step in ensuring a safe and smooth installation. Using the correct version for your scanner model and operating system prevents potential errors and guarantees access to all the software’s features. Proper preparation at this stage saves time and avoids frustration during installation.
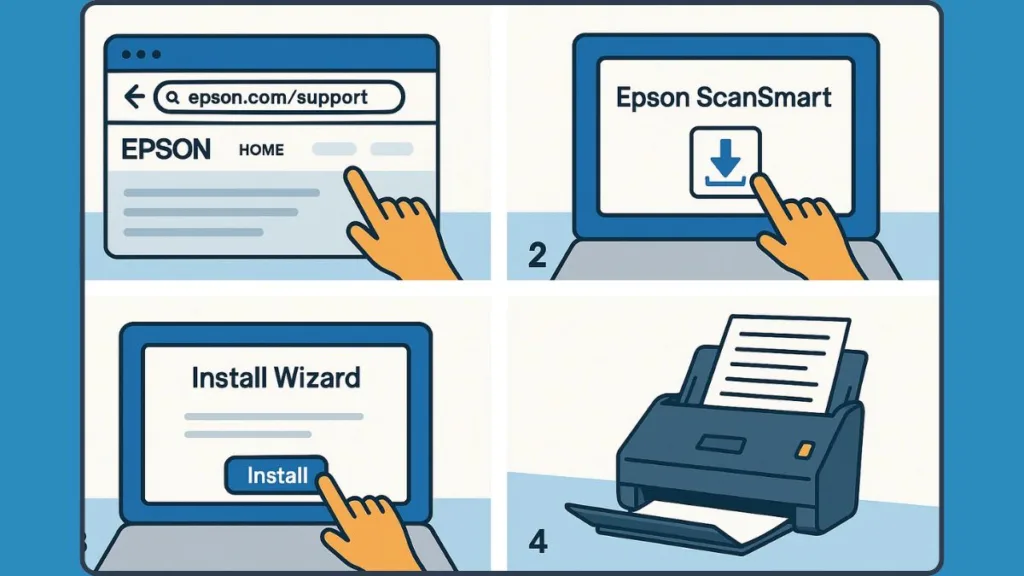
Access the Official Epson Support Site
Begin by visiting the Epson support website, which is the only reliable source for obtaining genuine software. Open a web browser and navigate to Epson Support.
In the search bar, type your scanner or all-in-one printer model accurately. Entering the exact model ensures that the support site provides the appropriate drivers and utilities for your device. If you are unsure of your exact model, you can usually find it printed on the scanner body or in the original documentation.
Important Note: Avoid using third-party websites for downloading software, as they may host outdated or unsafe versions that can compromise your system.
Select Your Scanner and Operating System
After entering your product model, select your scanner from the list displayed. For series-based models, make sure to choose the exact model to prevent downloading incompatible files.
Next, select your operating system from the dropdown menu. Whether you are using Windows 10, Windows 11, or macOS, choosing the correct system ensures the installer will function properly. Some systems may be automatically detected by Epson; in such cases, verify that the detected version is correct before proceeding.
Tip: If your computer has multiple operating systems installed or has recently been upgraded, double-check that you select the correct version to avoid installation errors.
Locate the ScanSmart Utility
Scroll to the Drivers and Utilities section and look for “ScanSmart” in the list of available software. Depending on your scanner model, it may appear as a standalone installer or as part of the Drivers and Utilities Combo Package, which includes both the software and necessary drivers.
Click Download to start obtaining the file. The installer’s name typically resembles ScanSmart_Setup.exe for Windows or a similar format for macOS.
Important Note: Using the Combo Package is recommended for certain Epson scanners, as it ensures that all components required for scanning, including drivers, are installed correctly.
Save the Installer Safely
When prompted, choose a known location on your computer to save the downloaded file, such as the Downloads folder or a dedicated installation folder. This makes it easier to locate the file later during the installation process.
Tip: Avoid changing the file name to prevent confusion during installation. Keeping the default name also makes it easier to reference the file if you need to reinstall in the future.
Verify the Download
Ensure the download completes without interruption. Check the file size against the information on the support page to confirm that the download is complete and not corrupted.
Important Note: If the download is interrupted or the file appears incomplete, delete the partial file and restart the download from the official Epson website. Do not attempt to use a partially downloaded installer.
Preparation Before Installation
Before running the installer, close any other scanner-related applications. This prevents conflicts and ensures that ScanSmart can access your scanner without interference.
Confirm that your scanner is powered on and connected to your computer via USB or WiFi, depending on your device. A stable connection is essential for the software to detect the scanner during installation.
Tip: If you experience connectivity issues, try restarting both the scanner and your computer before starting the installation.
By following these steps carefully, you ensure that the Epson ScanSmart software is downloaded safely, correctly matched to your device, and ready for installation. This preparation sets the stage for a smooth and error-free setup process, allowing you to begin scanning efficiently and taking full advantage of your Epson device’s features.
How to Install Epson ScanSmart on Your Computer
Installing Epson ScanSmart is a straightforward process when approached methodically. Following each step carefully ensures that the software is configured correctly and your scanner is fully functional without errors.
Step 1: Locate and Open the Installer
Navigate to the folder where you saved the ScanSmart installer during the download process. For Windows users, the file usually appears as ScanSmart_Setup.exe, while macOS users may see a .dmg or .pkg file.
Double-click the file to begin the installation. If prompted by your operating system to allow changes, select Yes or Open, which grants the installer permission to make the necessary modifications on your computer.
Important Note: Running the installer from a location other than where it was downloaded, such as a network drive, can occasionally lead to errors. Always ensure the file is on your local system.
Step 2: Follow the Installation Wizard
The installation wizard will guide you through each stage. Begin by reviewing the license agreement. Carefully read the terms and click Agree to continue.
Next, you may be asked to select an installation type. For most users, the default settings are recommended, as they include all necessary components for full functionality. Advanced users may choose a custom installation to specify the installation location or selectively install features.
Tip: Use the default installation unless you have a specific reason to change locations. This prevents missing dependencies or driver conflicts.
Step 3: Install Required Drivers
For certain Epson scanners, the installer may prompt you to install additional drivers or the Drivers and Utilities Combo Package. This step ensures that ScanSmart can communicate with your scanner efficiently.
Follow the on-screen instructions to complete the driver installation. The system may request a restart after installation to ensure all components are properly initialized.
Important Note: Do not skip driver installation, even if your scanner was previously recognized by your computer. Drivers are crucial for avoiding connectivity and scanning errors.
Step 4: Complete Installation
Once the software and drivers are installed, the wizard will confirm that the process is complete. Select Finish to close the installer.
Open Epson ScanSmart from your computer’s Start menu on Windows or the Applications folder on macOS. On first launch, the software may perform a quick setup check, ensuring it detects your connected scanner.
Tip: If the scanner is not detected immediately, check the USB or WiFi connection and ensure the scanner is powered on. Restarting the software often resolves detection issues.
Step 5: Verify Functionality
After launching the application, perform a test scan to confirm that everything is working correctly. This allows you to check that all features, including OCR for searchable PDFs, scan-to-cloud options, and multi-page scanning, are operational.
Important Note: If any functions fail during the test scan, revisit the installation steps, ensure all drivers are installed, and check that your operating system is compatible. Epson’s support site provides additional troubleshooting resources if needed.
Step 6: Explore Software Features
Once installation is verified, take a few minutes to familiarize yourself with the interface and settings. Configure scan profiles, choose preferred file formats, and explore the cloud or email integration options to maximize efficiency.
Tip: Setting up custom scan profiles for frequently used tasks can save time and reduce errors in repetitive scanning processes.
By carefully following these steps, you can ensure that Epson ScanSmart is installed correctly, fully functional, and ready to support your document scanning needs. A methodical installation helps prevent common problems, allowing you to take full advantage of the software’s capabilities from day one. Read this Official Guide From Epson for more detail.
Troubleshooting Common Installation Issues with Epson ScanSmart
Even with careful preparation and installation, users may occasionally encounter issues with Epson ScanSmart. Understanding common problems and their solutions ensures that scanning operations remain smooth and uninterrupted.
How Do I Install ScanSmart on My Computer if It’s Not Detected?
One of the most frequent issues is when ScanSmart fails to recognize the connected scanner. This can occur due to incorrect connections, outdated drivers, or network configuration problems.
To resolve this, confirm that the scanner is powered on and properly connected via USB or WiFi. For networked devices, ensure that your computer and scanner are on the same WiFi network. If detection fails, reboot both the computer and scanner. Additionally, verify that the Drivers and Utilities Combo Package has been installed correctly, as missing drivers are a common cause of detection errors.
Tip: Running a small test scan immediately after installation helps confirm that the device is recognized and functional.
Where Can I Find the Epson ScanSmart Software if Installation Fails?
Occasionally, users may encounter installation errors or interruptions due to incomplete downloads, insufficient permissions, or conflicts with other software.
Ensure the downloaded installer is complete and not corrupted by checking the file size against Epson’s support page. Close all other scanning or printing applications before attempting installation again. Running the installer as an administrator on Windows or using an account with admin privileges on macOS can resolve permission issues. Temporarily disabling any security software that might block the installation process may also help, but remember to re-enable it afterward.
Important Note: Attempting to install using a partial or corrupted file can lead to persistent software malfunctions. Always restart the download if any issue occurs.
Why Is Epson ScanSmart Not Working Properly After Installation?
Some users may find that ScanSmart opens but fails to perform scans properly, or features like OCR and multi-page scanning do not work as expected.
Confirm that the scanner model is supported by ScanSmart by checking the product’s support page for compatibility. Ensure the latest version of ScanSmart is installed, as Epson periodically releases updates to resolve bugs and enhance functionality. Also, verify that your operating system meets system requirements and that all recent updates have been installed.
Tip: Reinstalling ScanSmart using the Drivers and Utilities Combo Package can often resolve persistent issues by refreshing all drivers and software components.
Why Is My Scanner Not Connecting Over WiFi?
For scanners connected via WiFi, connection drops or scanning failures can occur due to network instability or configuration issues.
Confirm that your computer is connected to the same network as the scanner. Restart your router, scanner, and computer if connection issues persist. Reducing network interference by keeping the scanner and computer close to the WiFi source and minimizing obstacles can also help.
Important Note: Wired USB connections can sometimes bypass network-related issues, providing a reliable alternative if WiFi scanning proves problematic.
Do I Need to Install a Driver for Epson ScanSmart If I See Error Messages?
Users may experience error messages due to conflicts with other installed scanning applications or outdated drivers.
Close any other scanning or printer software before using ScanSmart. Ensure that all relevant device drivers are up to date and that no background software is interfering with scanner operations. Epson’s official support resources can provide guidance for specific error codes and recommended solutions.
Tip: Regularly checking for driver and software updates helps prevent many common errors and ensures full functionality of all ScanSmart features.
FAQs
This section addresses common questions users have when installing and using Epson ScanSmart, providing clear, actionable answers.
How Do I Install ScanSmart on My Computer?
To install, download the ScanSmart installer from Epson’s official support site, run the installation wizard, and follow the on-screen prompts. Ensure your scanner is connected and all required drivers are installed.
Where Can I Find the Epson ScanSmart Software?
The software is available exclusively on Epson’s official support website. Search for your scanner or printer model, select your operating system, and download the ScanSmart utility or the Drivers and Utilities Combo Package.
Do I Need to Install a Driver for Epson ScanSmart?
Yes. Installing the Drivers and Utilities Combo Package ensures that ScanSmart communicates properly with your scanner and provides full functionality, including multi-page scanning and OCR.
Why Is Epson ScanSmart Not Working?
Common causes include incorrect driver installation, network or USB connection issues, or system incompatibility. Reinstalling the software and drivers, checking connections, and ensuring system requirements are met usually resolves the problem.
How Do I Scan a Document Using Epson ScanSmart?
Open ScanSmart, select your scanner, choose scan settings (file format, resolution, and OCR if needed), and click Scan. For multi-page documents, use the auto document feeder (ADF) if available.
Final Tips and Best Practices for Using Epson ScanSmart
After installing and setting up Epson ScanSmart, following a few best practices ensures long-term efficiency and a smooth scanning experience.
Keep Software and Drivers Updated
Regularly check Epson’s official support site for updates to ScanSmart and associated drivers. Updates often fix bugs, improve compatibility with operating systems, and enhance performance. Ensuring your software is current prevents many common scanning issues.
Organize Scan Profiles and File Storage
Create custom scan profiles for frequently used tasks, specifying file formats, resolutions, and storage locations. Consistently saving files in organized folders helps maintain easy access and prevents misplacement of scanned documents.
Utilize OCR and Cloud Features Effectively
Take advantage of OCR (Optical Character Recognition) for searchable PDFs, making your documents easier to edit and locate. Linking ScanSmart to your preferred cloud services allows seamless file sharing and backup, reducing the risk of data loss.
Maintain Your Scanner and Connectivity
Regularly clean your scanner glass and ensure the auto document feeder (ADF) is free from dust or debris. For networked devices, confirm stable WiFi or Ethernet connections to prevent interruptions during scanning.
Tip: Performing periodic test scans helps identify minor issues early, ensuring your scanner remains fully functional.
Conclusion: Efficient Scanning Starts with Proper Setup
Setting up Epson ScanSmart correctly transforms your scanner into a powerful productivity tool. From downloading the correct software and installing drivers to configuring scan profiles and exploring features like OCR and cloud integration, each step contributes to a smoother workflow.
By following the steps outlined in this guide, users can avoid common installation pitfalls, troubleshoot issues efficiently, and take full advantage of their Epson scanner or all-in-one printer. Proper setup, regular maintenance, and smart organization of scanned documents ensure that you achieve fast, accurate, and reliable scanning results every time.
Tip: To keep your scanner performing optimally, regularly check for software and driver updates using the Epson Software Updater. This ensures compatibility with the latest operating systems and gives you access to new features and improvements.
Visit Our Post Page: Blog Page