
Windows 11 keeps changing your default printer? Learn how to change the default printer in Windows 11, stop automatic switching, and lock your settings permanently.
If you regularly print documents, labels, invoices, or photos, choosing the right default printer in Windows 11 can save you time and prevent costly mistakes.
When Windows sends files to the wrong printer, it slows you down and creates unnecessary frustration.
Imagine hitting “Print” on an urgent shipping label, only to realize it was sent to the slow, high-quality photo printer in the other room, or worse, to a virtual printer like “OneNote“ that doesn’t produce a hard copy at all. This usually happens when you use more than one printer at home or at work and Windows decides to manage the printer for you based on its internal algorithms.
In this comprehensive guide, you’ll learn how to change the default printer in Windows 11, how to set a permanent default printer, and how to stop Windows 11 from changing the default printer automatically.
You’ll also discover multiple methods—using System settings, the classic Control Panel, and command-line tools like Command Prompt and PowerShell—along with practical fixes if you can’t set the default printer in Windows 11. Everything is explained directly to you, step by step, so you can regain full control over your printing workflow and ensure your documents land in the right output tray every time.
Understanding the Default Printer Function in Windows 11
Your default printer is the default print device that Windows 11 automatically selects whenever you click Print, unless you manually choose a different one in the print dialog box. This applies to standard documents, PDFs, images, emails, and web pages printed from any application, including Microsoft Word, Excel, Google Chrome, and Adobe Acrobat.
When you make a printer default in Windows 11, all print jobs from these apps are routed to that hardware or virtual device by default. This helps you avoid repeatedly selecting a printer from a long list of devices (which might include fax machines or “Microsoft Print to PDF”) and reduces the chance of sending sensitive documents to the wrong device in a shared office environment.
The default printer is configured per user account, not system-wide. That means if multiple users share the same PC, such as family members on a home computer, each of you can have a different default printer preference.
Windows 11 may also adjust the default printer based on location, network connection (Ethernet vs. Wi-Fi), or recent usage history, which is why understanding Windows 11 default printer settings is so important for maintaining a consistent experience.
The Reason Your Default Printer Keeps Changing Automatically
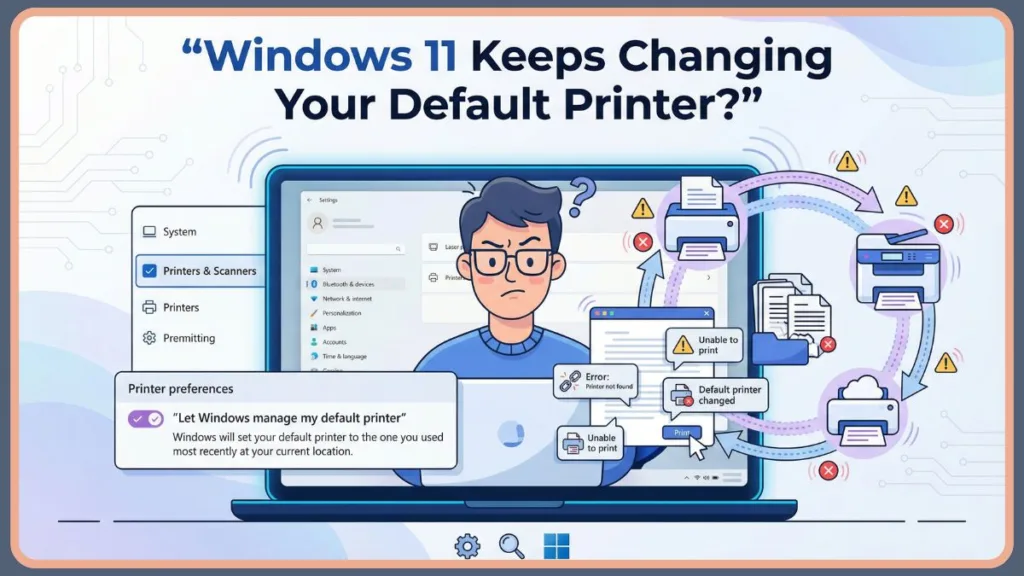
If you’re wondering, “Why does my default printer keep changing in Windows 11?”, the answer usually lies in one specific automated setting: “Let Windows manage my default printer.”
When this option is enabled, Windows automatically switches the default printer to the one you used most recently or the one associated with your current network profile.
For example, if you print a boarding pass at the office and later connect to your home Wi-Fi to print a recipe, Windows may still try to use the office printer as the default because it was the last “active” device. This behavior is often referred to as Windows 11 set default printer by location or dynamic printer switching.
While this feature can be helpful for laptop users who move between networks often and want their device to “guess” the right printer, it becomes a problem when you want to set a permanent default printer in Windows 11 and maintain full manual control.
It creates inconsistency, leading to “Printer Offline” errors when the system defaults to a device that isn’t currently available.
The Recommended Way to Set Default Printer in Windows 11
The most reliable and beginner-friendly way to set the default printer in Windows 11 is through the built-in, modernized System settings app.
This method works seamlessly with all types of devices, including USB printers, wireless Wi-Fi printers, and shared network printers from major manufacturers like HP, Canon, Epson, and Brother.
Setting Your Preference Using the Settings App
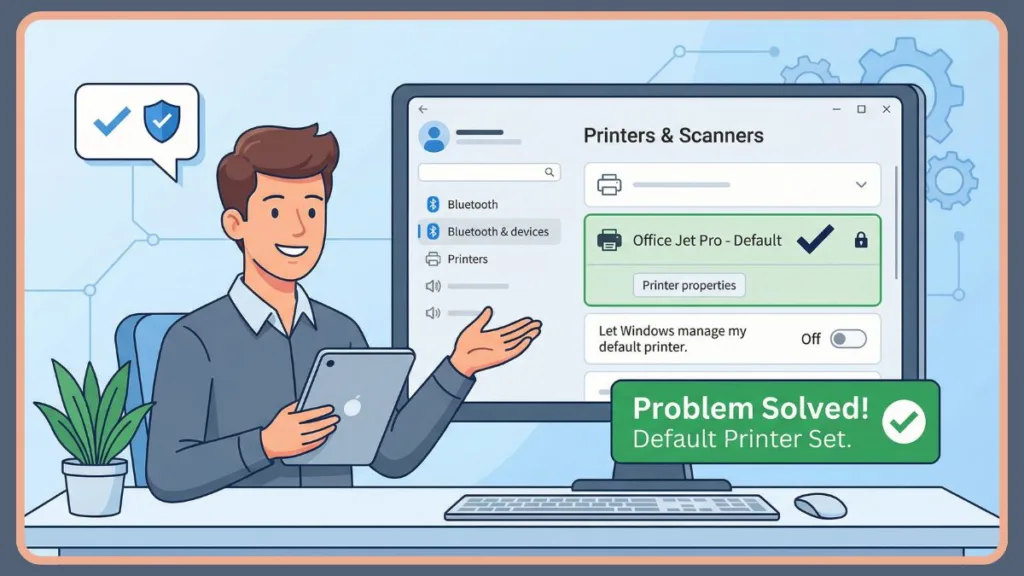
To begin, press Windows + I to open System settings. From there, click Bluetooth & devices from the left sidebar, then select Printers & scanners. This area contains all your Printers & Scanners settings in one place, allowing you to view print queues, manage drivers, and run troubleshooters.
Scroll down to the “Printer preferences” section and locate the toggle switch for “Let Windows manage my default printer.”
Turn this option OFF so you can manually control the default printer. If this is left On, the option to set a default will often be greyed out or hidden.
Once disabled, scroll back up to the list of installed printers and click on the specific printer you want to use. Inside the printer’s individual settings page, click the Set as default button (usually located near the top right, next to the “Print test page” option).
After completing these steps, Windows 11 marks the printer status as Default, ensuring that future print jobs automatically use that printer unless you explicitly choose otherwise in the application’s print menu.
Disabling the Let Windows Manage My Default Printer Feature
Turning off automatic printer management is essential if you want consistent, predictable printing behavior. If you leave this setting enabled, Windows can continue switching your default printer after system restarts, network changes, or even Windows updates.
This setting matters because it enables location-based printer switching, which often leads to confusion. By disabling it, you prevent Windows from overriding your manual printer selection and ensure a more reliable setup.
You should keep this option turned off if you always use the same printer, want full control over your default print device, or work from a fixed home or office environment.
You may consider keeping it on only if you frequently travel between locations and rely on different printers for each network, trusting Windows to make the switch for you.
Changing the Default Printer via the Classic Control Panel
If you prefer a traditional interface or need direct access to legacy printer tools, you can change the default printer in Windows 11 using the Control Panel style. This method is still fully supported and gives you access to classic printer options, which some IT professionals find faster for managing older devices.
Step by Step Instructions for Control Panel
- Open the Start menu, type Control Panel, and launch it.
- Navigate to Hardware and Sound, then select Devices and Printers. (If you don’t see this, switch the “View by” option in the top right to “Category”).
- Here, you’ll see all connected printers, faxes, and multimedia devices. Find the printer you want to use, right-click on it, and choose Set as default printer from the context menu.
- You will see a small green checkmark appear on the printer icon, confirming it is now the default. This visual indicator is unique to the Control Panel view and provides immediate confirmation.
Locating the Devices and Printers Menu in Windows 11
Windows 11 hides the classic Devices and Printers view deeper in the menus compared to Windows 10, which can make it harder to find if you’re used to older versions. You can still access it by going to Control Panel → Hardware and Sound → Devices and Printers.
Pro Tip: You can open this folder instantly without navigating menus by pressing Windows + R on your keyboard, typing
control printers, and hitting Enter. This command shortcuts directly to the legacy printer management screen.
Setting the Default Printer Using Command Prompt for Advanced Users
If you’re an advanced user, IT administrator, or working in Safe Mode, you can set the default printer in Windows 11 via Command Prompt using built-in management commands. This method is also useful for automation, creating batch files for office deployments, and scripting user environments.
Executing the Command to Set a Default Printer
Start by opening Windows Terminal or Command Prompt (Search for “cmd” in the Start menu, right-click, and choose Run as Administrator to ensure you have necessary permissions).
- First, run the command that displays all printers to identify the exact name of your printer as the system sees it:
wmic printer get name,default - After noting the exact printer name (e.g., “HP LaserJet 1010” or “Canon MG3000 Series”), run the following command to assign it as the default printer:
wmic printer where name="HP LaserJet 1010" call setdefaultprinter
When the command completes successfully, it will display “Method execution successful,” and the printer becomes the default print device immediately without requiring a restart.
Note for Windows 11 24H2 Users: Microsoft is gradually deprecating the WMIC tool in favor of PowerShell. If the command above does not work on your build, you can use PowerShell instead.
Open PowerShell as Administrator and run: $printer = Get-WmiObject -Class Win32_Printer -Filter "Name='HP LaserJet 1010'" $printer.SetDefaultPrinter()
Troubleshooting Steps When You Cannot Set a Default Printer
If you can’t set the default printer in Windows 11, or if the default printer option is missing or greyed out, the issue is usually related to system services, outdated drivers, or network connectivity problems.
- Run the Printer Troubleshooter: Go to Settings > System > Troubleshoot > Other troubleshooters. Find “Printer” in the list and click Run. This diagnostic tool can automatically detect and fix common spooler errors and registry issues.
- Restart the Print Queue: Restarting the Print Spooler service often resolves temporary glitches where the printer refuses to accept new status assignments. Press Windows + R, type
services.msc, find Print Spooler, right-click it, and select Restart. - Update Drivers: Updating your printer driver preferences through Device Manager or downloading the latest package from the manufacturer’s website (like HP Smart or Canon Support) ensures compatibility with Windows 11 updates.
- Re-add the Printer: Removing and re-adding the device using Add printer in Windows 11 settings can reset corrupted configurations. This forces Windows to reinstall the printer instance cleanly.
- Check Connectivity: If the printer appears offline, checking Ethernet cables, Wi-Fi connections, and printer status (toner, paper jams) can help fix printer offline Windows 11 issues that prevent it from being set as default.
Preventing Windows 11 from Automatically Switching Printers
To fully stop Windows 11 from changing the default printer, you must be proactive.
Disable automatic printer management (as shown above), avoid frequently switching manually between printers for single jobs, keep drivers up to date to prevent “ghost” printer installations, and try to use one primary printer per network.
These steps help maintain a stable and predictable default printer setup, preventing the operating system from reverting to “OneNote” or “Microsoft XPS Document Writer.”
Methods to Set a Permanent Default Printer for Enterprise
If you need stricter control—especially in business environments where employees share workstations—you may want to force default printer Windows 11 behavior using administrative policies.
Enforcing Default Printer Selection with Group Policy
Using Group Policy, you can disable automatic printer management and lock default printer settings for users on supported editions of Windows 11 (Pro, Education, and Enterprise).
- Press Windows + R, type
gpedit.msc, and press Enter to launch the Local Group Policy Editor. - Navigate to: User Configuration > Administrative Templates > Control Panel > Printers.
- Double-click on the policy named “Turn off Windows default printer management.”
- Select Enabled and click Apply.
This approach ensures that Windows will never attempt to change the default printer based on your location or network usage, overriding any user attempts to enable the “Let Windows manage” feature.
Creating Quick Access Shortcuts for Printer Settings
There is no built-in change default printer shortcut in Windows 11 on the desktop, but you can speed things up by pinning Printers & scanners to the Start menu, pinning the Devices and Printers folder from Control Panel to your Taskbar, or simply using Windows Search (Windows Key + S) to type “Printers” and quickly access printer settings.
Managing Other Essential Printer Tasks in Windows 11
Default printer problems are often connected to other printer-related tasks and maintenance.
These include wireless printer setup in Windows 11, troubleshoot printer connection Windows 11, remove printer Windows 11 to clear old drivers, and resolving persistent offline status issues. Managing these tasks proactively improves overall printing reliability and ensures your default choice remains available.
Common Questions About Windows 11 Printing
How do I make my printer the default in Windows 11?
You make your printer the default by opening Settings > Bluetooth & devices > Printers & scanners, turning off automatic printer management to unlock the setting, selecting your printer from the list, and clicking Set as default.
Why is Windows 11 changing my default printer automatically?
This usually happens because the feature Let Windows manage my default printer is enabled by default, or because your network or physical location changed, prompting Windows to guess which printer is nearest to you.
How do I turn off Let Windows manage my default printer?
Open Printers & scanners in System settings, scroll to Printer Preferences, and toggle the “Let Windows manage my default printer” option to Off.
Can I set a different default printer for different networks?
Windows 11 attempts to automatically manage printers by location, but it does not allow manual, user-defined “per-network” default printer assignments (e.g., “Always use HP at home, always use Xerox at work”) without using advanced third-party tools or location-aware scripts.
Final Thoughts on Managing Your Print Workflow
When you understand how to change the default printer in Windows 11, you gain full control over your printing experience, ensuring your documents go exactly where you intend them to.
Whether you use the modern System settings, the legacy Control Panel, or advanced Command Prompt tools, the most important step is disabling automatic printer management and choosing the printer that fits your workflow.
By keeping drivers updated, reviewing Windows 11 default printer settings regularly, and managing related printer tasks like spooler health and connectivity, you can avoid common printing issues and ensure smooth, reliable printing every day.
Visit Our Post Page: Blog Page