
Seeing unexpected Apple charges? Learn how to see subscriptions on iPhone, view active and expired plans, and stop unwanted renewals quickly.
If you’ve ever noticed a charge from Apple and wondered what it’s for, you’re not alone. Free trials often roll into paid plans without much warning, older apps may keep renewing quietly in the background, and Apple places subscription controls several layers deep inside Settings. Because of this, many users don’t realize they’re still paying for something until a charge appears on their card.
This guide shows you exactly how to see subscriptions on iPhone, how to identify active versus expired plans, and how to cancel, change, or renew them correctly. You won’t need to guess, dig through random menus, or rely on deleting apps. Everything you need is already on your iPhone—you just need to know where to look.
The Fastest Way to See Subscriptions on iPhone
This is the only location where Apple lists subscriptions billed through your Apple ID. If an app or service charges you via the App Store, it will appear here.
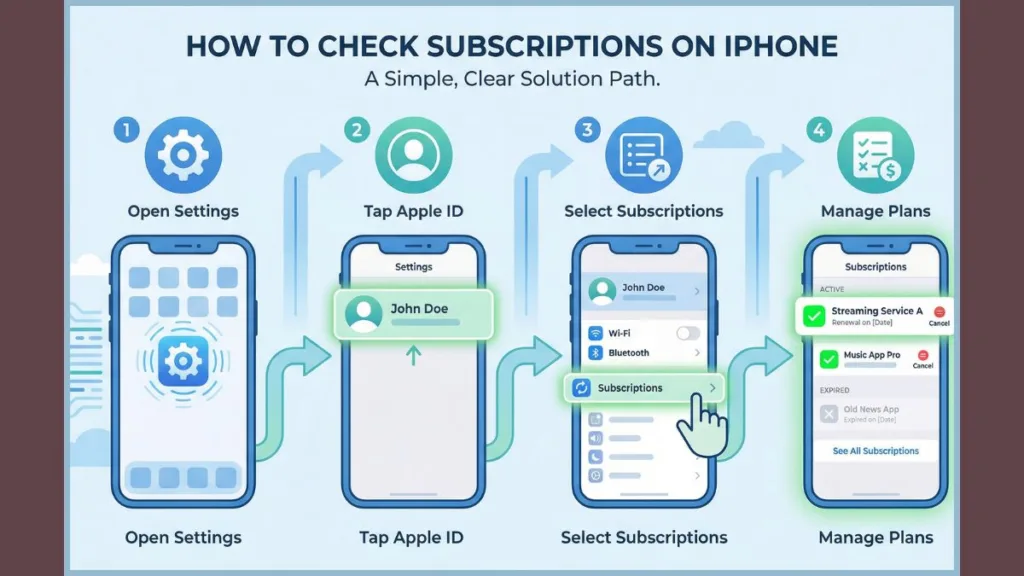
- First, open the Settings app on your iPhone. This is where Apple keeps all account-level controls.
- Next, tap your name (Apple ID) at the very top of the screen. This opens your Apple ID account settings.
- Finally, tap Subscriptions. This loads the full subscription manager tied to your Apple ID.
Once you reach the Subscriptions screen, you’ll see a complete overview of your subscription status.
- You’ll find Active subscriptions, which include anything currently billing or still within a free trial period.
- Below that, you’ll see Expired subscriptions, which are plans you previously canceled or that ended on their own.
- Each subscription clearly shows its renewal date, so you know exactly when the next charge is scheduled.
- You can also view the price and plan type, such as monthly, yearly, or tier-based options.
There are a few important limits you should understand right away.
- You cannot manually delete subscriptions from this list, even if they are expired.
- Expired subscriptions typically remain visible for up to one year before Apple removes them automatically.
- Deleting an app from your Home Screen does not cancel its subscription. Billing continues until you cancel it here.
If your main goal is to audit what you’re currently paying for, this Subscriptions screen is always the correct starting point.
Why Your iPhone May Not Be Showing All Subscriptions
If the Subscriptions page looks empty or seems to be missing something you expect to see, the issue is almost always related to account or billing setup.
- The most common reason is that you’re signed into the wrong Apple ID. Subscriptions are tied to the Apple ID used at the time of purchase, not to the device itself. To verify this, open Settings and confirm the email address shown under your name. If you’ve used multiple Apple IDs in the past, you’ll need to repeat the subscription check under each one.
- Another common reason is that the subscription is billed outside Apple. Services like Netflix or Spotify may not appear if you subscribed directly on their website or through another payment method. Apple only shows subscriptions that are billed through the App Store.
- Family Sharing can also cause confusion. Even if you’re part of a Family Sharing group, you can only see your own subscriptions. Shared subscriptions are visible and manageable only if the app supports sharing and the correct options are enabled.
Understanding these limits helps explain why a subscription may exist without appearing in your list.
How to Check Paid Subscriptions Using iPhone Purchase History
Many users assume subscriptions and purchase history are the same thing, but they serve different purposes and show different data.
Subscriptions show what is currently recurring and are used for canceling, changing, or renewing plans. Purchase History, on the other hand, shows everything you’ve ever been charged, including one-time purchases and refunds.
To view your Purchase History:
- Open Settings on your iPhone.
- Tap your name at the top of the screen.
- Select Media & Purchases, then tap View Account.
- Authenticate using Face ID, Touch ID, or your passcode.
- Tap Purchase History to load your transactions.
Inside Purchase History, you can do several things.
- You can see the exact prices charged and the billing method used.
- You can confirm subscription renewals, one-time purchases, and refunds.
- You can filter results by Last 90 Days, by year, or by item type if you’re looking for older charges.
There are also important restrictions here.
- You cannot delete purchase history entries.
- You can only hide items from the App Store’s Purchased list, not remove them from your account.
If you’re tracking spending or investigating a charge, use Purchase History. If you’re trying to stop future charges, return to the Subscriptions screen.
How to Cancel Subscriptions on iPhone and Stop Charges
If your priority is stopping a recurring charge, canceling the subscription is the only reliable solution.
- Open Settings and tap your name.
- Select Subscriptions to view all active plans.
- Tap the subscription you want to cancel.
- Choose Cancel Subscription or Cancel Free Trial.
- Confirm the cancellation when prompted.
After cancellation, a few things are important to understand.
- You’ll usually keep access to the service until the current billing period ends.
- Apple does not issue partial refunds unless the app developer explicitly allows it.
- Once canceled, the subscription moves to the Expired section.
A critical reminder: deleting the app does not stop billing. The subscription remains active until you cancel it through Settings.
How to Change or Renew an iPhone Subscription
How to change a subscription plan on iPhone
Changing a plan is useful if you want to switch from monthly to yearly billing or downgrade to a cheaper tier.
- Open Settings, tap your name, and go to Subscriptions.
- Select the subscription you want to modify.
- Tap See All Plans to view available options.
- Choose the plan you want and confirm the change.
Depending on the app, the change may apply immediately or start at the next billing cycle.
How to renew an expired subscription on iPhone
If you canceled a subscription and later decide to return, you may be able to renew it.
- Go to Settings > your name > Subscriptions.
- Scroll down to the Expired section.
- Tap the subscription you want to renew.
- Select Renew and confirm payment.
If no Renew option appears, the app no longer allows reactivation through Apple.
How Family Sharing Impacts iPhone Subscriptions
Family Sharing changes how subscriptions work, but only when properly configured.
- Even with Family Sharing enabled, you still see only your own subscriptions.
- For a subscription to be shared, the app must support Family Sharing and be on a family-eligible plan.
- The Share with Family option must be turned on manually.
To enable subscription sharing:
- Open Settings and tap your name.
- Select Family Sharing.
- Tap Subscriptions.
- Turn on Share with Family for eligible services.
Keep in mind that subscription sharing and purchase sharing are separate features and must be configured independently.
iPhone Subscription FAQs You Should Know
Why can’t I see my subscriptions on iPhone?
This usually happens because you’re signed into the wrong Apple ID or the subscription is billed outside the App Store.
How do I know if I have active subscriptions?
Open Settings > your name > Subscriptions and check the Active section for currently billing plans.
Does deleting an app cancel the subscription?
No. Deleting an app does not affect billing. You must cancel the subscription from Settings.
How do I unsubscribe from an app on iPhone?
Go to Settings > your name > Subscriptions, select the app, and tap Cancel Subscription.
Can I delete my purchase history on iPhone?
No. Apple does not allow deletion of purchase history. Items can only be hidden.
Tips to Avoid Surprise Subscription Charges on iPhone
- Review your Subscriptions screen at least once a month to catch unused plans early.
- Turn on Renewal Receipt Emails so you receive confirmation every time a subscription renews.
- Cancel free trials immediately after signing up to avoid forgetting later.
- Choose yearly plans only after testing a service on a monthly basis.
- Check Purchase History whenever you see an unfamiliar Apple charge.
Bottom line
Managing subscriptions on iPhone is straightforward once you know where Apple places the controls. Use Subscriptions to manage renewals and cancellations, and use Purchase History to track spending and past charges. Don’t rely on deleting apps, and don’t expect third-party billing to appear automatically. Once you’ve reviewed these sections, there are no surprises left.
Useful Resources
Official Apple Guides (Most Reliable)
Apple Support – Manage subscriptions on iPhone: Helps users verify Apple-billed subscriptions and understand what appears under the Subscriptions menu.
Apple Support – View purchase history: Useful for users checking past charges, refunds, and billing details tied to their Apple ID.
Billing, Refunds, and Charges
Apple Support – Report a problem or request a refund: Essential for users who find an unfamiliar Apple charge or want to request a refund for a subscription.
Apple – Apple ID account management: Helps users confirm they’re signed into the correct Apple ID, which is critical when subscriptions don’t appear.
Family Sharing & Shared Subscriptions
Apple Support – Set up and manage Family Sharing: Clarifies what subscriptions can be shared, visibility limits, and organizer vs member roles.
Apple Support – Share App Store subscriptions with family: Useful for readers confused about why shared subscriptions aren’t visible.
Visit Our Post Page: Blog Page