
Do you want to show the Favorites bar in Microsoft Edge? Learn how to display, turn on, or get back the missing bookmarks bar in Edge on Windows and Mac. Simple steps to manage and customize your Favorites for quick access.
Why the Favorites Bar Matters in Microsoft Edge
If you’re someone who frequently visits the same handful of websites, the Microsoft Edge Favorites bar can save you plenty of clicks. Positioned just below the address bar, this toolbar gives you instant access to your most-used pages. However, after an update or a fresh installation, many users notice that the favorites bar is not showing in Edge. Fortunately, your bookmarks are not lost—they’re simply hidden by default.
What Makes the Favorites Bar So Useful?
The Favorites bar in Edge acts like a shortcut shelf for the web. Instead of typing long URLs or digging through menus, you can keep your most important sites—like email, news, or work tools—right at your fingertips. And because it syncs across devices, you can enjoy the same organized browsing whether you’re on Windows 10, Windows 11, or even a Mac.
Why You Might Need This Guide
It’s common for new Edge users to ask, “Where is the favorites bar in Edge?” or “How do I show my bookmarks bar in Edge?” The truth is, Microsoft hides it by default to keep the browser’s look clean and minimal. But if you’d rather have quick access to your bookmarks, you’ll want to learn how to show the favorites bar in Edge permanently.
By the end of this guide, you’ll not only know how to turn on the favorites bar in Edge, but also how to customize it to match your browsing style.
What is the Microsoft Edge Favorites Bar? (And Why It Sometimes Hides)
When people talk about the Favorites bar in Microsoft Edge, they’re referring to a slim toolbar that sits directly below the address bar. It’s also known as the bookmarks bar, and its main job is to provide one-click access to your saved websites. Instead of opening menus or searching your history, you can simply click an icon on the bar and jump straight to your destination.
How the Favorites Bar Works in Edge
Think of the Edge Favorites bar as a personalized control panel for your web browsing. You can add bookmarks for work, school, or personal use, and even organize them into folders. As a result, you save time and avoid clutter while keeping your most important websites within reach. Additionally, if you sign in with a Microsoft account, your favorites will sync across devices—so whether you’re on Windows 10, Windows 11, or Mac, your bookmarks stay consistent.
Why the Favorites Bar Sometimes Disappears
If your favorites bar is missing in Edge, you’re not alone. By default, Edge is designed to show the bar only when you open a new tab. This clean look makes the browser appear more spacious, but it can also confuse users who expect the bar to always be visible. Furthermore, updates or accidental keystrokes—such as pressing Ctrl + Shift + B—can cause the bar to suddenly hide.
The Good News: Your Bookmarks Are Safe
Although the bar might vanish, your saved websites aren’t deleted. They remain stored in Edge, ready to reappear once you adjust your settings. In short, knowing how to display the Favorites bar in Edge ensures you never lose access to the websites that matter most.
Why is My Favorites Bar Not Showing in Microsoft Edge?
If you’ve noticed that your favorites bar is not showing in Edge, don’t worry—you’re not the only one. Many users run into this issue, especially after updating their browser or installing Edge on a new device. The good news is that the problem usually has a simple explanation.
Common Reasons the Favorites Bar Goes Missing
There are a few typical causes behind the Edge favorites bar missing problem:
- Hidden by Default – By design, Microsoft Edge only shows the bar on new tabs. As soon as you load a website, it disappears to give you more space.
- Reset After Updates – Occasionally, browser updates reset appearance settings, which may switch the bar back to its default “only on new tabs” mode.
- Accidental Shortcut Pressed – The keyboard shortcut Ctrl + Shift + B (or Command + Shift + B on Mac) quickly hides or shows the bar. Many users press it by mistake without realizing it.
User Question: Why is My Favorites Bar Missing from Edge?
If you’ve asked yourself, “Why is my favorites bar missing from Edge?” the answer is simple: it’s most likely hidden, not deleted. Your bookmarks are still stored safely, and with a few quick adjustments, you can bring the Microsoft Edge favorites bar back in no time.
The Next Step: How to Show the Favorites Bar Again
Now that you know why it disappears, the next step is learning how to get the favorites bar back in Edge. Luckily, you can do this in several ways—through a shortcut, the settings menu, or the favorites menu itself. We’ll walk through each method in the next section.
How to Show Favorites Bar in Microsoft Edge (Windows 10 & Windows 11)
The favorites bar in Microsoft Edge is one of the most useful tools for quick browsing, but it can sometimes disappear after an update, a reset, or even a fresh installation. Fortunately, turning it back on is easy once you know where to look. Below, we’ll cover all the practical methods to show the favorites bar in Edge—from quick shortcuts to deep settings—so you can get it back exactly the way you want.
Instantly Toggle with a Keyboard Shortcut
If you prefer speed and simplicity, the fastest way to show or hide the favorites bar in Edge is with the shortcut:
Press Ctrl + Shift + B (Windows 10 & Windows 11).
- If your bar is hidden, it will immediately appear.
- If it’s visible, the same shortcut hides it.
This is perfect for users who don’t want the bar cluttering their screen all the time but still want quick control.
Quick Tip: On laptops with compact keyboards, you may need to use Fn + Ctrl + Shift + B depending on your function key settings.
Enable the Favorites Bar Through Edge Settings
For a more permanent fix, head into the Edge appearance settings. This ensures the bar stays visible exactly how you prefer:
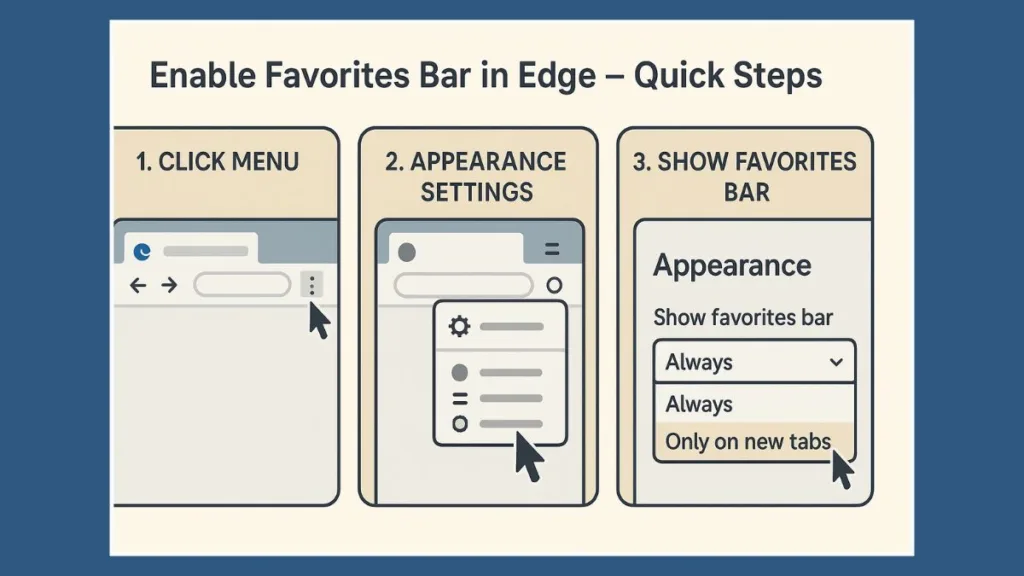
- Open Microsoft Edge and click the three-dot menu (···) in the top-right corner.
- From the dropdown, choose Settings.
- Select Appearance from the left-hand menu.
- Scroll down to the Customize toolbar section.
- Locate Show favorites bar and select one of these options:
- Always – The favorites bar will stay pinned below the address bar on every page.
- Never – Completely hides the bar.
- Only on new tabs – The bar shows up only when you open a fresh tab.
Pro Tip: You can type edge://settings/appearance directly into the address bar to skip the menus and jump straight to this page.
Adjust from the Favorites Menu
Another route to display or hide the Edge bookmarks bar is from the built-in Favorites panel:
- Press Ctrl + Shift + O to open the Favorites menu.
- In the panel, click the More options (···) button.
- Select Show favorites bar and choose your preferred visibility (Always, Never, or Only on new tabs).
This is particularly handy if you’re already organizing bookmarks and don’t want to switch over to Settings.
Right-Click on the Favorites Bar to Customize
If your bar currently appears only on new tabs, you can quickly control its behavior:
- Open a new tab to make the bar visible.
- Right-click anywhere on the favorites bar.
- From the small menu, select your choice: Always, Never, or Only on new tabs.
This trick is often overlooked but is the simplest way to get your bar back without navigating through multiple menus.
Reset Edge Appearance Settings (If the Bar Still Won’t Show)
Sometimes, even after enabling the options above, the favorites bar in Edge may still not appear due to minor glitches. Here’s how to reset appearance settings:
- Go to Settings > Appearance.
- Double-check that “Show favorites bar” is not set to Never.
- If issues persist, try switching it to Never, restart Edge, and then switch it back to Always.
This quick toggle often forces Edge to refresh its toolbar settings.
Sync Favorites Across Devices
If you’ve restored your bar but notice that some bookmarks are missing, they may not be syncing. To ensure your Edge favorites bar is consistent across Windows 10, Windows 11, and even mobile devices:
- Go to Settings > Profiles > Sync.
- Make sure Favorites is toggled ON.
- Sign in with the same Microsoft account on all devices.
This way, any favorites added on one device will automatically appear in your favorites bar everywhere.
What to Do If Favorites Bar is Missing After Update
Many users report that after an Edge update, the favorites bar disappears. Don’t worry—your bookmarks are still safe. They’re simply hidden by default after some updates. To recover them:
- Follow the steps above to re-enable the bar.
- If bookmarks still don’t show, open the Favorites menu (Ctrl + Shift + O) to confirm your saved links are intact.
- From there, you can reorganize them into folders and re-pin the bar.
When Should You Use “Always,” “Never,” or “Only on New Tabs”?
Microsoft Edge gives three visibility options for a reason:
- Always – Great for heavy bookmark users who want one-click access at all times.
- Never – Best if you prefer a clean, minimalist browsing experience.
- Only on new tabs – A balanced option for people who want a clutter-free screen while browsing but still need favorites handy when starting new searches.
With these methods, you’ll have full control over the Microsoft Edge favorites bar—whether you want it permanent, hidden, or on-demand. By mastering both the shortcut keys and the settings menus, you can easily customize the bar to match your browsing style.
How to Show Favorites Bar in Edge on Mac (Step-by-Step Guide)
For many Mac users, the Microsoft Edge favorites bar is one of the most practical features. It lives right under the address bar and gives you instant access to your most-visited websites with a single click. However, if you recently installed Edge or updated it, you may notice that the favorites bar doesn’t appear by default. The good news is that your bookmarks are not lost—they’re simply hidden, and bringing them back is easier than you might think.
Toggling the Favorites Bar Instantly with a Shortcut
If you love efficiency, Edge has a quick keyboard shortcut to help you toggle the favorites bar without diving into menus. On your Mac keyboard, press Command (⌘) + Shift + B. If the bar is hidden, it will reappear right away; if it’s already showing, the same shortcut will hide it again. This little trick is perfect if you like to keep a clean browsing window but still want to reveal your favorites whenever you need them.
Accessing the Favorites Bar Through Settings
For those who prefer a more traditional approach, you can control the favorites bar from within Edge’s settings. To do this, open Edge and click the three-dot menu (···) in the upper-right corner. From there, select Settings, then choose Appearance on the left-hand side. Within the “Customize toolbar” section, you’ll see an option called Show favorites bar.
Here, you can decide how you want it to appear:
- Always if you want it visible on every page.
- Never if you prefer a minimal, clutter-free look.
- Only on new tabs if you want a middle ground where the bar shows up when you open a fresh tab but disappears once you’re browsing a website.
Pro Tip: If you don’t want to click around, simply type edge://settings/appearance in your address bar. This shortcut will take you directly to the right page.
Using the Favorites Panel for Extra Control
Edge on Mac also gives you access to the Favorites panel, which not only helps you organize bookmarks but also lets you manage how the favorites bar appears. To open the panel, press Command (⌘) + Option (⌥) + B. Inside this panel, look for the More options (···) menu, and from there, you’ll find the same favorites bar visibility settings.
This method is especially helpful if you’re in the middle of organizing your bookmarks because you can see the changes happen right in front of you.
Quick Adjustments with Right-Click
Another simple way to customize the favorites bar is by right-clicking directly on it. If the bar is set to appear only on new tabs, open a new tab first, then right-click anywhere on the bar. A small menu will pop up with options to set it to Always, Never, or Only on new tabs. This approach is fast, intuitive, and doesn’t interrupt your browsing flow.
Syncing Favorites Across Devices
If you use multiple devices—say, a MacBook for personal use and a Windows PC for work—syncing your favorites is a smart way to keep everything consistent. To enable sync, go to Settings > Profiles > Sync, and toggle Favorites on. Once you sign in with the same Microsoft account on all devices, any website you save to your favorites bar on your Mac will automatically appear on your other devices.
This is a huge time-saver if you frequently switch between platforms and don’t want to manually manage bookmarks everywhere.
Fixing Favorites Bar Missing After Updates
Sometimes, after an Edge update, Mac users notice that the favorites bar disappears. This doesn’t mean your bookmarks are gone; they’re just temporarily hidden. To fix this, go back to Settings > Appearance > Show favorites bar and set it to Always. If it doesn’t work right away, toggle it to Never, restart Edge, and then switch it back to Always.
If you still don’t see the bar, press Command (⌘) + Option (⌥) + B to open the Favorites panel. Your bookmarks should still be there. In rare cases, you may need to update Edge again or restart your Mac for the settings to refresh.
Choosing the Best Display Setting
Which visibility option should you pick? That depends on your browsing style:
- If you rely heavily on quick access to sites like Gmail, Google Docs, or Microsoft Teams, Always is your best bet.
- If you prefer a clean, minimalist browsing window, choose Never.
- If you want a balance—easy access to bookmarks when you start fresh, but no distractions afterward—then Only on new tabs is ideal.
Organizing the Favorites Bar for Productivity
The favorites bar can quickly become cluttered if you save too many sites, but Edge gives you several ways to tidy it up. You can drag and drop bookmarks to reorder them, rename them to shorter labels, or create folders to group similar sites together. For example, you might keep all your work-related links in one folder and personal sites in another.
On smaller Mac screens, these tricks help maximize space. Some users even delete the bookmark names entirely, leaving just the icons (favicons) to save space while still keeping everything recognizable.
Troubleshooting Common Issues
If the favorites bar still refuses to appear, a few extra steps may help. Start by clearing your cache and cookies, as small glitches can sometimes affect how the toolbar displays. Next, try disabling any extensions that might interfere with the interface. And as a last resort, you can uninstall and reinstall Edge. If you’ve enabled sync, your bookmarks will come back once you sign in again.
Adding and Managing Bookmarks in the Favorites Bar
The Microsoft Edge Favorites bar isn’t just a list of shortcuts—it’s your personalized navigation hub. When set up and maintained properly, it can transform your browsing experience, saving you countless clicks and keeping essential websites only a second away. However, to truly maximize its potential, you’ll want to go beyond simply adding bookmarks. Let’s dive into the complete process of adding, customizing, organizing, and maintaining favorites so your bar always works for you.
How to Add a Bookmark to the Favorites Bar in Edge
Adding a bookmark to the Edge favorites bar takes just a few steps:
- Open the website you want to save.
- Click the star icon (⭐) in the address bar.
- Choose Save in > Favorites bar from the drop-down.
- Click Done, and the site instantly appears on your bar.
Shortcut method: Drag the padlock icon (🔒) or favicon from the address bar directly onto the favorites bar. It’s the fastest way to add sites without menus.
Adding Bookmarks Without Opening the Website
Sometimes you already know the website link. In that case:
- Right-click anywhere on the favorites bar.
- Select Add page.
- Type the website name and URL manually.
- Click Save, and you’re done.
This is ideal when preparing your bar in advance, such as for work or project research.
Organizing Favorites with Folders
If you add bookmarks regularly, the bar can get cluttered. To maintain order, create folders:
- Right-click on the favorites bar.
- Select Add folder.
- Name it something meaningful (Work, Shopping, Social Media).
- Drag bookmarks into the folder for instant grouping.
Example: Instead of 10 shopping sites crowding the bar, you can create one folder named Shopping and place all those bookmarks inside.
Advanced Bookmark Organization with Subfolders
For heavy users, Edge supports nested folders (folders within folders).
- Example setup:
- Work Projects
- Client A
- Client B
- Entertainment
- Movies
- Music
- Gaming
- Work Projects
This makes the favorites bar look neat and turns it into a structured directory rather than an endless row of links.
Rename and Edit Bookmarks for Clarity
Many websites have long or confusing names that take up too much space on the bar. To fix this:
- Right-click a bookmark.
- Select Edit.
- Shorten the name or remove it entirely.
Example: Change “The New York Times – Breaking News, US News, World News” to just “NYT”.
By doing this, you’ll fit more bookmarks without making the bar look overcrowded.
Rearrange Favorites for Easy Access
Prioritize your most-used sites with drag-and-drop:
- Click and hold a bookmark.
- Drag it left or right to reorder.
- Place work-related sites on one side and personal sites on the other for better separation.
Some users prefer arranging icons alphabetically, while others organize by frequency of use. Choose what works best for you.
Use “Icons Only” Mode for a Cleaner Look
One of Edge’s hidden gems is the icons-only mode:
- Edit a bookmark.
- Delete the name, keeping only the favicon (website’s small icon).
The result is a sleek favorites bar showing only recognizable icons like YouTube, Gmail, Twitter—no text needed. This dramatically saves space.
Create Separator Bookmarks for Visual Grouping
Want to visually divide sections? Edge doesn’t provide built-in dividers, but here’s a trick:
- Add a new bookmark with the name “|” or “—” and leave the URL blank.
- Place it between groups of bookmarks.
Now your bar will have a neat, separated layout that’s easier on the eyes.
Removing or Cleaning Up Bookmarks
Over time, favorites may pile up with links you no longer use. To keep things fresh:
- Right-click > Delete to remove single bookmarks.
- Use Favorites manager (Ctrl + Shift + O / ⌘ + Option + B) for bulk editing.
Tip: Schedule a quick cleanup every month or quarter. This ensures your bar only contains relevant sites and doesn’t feel overwhelming.
Sync Bookmarks Across Devices
If you use multiple devices (like a Windows laptop, Mac, or mobile phone), syncing ensures your favorites follow you everywhere:
- Go to Settings > Profiles > Sync.
- Turn on Favorites.
- Sign in with your Microsoft account across devices.
Now, a bookmark saved on your PC instantly appears on your smartphone or Mac favorites bar.
Back Up and Export Your Favorites
If you’re upgrading your device or want a safety copy:
- Open Settings > Profiles > Import browser data.
- Choose Export favorites.
- Save the file (usually as HTML).
Later, you can import it back into Edge—or even into Chrome, Firefox, or Safari.
Use Edge’s Favorites Sidebar for Power Users
Did you know Edge also lets you manage bookmarks via a sidebar panel?
- Open the Favorites button (star with three lines) on the toolbar.
- From here, you can drag, rename, or delete bookmarks without leaving your page.
This sidebar gives you more control, especially if your favorites bar is too full.
Keyboard Shortcuts for Favorites Management
Speed things up with shortcuts:
- Ctrl + D (⌘ + D on Mac): Bookmark the current page.
- Ctrl + Shift + O (⌘ + Option + B on Mac): Open Favorites manager.
- Ctrl + B (⌘ + Shift + B on Mac): Show or hide the favorites bar instantly.
These shortcuts save time and help you manage bookmarks more efficiently.
Best Practices for a Productive Favorites Bar
To get the most out of your Microsoft Edge Favorites bar, it helps to keep things simple and minimal. Start by pinning only the sites you visit daily—like email, work dashboards, or your go-to news source. For websites you use occasionally, create folders so they stay organized without cluttering the main view. This way, your most important links are always within reach while everything else is neatly tucked away.
Another smart habit is to sync your favorites across devices. Whether you’re on a laptop, desktop, or even your phone, you’ll enjoy a consistent browsing setup everywhere you go. Don’t forget to perform regular cleanups as well. Just like tidying your desk, removing outdated or unused bookmarks keeps the bar lean and efficient. Think of your Favorites bar as your digital workspace—the cleaner and more organized it is, the faster and smoother your workflow will be.
Pro Tips for Customizing the Favorites Bar in Microsoft Edge
The Microsoft Edge Favorites bar is more than just a place to store shortcuts—it’s your personal command center for the web. While turning it on is simple, the real power comes from customizing it to fit your workflow. Below, you’ll find expert tips that will help you organize, personalize, and optimize the Favorites bar so it works exactly the way you need.
Simplify with Text and Icon Views
One of the most overlooked tricks is customizing how your bookmarks appear:
Show icons only: If you want to save space, right-click a favorite and uncheck “Show title.” This way, only the favicon (website icon) appears.
Show text and icons: Prefer clarity over space? Leave titles visible, so you always know what each bookmark is.
Pro Tip: Using icons-only view allows you to fit more bookmarks on the Favorites bar without cluttering.
Create Folders for Easy Grouping
If your Edge Favorites bar feels crowded, folders are the solution:
- Right-click the bar and select Add Folder.
- Give it a clear name, like Work, News, or Shopping.
- Drag and drop favorites into the folder.
This method keeps your bar neat, while still making your bookmarks accessible with a single click.
Organize with Drag-and-Drop
Did you know you can rearrange bookmarks instantly? Simply drag favorites or folders left or right until they’re in the order you prefer. For example, you might want to keep work-related bookmarks on the left and personal ones on the right.
Customize When the Favorites Bar Appears
Edge gives you flexibility on when to show the Favorites bar:
Always show favorites bar → Perfect if you use bookmarks constantly.
Show only on new tabs → Keeps your browsing view clean, but still makes favorites easy to access.
Never show favorites bar → Useful if you prefer to rely solely on the favorites menu.
You can adjust this anytime under Settings > Appearance > Customize toolbar > Show favorites bar.
Add Custom Websites Quickly
For even faster browsing, right-click on the bar and select Add Page. Alternatively, drag the lock icon (🔒) from the address bar directly onto your Favorites bar. This instantly saves the website without opening menus.
Sync Favorites Across Devices
Do you switch between Windows, Mac, or mobile devices? By turning on Sync favorites under Edge settings, your customized Favorites bar travels with you. That means your bookmarks, folders, and layouts stay consistent no matter where you log in.
Bonus: Use Edge Collections Alongside Favorites
For projects or research, try pairing the Favorites bar with Edge Collections. While favorites are best for quick, permanent links, Collections allow you to save groups of pages with notes, images, and context. It’s like upgrading your bookmark system to a full productivity tool.
In short: Customizing the Favorites bar in Microsoft Edge is all about making it your own. From folders and drag-and-drop organization to syncing and display options, these small tweaks can make a big difference in how efficiently you browse.
Frequently Asked Questions About the Microsoft Edge Favorites Bar
How do I show the Favorites bar in Microsoft Edge?
To show the Favorites bar in Edge, go to the three-dot menu → Settings → Appearance → Customize Toolbar → Show Favorites Bar. From here, you can choose Always, Never, or Only on New Tabs depending on your preference.
Why is my Favorites bar missing in Edge?
The Favorites bar not showing in Edge usually means it’s hidden in the toolbar settings. It could also disappear after a browser update. Simply head to the Appearance settings and toggle it back on.
Can I display the Favorites bar only on new tabs?
Yes! In Edge, you can set the Favorites bar to appear only when you open a new tab. This option is found under Customize Toolbar in settings. It’s a great way to keep your screen clutter-free while still having quick access when you need it.
What’s the keyboard shortcut to show or hide the Favorites bar in Edge?
The shortcut is Ctrl + Shift + B (Windows) or Command + Shift + B (Mac). This instantly toggles the bookmarks bar on or off without going into settings.
How do I add bookmarks to the Favorites bar in Edge?
Click the star icon in the address bar, then select Save in Favorites Bar. You can also drag and drop links directly onto the bar for faster access.
Can I sync my Favorites bar across devices?
Absolutely. By signing in with your Microsoft account and turning on sync, your Favorites bar, bookmarks, and folders will be available on all your devices running Edge—Windows, Mac, iOS, or Android.
How do I organize bookmarks in the Edge Favorites bar?
You can drag and reorder favorites, create folders for different categories, and even rename items for clarity. This helps keep your favorites bar neat and productive.
How do I permanently show my bookmarks bar in Edge?
To always show favorites bar in Edge, go to Settings → Appearance → Show Favorites Bar and select Always. This ensures your saved sites are visible at all times.
Conclusion – Keep Your Favorites Always Within Reach
The Microsoft Edge Favorites bar may seem like a small feature, but it plays a big role in making your browsing experience smooth and productive. When it’s visible, your most-used websites are literally one click away. However, when it disappears, it can slow you down and create unnecessary frustration. That’s why knowing how to show, manage, and customize the Favorites bar in Edge is essential.
Why Customization Matters
Although turning on the Favorites bar is simple, taking a few extra minutes to customize it ensures it works for your unique browsing style. For instance, you might prefer icons-only to save space, or folders to organize different areas of life—like work, school, or hobbies. By tailoring it to your needs, you’ll always feel in control of your digital environment.
Final Thoughts – Stay Productive with Edge
In conclusion, the Edge Favorites bar is your shortcut to efficiency. By learning how to show it, adjust its settings, and organize it smartly, you’re setting yourself up for a faster, more enjoyable browsing experience. And since Edge lets you sync favorites across devices, your bookmarks will always stay close, whether you’re on Windows, Mac, or mobile.
Tip to remember: Keep your Favorites bar organized and updated, just like you would with a real desk. The more streamlined it is, the easier it becomes to reach what matters most.
Useful Resources for Microsoft Edge Users
- Microsoft Edge Official Help – Favorites & Bookmarks: Get step-by-step instructions from Microsoft’s official support site on how to manage favorites, customize your toolbar, and fix common issues.
- Microsoft Community Forums – Edge Browser Discussions: Connect with other users and experts to troubleshoot problems, share tips, and find real-world solutions for Edge.
- Microsoft Edge Insider Blog: Stay up-to-date with Edge’s latest features, improvements, and insider news directly from Microsoft developers
Visit Our Post Page: Blog Page