
Accidentally triggered SOS or stuck in SOS mode on your iPhone? Let’s Learn how to turn off SOS on iPhone, disable SOS, and solve SOS only errors step by step.
If your iPhone suddenly shows SOS Only in the status bar, it can feel confusing and even stressful. Don’t worry — this usually means your device has lost network connectivity or the Emergency SOS feature was triggered.
In this guide, you’ll learn how to turn off SOS on iPhone, disable SOS mode, and apply simple fixes to get your phone back to normal.
Understanding SOS on iPhone – What SOS Only Means
If you’ve ever glanced at your iPhone and noticed “SOS” or “SOS Only” in the status bar, it can be a little alarming—but there’s no need to panic. This indicator doesn’t necessarily mean something is wrong with your iPhone itself; it’s usually related to your cellular network connection.
SOS vs Emergency SOS: What’s the Difference?
First things first: it’s important to understand the difference between SOS in the status bar and the Emergency SOS feature.
SOS in the status bar signals that your iPhone isn’t connected to your regular cellular network. You can still make emergency calls, but normal calls, text messages, and mobile data may not work. This is especially common in remote areas, during network outages, or if your SIM card has issues.
Emergency SOS, on the other hand, is a safety feature designed to alert emergency contacts and call services like 911, 112, or 999 quickly. Accidental triggers can happen if the side and volume buttons are pressed rapidly, but this is separate from the network-related SOS indicator.
Why Does Your iPhone stuck in sOS mode?
Seeing SOS Only usually means your iPhone has lost its connection to your carrier, but it can still reach emergency services. There are several common reasons this happens:
- Your SIM card has failed or isn’t properly inserted.
- Automatic Network Selection isn’t enabled, so your phone isn’t connecting to the right carrier.
- Data Roaming is turned off while traveling internationally.
- Your network provider is experiencing outages.
- Older iPhone models (iPhone 5s, 5c, or iPads pre-3rd generation) may also see this if 3G networks are being phased out.
Even if your iPhone shows SOS, you’re not completely cut off—you can still call local emergency numbers. This is Apple’s way of keeping you safe, even when regular service isn’t available.
Key Takeaways
- SOS Only = network issue, not a device failure.
- You can always make emergency calls, even without cellular service.
- Check your SIM card, network settings, and updates to restore full connectivity.
By understanding what SOS and SOS Only mean, you’ll know whether the issue is just a temporary network glitch or something that needs further troubleshooting.
What Happens When You Accidentally Call SOS on iPhone?
It’s surprisingly easy for the Emergency SOS feature on iPhone to be triggered by accident. Maybe your phone was in your pocket, bag, or a child was fiddling with it, and suddenly your iPhone starts counting down with a loud alarm—ready to call emergency services. While this feature is life-saving in true emergencies, false activations can be stressful and inconvenient.
Why Accidental SOS Calls Happen
One of the most common causes is rapid button presses. Pressing the side button along with either of the volume buttons quickly can trigger Emergency SOS, often without the user realizing it. Similarly, holding the side and volume buttons together for a few seconds initiates the SOS countdown. Even everyday mishandling—like a phone jostling in your pocket or bag—can activate the feature unexpectedly, especially during physical activities.
These accidental triggers can result in unintentional calls to 911, 112, or other local emergency services, loud alarms that are disruptive or embarrassing, and anxiety about potential fines or notifications from your carrier.
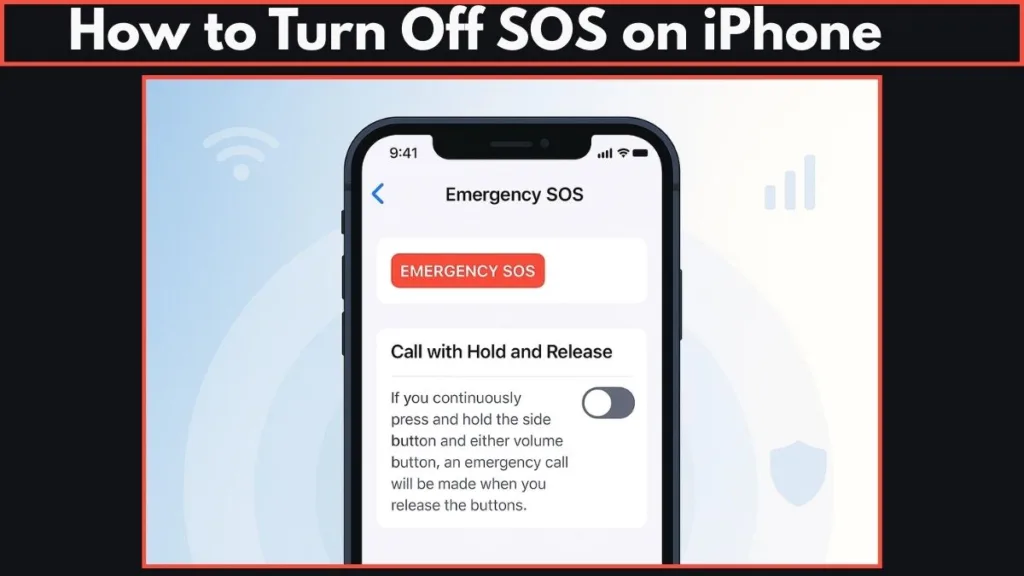
iPhone Initiated Emergency SOS: How To Turn Off
Step 1: Turn Off Auto Call
Navigate to Settings → Emergency SOS and toggle Auto Call off. This prevents your iPhone from automatically dialing emergency services when the buttons are pressed rapidly.
Step 2: Customize Emergency Contacts
Open the Health app and set up your emergency contacts. This ensures that if SOS is triggered manually, the right people are alerted promptly.
Step 3: Practice SOS Familiarity
Trigger and cancel SOS in a safe environment to understand exactly how it works. This makes it less stressful if it goes off by accident in the future.
Step 4: Use Manual Emergency SOS When Needed
Even with Auto Call off, you can manually use Emergency SOS by holding the side button and one of the volume buttons, then selecting the call option. This ensures help is always accessible when you need it.
Pro Tip: If the SOS countdown starts by accident, tap the stop button on your screen to cancel the call immediately. This small step can prevent unnecessary notifications and alarms, saving you from inconvenience and potential embarrassment.
How To Turn Off Emergency SOS iPhone
The Emergency SOS feature on your iPhone is a lifesaver, designed to help you quickly call emergency services and alert your emergency contacts.
However, there are situations where you might want to turn it off or adjust its settings—especially to prevent accidental activations while keeping control over your device. The process is simple and takes only a few minutes.
Why You Might Want to Turn Off SOS
Turning off SOS is helpful if your iPhone often triggers emergency calls accidentally. Accidental triggers can happen when your phone is in a pocket, bag, or while exercising, causing the side button and volume buttons to press unintentionally. SOS also includes a loud alarm and countdown, which can be disruptive in quiet spaces or meetings.
By managing this feature, you reduce stress, avoid false emergency notifications, and still maintain the ability to manually access SOS when necessary.
Disabling SOS temporarily can also be useful if you are traveling, testing your iPhone, or using a case that presses buttons unintentionally. However, it’s important to remember that turning off Auto Call does not disable emergency access entirely—you can still trigger SOS manually in case of a real emergency.
Step-by-Step Process to Disable SOS in iPhone
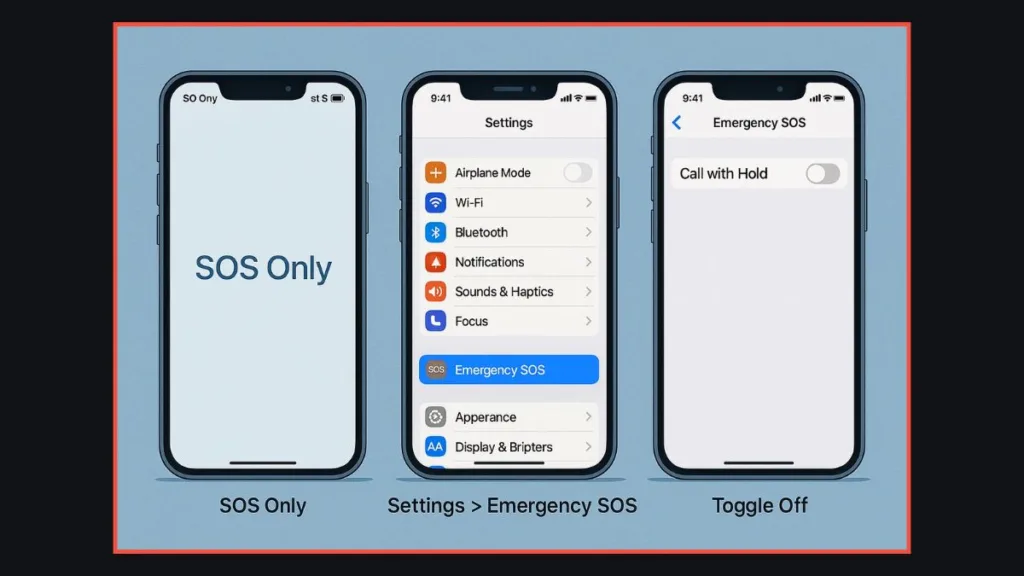
Step 1: Open Settings
Start by opening the Settings app on your iPhone. This is where all device settings are managed, including emergency and network features. Make sure your device is up-to-date for the best experience.
Step 2: Access Emergency SOS Settings
Scroll down and tap Emergency SOS. In this section, you’ll find all the options for customizing how SOS behaves, including Auto Call, countdown sound, and emergency contacts. Understanding these options helps you tailor SOS to your needs.
Step 3: Turn Off Auto Call
Toggle the Auto Call switch to off. Disabling Auto Call prevents your iPhone from automatically dialing emergency services when you press the side button five times or hold the side button and a volume button simultaneously. This simple step significantly reduces the risk of false alarms while keeping the SOS feature accessible manually.
Step 4: Confirm Your Choice
If your iPhone prompts you to confirm the change, tap Confirm. This ensures that Auto Call is intentionally disabled and prevents accidental toggling.
Step 5: Customize Emergency Contacts
Even with Auto Call off, it’s wise to review and update your emergency contacts in the Health app. Make sure the right people are listed so that if you manually trigger SOS, they are immediately notified. This is especially helpful if your household or travel companions change frequently.
Step 6: Familiarize Yourself with Manual SOS
Turning off Auto Call doesn’t disable SOS entirely. You can still manually trigger Emergency SOS by holding the side button and one of the volume buttons, then sliding the emergency call option. Practicing this in a safe environment ensures you know exactly how it works and can respond confidently in a real emergency.
Step 7: Manage SOS Alerts
Some iPhones allow you to toggle the countdown sound and vibration alerts. Adjusting these settings can prevent sudden loud noises while keeping SOS functionality active. This is especially useful in quiet offices, meetings, or while traveling.
Step 8: Monitor Accidental Triggers
After disabling Auto Call, keep an eye on how often SOS is triggered accidentally. If it still happens, check whether your iPhone case or placement in your pocket might be pressing buttons unintentionally. Simple adjustments can prevent accidental SOS activations without turning off the feature completely.
Pro Tip: Even with Auto Call off, your iPhone remains capable of emergency calls. Always remember that SOS can be triggered manually, ensuring safety is never compromised. Regularly reviewing SOS settings and practicing the manual trigger helps you stay familiar with this critical feature while avoiding accidental calls.
Why Does My iPhone Say SOS Only?
If your iPhone frequently displays “SOS Only” in the status bar, it can be confusing and alarming. Unlike Emergency SOS, which is a safety feature, the SOS Only status indicates that your device has lost connection to its regular cellular network. While you can still make emergency calls to local services, normal phone calls, messages, and mobile data may not function. Understanding why this happens is the first step toward fixing it.
Common Reasons for SOS Only on iPhone
1. Poor Network Coverage
The most common cause is simply being out of your carrier’s range. This often happens in remote areas, underground locations, elevators, or thick-walled buildings. Even if your device shows full bars previously, a weak network signal can temporarily trigger SOS Only.
2. SIM Card Issues
A damaged, improperly inserted, or faulty SIM card can prevent your iPhone from connecting to the cellular network. If you recently switched phones or carriers, or transferred a SIM card from another device, SOS Only can appear until the SIM is properly recognized.
3. Disabled Automatic Network Selection
If your iPhone isn’t set to automatic network selection, it may fail to reconnect to your carrier’s network, especially after traveling or restarting the phone. Manual network selection can sometimes lead to SOS Only if the wrong network is chosen.
4. Software or iOS Bugs
Outdated iOS versions or temporary software glitches can cause your iPhone to misinterpret network availability, resulting in SOS Only. Many users have found that updating iOS or restarting the device resolves the issue.
5. Carrier Outages or Restrictions
At times, your carrier may be experiencing a temporary outage, or there might be account issues preventing your iPhone from accessing the network. Local regulations, IMEI registration requirements, or data plan restrictions can also interfere with service.
6. Traveling Internationally
If you’re abroad, Data Roaming needs to be enabled, and your plan must support international connections. Without it, your iPhone may revert to SOS Only, allowing emergency calls but blocking regular service.
What SOS Only Means for You
When you see SOS Only, your iPhone is essentially in emergency mode for cellular connectivity. This ensures that you can still reach emergency services like 911, 112, or 999, depending on your location. However, regular communication, including phone calls, text messages, and internet access, is temporarily unavailable until the issue is resolved.
Understanding the root causes and knowing the right steps to troubleshoot will help you restore full cellular service quickly, whether it’s a simple SIM adjustment, toggling Airplane Mode, updating iOS, or contacting your carrier for support.
Managing iPhone Stuck in SOS Mode & Can’t Turn It Off
It can be unsettling when your iPhone is stuck in SOS mode, even after trying basic fixes like restarting the phone or toggling Airplane Mode. In this state, your iPhone allows only emergency calls, blocking normal communication, messages, and mobile data. While the SOS-only display is designed to ensure safety, being unable to connect to your network can be frustrating, especially when you rely on your iPhone for work, travel, or personal use.
Fortunately, most SOS-only issues can be resolved with systematic troubleshooting. By understanding the root causes and following the steps below, you can regain full connectivity and prevent the SOS display from persisting.
Why Your iPhone Might Be Stuck in SOS Mode
Your iPhone may remain in SOS mode for several reasons:
- A faulty or damaged SIM card can prevent the device from connecting to your carrier’s network.
- Disabled Automatic Network Selection may keep the iPhone from choosing the correct network.
- Network outages or restrictions from your carrier can result in temporary SOS-only displays.
- Software glitches or outdated iOS may cause the iPhone to misinterpret network availability.
- Older devices using 3G networks may be affected if your carrier has phased out 3G services in your area.
Identifying the underlying cause helps you choose the right solution and restore your iPhone to normal functioning quickly.
Disable SOS Mode on iPhone – Step-by-Step Fix
Step 1: Force Restart Your iPhone
A force restart is often the quickest way to resolve temporary software glitches causing SOS mode. The method depends on your iPhone model:
- iPhone 8 and later: Press and quickly release the volume up button, press and quickly release the volume down button, then hold the side button until the Apple logo appears.
- iPhone 7: Hold the volume down and side buttons simultaneously until the Apple logo appears.
- iPhone 6s and earlier: Hold the Home and side buttons together until the Apple logo appears.
This process essentially forces your iPhone to reset its network connections and clear any temporary errors that may be keeping it in SOS mode.
Step 2: Remove and Reinsert the SIM Card
A damaged or improperly inserted SIM card is a common cause of persistent SOS mode. Remove the SIM card, check for physical damage, and reinsert it carefully. For dual SIM iPhones, ensure both SIMs are properly seated. In some cases, contacting your carrier for a replacement SIM or switching to an eSIM can resolve the issue entirely.
Step 3: Enable Automatic Network Selection
Go to Settings → Cellular → Network Selection and turn on the Automatic toggle. This ensures your iPhone automatically connects to the correct network without manual intervention.
If automatic selection is off, your iPhone may remain stuck in SOS mode, particularly after traveling or restarting the device.
Step 4: Check for Carrier and iOS Updates
Outdated carrier settings or iOS versions can cause connectivity issues. Connect to Wi-Fi, then check Settings → General → About for any pending carrier updates.
Additionally, go to Settings → General → Software Update to ensure your iPhone is running the latest iOS. Keeping your device updated helps prevent glitches and improves overall network stability.
Step 5: Enable Data Roaming if Abroad
If you’re traveling internationally, your iPhone may display SOS Only until Data Roaming is enabled. Go to Settings → Cellular → Cellular Data Options and turn on Data Roaming. For Dual SIM users, select the specific line before enabling roaming. This allows your iPhone to connect to local networks and regain normal functionality.
Step 6: Contact Your Carrier
If your iPhone remains stuck, reach out to your carrier. Ask them to verify your account status, check for local network outages, and confirm that your device is properly registered on their network. Sometimes, carrier-side restrictions or outages are the primary reason your iPhone cannot connect to the network.
Step 7: Visit an Apple Store or Authorized Service Center
Persistent SOS mode can sometimes indicate a hardware issue, such as a faulty SIM slot, damaged antenna, or internal network module problem. Visiting an Apple Store or an authorized service center allows for a professional diagnostic check and repair if needed.
Pro Tip: While troubleshooting, remember that SOS mode still allows emergency calls. Even if your regular network is unavailable, you can reach local emergency services such as 911, 112, or 999, depending on your region. Regularly reviewing SOS settings, practicing manual emergency triggers, and keeping your iPhone updated ensures both safety and reliable connectivity.
Additional Tips & Best Practices for iPhone SOS Settings
While fixing SOS mode on your iPhone often requires specific troubleshooting steps, developing a few good habits can prevent the issue from showing up repeatedly. Think of these as your ongoing best practices for keeping your iPhone reliable and ready whenever you need it.
Keep Your iPhone Updated
Apple frequently releases iOS updates that patch bugs, improve network compatibility, and strengthen system stability. By regularly updating your device, you reduce the risk of software glitches that can trigger SOS mode. Head to Apple’s iOS update support page for step-by-step instructions on how to check for and install the latest version.
Maintain Your SIM and eSIM
A clean and functional SIM card is essential for uninterrupted service. If you use a physical SIM, check it periodically for dust or scratches and store it safely when not in use. For eSIM users, ensure your plan is correctly activated and synced with your carrier. You can learn more about using Dual SIM with eSIM on iPhone directly from Apple.
Use Automatic Network Selection
Leaving your iPhone set to automatic network selection ensures the device always connects to the strongest available signal. This is especially useful if you frequently travel between regions or switch towers often. Manual selection may occasionally help with signal issues, but long-term, automatic mode is the most reliable.
Enable Wi-Fi Calling
If you live or work in an area with patchy cell coverage, Wi-Fi calling can be a lifesaver. It allows you to make calls and send texts through a Wi-Fi connection, bypassing weak carrier signals that might otherwise leave your phone stuck in SOS. You can enable this feature under Settings → Cellular → Wi-Fi Calling or see Apple’s guide on how to turn on Wi-Fi calling.
Check Carrier Support Before Traveling
Traveling abroad? Not all networks support iPhone’s connectivity features equally. Before leaving, contact your carrier to check if roaming is included in your plan and whether your iPhone will be compatible with local networks. Apple maintains a list of wireless carriers that support iPhone features—a handy resource for international trips.
Monitor Carrier Outages
Sometimes the issue isn’t your iPhone at all—it’s the carrier network. Carriers often publish outage maps or service status pages online. For example, you can check the status of AT&T, Verizon, or T-Mobile networks directly if you’re based in the U.S.
Stay Familiar with Emergency Features
Remember, SOS mode exists for your safety. While frustrating at times, it ensures you’re never cut off from emergency services. Take a moment to familiarize yourself with how to use Emergency SOS on iPhone, how to disable it if activated by accident, and how your iPhone behaves in emergency-only situations. That knowledge could make all the difference when it matters most.
Quick Takeaway: By staying proactive—through updates, good SIM care, reliable settings, and awareness of network conditions—you can significantly reduce the chances of your iPhone getting stuck in SOS mode. Think of these practices as your long-term insurance policy for smooth and stress-free connectivity.
Frequently Asked Questions About iPhone SOS Mode
How do I get my phone off of SOS mode?
If your iPhone is stuck in SOS mode, start with simple fixes: toggle Airplane Mode, restart your phone, or check for a carrier settings update. If none of these work, try resetting network settings. In rare cases, a SIM card replacement may be needed.
How do I stop my iPhone from emergency calling?
You can prevent accidental Emergency SOS calls by going to Settings > Emergency SOS and turning off the Call with Hold or Call with 5 Presses options. This way, your iPhone won’t dial emergency services unless you intentionally trigger it.
Why does my iPhone 14 keep saying SOS only?
On the iPhone 14 and newer models, “SOS Only” often appears when your phone can’t connect to your carrier but can still make emergency calls. This may happen due to network outages, poor signal, or an issue with your SIM card or eSIM.
What does SOS only mean on iPhone?
SOS Only means your iPhone isn’t connected to your normal cellular network but can still place emergency calls through any available network. It’s Apple’s way of ensuring you’re never completely disconnected in a crisis.
How do I stop my iPhone from accidentally calling emergency services?
Head to Settings > Emergency SOS and adjust the shortcuts. You can disable the side button press triggers, or set the feature to require confirmation before dialing. This prevents accidental emergency calls while still keeping the option available in real emergencies.
Can I turn off SOS on my iPhone?
You can’t completely remove SOS from iPhone, since it’s a safety feature. However, you can disable the quick shortcuts and tweak the settings so it doesn’t activate unless you deliberately use it.
How do I turn off Emergency SOS via satellite?
On supported models (like iPhone 14 series), Emergency SOS via satellite is a built-in safety feature. You can’t turn it off entirely, but you can avoid triggering it by not opening the Emergency SOS interface when you’re out of cellular range.
Why is my iPhone stuck in SOS mode even after restarting?
If restarting doesn’t fix the issue, the cause might be network-related or SIM-related. Try updating iOS, resetting network settings, or contacting your carrier for troubleshooting. If the problem persists, it may be a hardware issue requiring Apple Support.
Conclusion – Fixing iPhone SOS Only Mode & Disabling Emergency SOS
Dealing with SOS mode on your iPhone can feel confusing, but it’s usually not a permanent issue. Whether it happens because of a weak network, a SIM card problem, or an accidental button press, you now have a clear step-by-step guide to fix it. From understanding what SOS only means, to preventing accidental triggers, to managing situations where your iPhone is stuck, the solutions we’ve covered are designed to get you back to normal in minutes.
Remember, SOS mode exists to keep you safe—it ensures you can always reach emergency services when you need them most. But with the right best practices—like updating your iOS, enabling Wi-Fi calling, and checking carrier compatibility—you can prevent it from becoming a daily frustration.
Visit Our Post Page: Blog Page