
Do you want to turn on Secure Boot Windows 11? Learn how to enable Secure Boot, switch from Legacy to UEFI, check status, and meet Windows 11 requirements fast.
Unlocking Secure Boot: Your Essential First Step for Windows 11 Security and Compatibility
If you’re gearing up to upgrade to Windows 11 or aiming for a safer, more robust PC experience, enabling Secure Boot on Windows 11 is a non-negotiable step. Secure Boot is a vital security feature that acts like a digital bouncer, ensuring only trusted software can start when your computer boots up. This not only protects your system from nasty malware but also meets Microsoft’s strict Windows 11 system requirements.
In fact, with over 90% of modern PCs supporting Secure Boot through UEFI firmware, many users find themselves stuck because this feature is either turned off or hidden in the BIOS settings. Whether you’re a gamer frustrated by anti-cheat errors in popular titles like Valorant or just someone who values airtight security, knowing how to turn on Secure Boot in Windows 11 can save you hours of headaches.
Not sure where to start? Microsoft’s official guide on Windows 11 Secure Boot requirements is a great resource that walks you through the basics and why this feature is critical for your device.
In this step-by-step blog, we’ll demystify Secure Boot, walk you through checking your current status, and guide you to safely enable it across various PC brands like Dell, Lenovo, and HP. Let’s get your system locked down and Windows 11-ready!
What Is Secure Boot and Why Does It Matter for Windows 11?
Understanding Secure Boot: Your PC’s Startup Gatekeeper
Secure Boot is a powerful feature built into your PC’s firmware, specifically the UEFI (Unified Extensible Firmware Interface). Think of it as a security checkpoint during your computer’s startup process that allows only trusted, digitally signed software to run. This keeps dangerous bootkits and rootkits—malicious software that attacks early in the boot sequence—out of your system.
Why Secure Boot Is Essential for Windows 11
Microsoft has made Secure Boot a mandatory requirement for Windows 11, alongside TPM 2.0. These security features work together to establish a trusted foundation, ensuring your PC is protected against low-level malware and is fully compatible with the latest Windows updates and features. You can learn more about these requirements on the official Windows 11 specifications page.
The Security Benefits: Beyond Just a Requirement
Enabling Secure Boot is more than just ticking a box for Windows 11. It significantly strengthens your PC’s defense against advanced cyber threats that target the system during boot. For security enthusiasts and everyday users alike, Secure Boot provides peace of mind that your system’s core remains uncompromised.
Dive Deeper: Secure Boot vs. Trusted Boot
Curious about how Secure Boot stacks up against other security features like Trusted Boot? The Microsoft Security Blog offers a detailed breakdown to help you understand the layers of Windows security.
How to Check Secure Boot Status on Your Windows 11 PC: Quick and Easy Steps
Before you jump into enabling Secure Boot, it’s smart to check whether it’s already active on your system. Luckily, Windows 11 makes this straightforward with built-in tools that reveal your Secure Boot status in just a few clicks.
Using System Information (msinfo32) to Verify Secure Boot State
One of the fastest ways to check your Secure Boot status is through the System Information tool. Here’s how:
- Press Windows + R to open the Run dialog box.
- Type msinfo32 and hit Enter.
- In the System Information window, look for the entries:
- BIOS Mode — This should read UEFI to support Secure Boot.
- Secure Boot State — This will show On, Off, or Unsupported.
If you see Secure Boot State: On, congrats! Your PC’s Secure Boot is enabled and protecting you. If it’s Off or Unsupported, it means you’ll need to enable or troubleshoot it in the firmware settings.
What Does It Mean If Secure Boot Shows “Unsupported”?
“Unsupported” usually means your PC’s firmware doesn’t support Secure Boot, or it’s running in Legacy BIOS mode instead of UEFI. To fix this, you might need to switch from Legacy BIOS to UEFI boot mode and possibly convert your disk from MBR to GPT (more on that in the next section).
Alternative Tools and Commands to Check Secure Boot
If you prefer using PowerShell or Command Prompt, here’s a quick command to get your Secure Boot status:
Confirm-SecureBootUEFI
This command returns True if Secure Boot is enabled, or False otherwise. You can learn more about this command in the Microsoft Docs.
Preparing Your Windows 11 PC: Switching from Legacy BIOS to UEFI and Other Must-Know Steps
Before you dive into enabling Secure Boot, it’s crucial to get your PC ready. Most Secure Boot issues boil down to one key factor: your system needs to be running in UEFI mode, not Legacy BIOS. Plus, your disk needs to be formatted with GPT instead of the older MBR style. Don’t worry — we’ll walk through these essentials step-by-step.
Why Switching from Legacy BIOS to UEFI Matters
Secure Boot only works when your PC uses UEFI (Unified Extensible Firmware Interface) instead of the old-school Legacy BIOS mode. UEFI is a modern firmware interface that supports Secure Boot and many advanced features Windows 11 depends on. If your system is still set to Legacy mode, Secure Boot will remain disabled or unavailable.
To check your current BIOS mode, remember from Section 3: open System Information (msinfo32) and look for BIOS Mode. If it says Legacy, it’s time to switch.
Converting MBR to GPT: A Key Requirement for UEFI and Secure Boot
Windows 11 requires your system disk to use the GPT (GUID Partition Table) format for UEFI boot mode to work properly. If your drive is formatted with MBR (Master Boot Record), Secure Boot won’t function.
Thankfully, Windows 11 includes a handy tool called mbr2gpt that can convert your disk from MBR to GPT without deleting your data. To use it, you’ll need to run a few commands in Command Prompt with administrative rights. Microsoft provides a detailed guide on using the mbr2gpt conversion tool.
Suspend BitLocker and Backup Your Data Before Making Changes
Before making changes to your firmware settings or disk partition style, it’s always wise to suspend BitLocker encryption if it’s enabled. This prevents any encryption-related hiccups during the boot mode switch.
Also, back up your important files. While the conversion tools are designed to be safe, it’s better to be cautious and ensure your data is protected.
How to Switch Your PC from Legacy BIOS to UEFI
Switching from Legacy BIOS to UEFI typically requires changing the boot mode in your BIOS settings:
- Restart your PC and enter BIOS/UEFI setup (common keys are F2 for Dell, F1 for Lenovo, and Esc + F10 for HP — more on this in Section 5).
- Navigate to the Boot menu.
- Find the Boot List Option or UEFI/Legacy Boot setting.
- Change the setting from Legacy or CSM (Compatibility Support Module) to UEFI Only.
- Save and exit BIOS.
If you’re unsure about these steps, check your PC manufacturer’s website. Here are some quick links for Dell BIOS settings, Lenovo BIOS guide, and HP BIOS configuration.
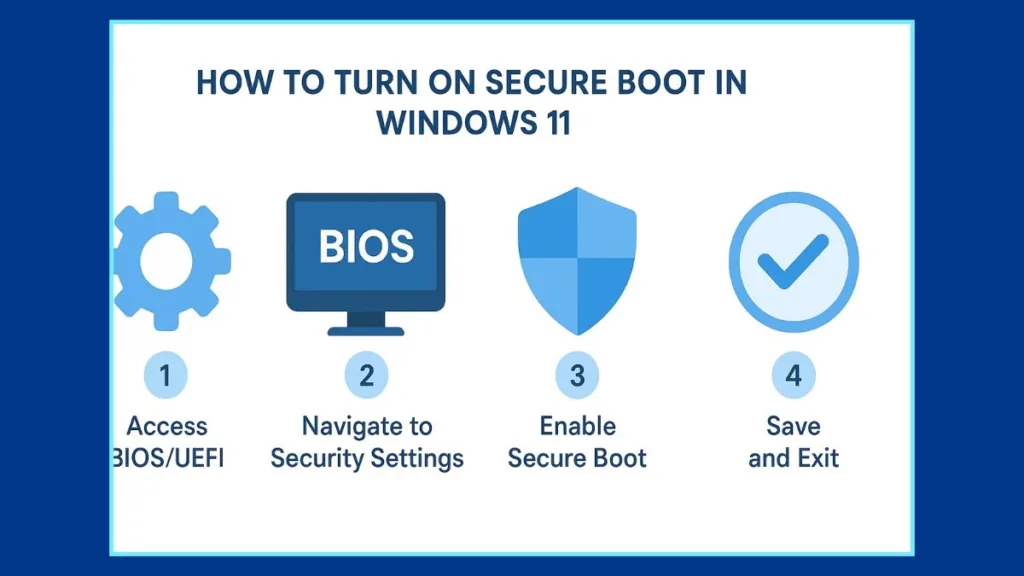
Step-by-Step Guide: How to Enable Secure Boot on Windows 11 Like a Pro
Now that your PC is primed with UEFI mode and GPT partitioning, it’s time for the main event — enabling Secure Boot on Windows 11. Whether you have a Dell, Lenovo, or HP machine, the process is pretty similar, with just a few brand-specific tweaks. Let’s break it down so you can confidently enable Secure Boot Windows 11 style!
Accessing UEFI Firmware Settings via Windows 11
The easiest way to get into your UEFI firmware (BIOS) settings is right from Windows:
- Open Settings → Update & Security → Recovery.
- Under Advanced startup, click Restart now.
- Once your PC restarts, select Troubleshoot → Advanced options → UEFI Firmware Settings → Restart.
This will take you directly into the UEFI interface, where Secure Boot lives.
Brand-Specific BIOS Keys and Navigation
If you prefer the classic route of pressing a key during startup, here’s the lowdown:
- Dell: Press F2 repeatedly during boot.
- Lenovo: Tap F1 at startup (sometimes Enter then F1).
- HP: Press Esc immediately after powering on, then F10 to open BIOS setup.
Once inside the BIOS/UEFI, use the arrow keys and menus to find Secure Boot.
Enabling Secure Boot in BIOS Settings
Look for the Secure Boot option — it’s usually under the Boot, Security, or a dedicated Secure Boot tab. Here’s what to do next:
- Change Boot Mode to UEFI if it isn’t already (sometimes called “Boot List Option” or “UEFI/Legacy Boot”).
- Set Secure Boot to Enabled.
- If you see options like Secure Boot Mode or Custom Mode, choose Standard unless you have custom certificates.
- If prompted about missing keys, select the option to restore default keys.
Save Your Settings and Reboot
Don’t forget to save your changes — usually by pressing F10 — then exit the BIOS. Your PC will reboot with Secure Boot active, making your Windows 11 installation more secure and compliant.
Troubleshooting Tips
If you hit snags like Secure Boot being greyed out or unavailable, double-check that CSM (Compatibility Support Module) or Legacy mode is disabled. Also, ensure your disk is GPT formatted and BitLocker is suspended (if enabled).
For a comprehensive manufacturer-specific walkthrough, check out:
Troubleshooting Secure Boot on Windows 11: Fix Common Issues with Confidence
Even with all the right steps, sometimes enabling Secure Boot on Windows 11 doesn’t go as smoothly as planned. Whether you’re facing a greyed-out Secure Boot option, confusing status messages, or boot failures, don’t worry — these hiccups are common and totally fixable.
Why Is Secure Boot Greyed Out or Unavailable?
A frequent cause of a greyed-out Secure Boot option is that your PC is still running in Legacy BIOS mode or has CSM (Compatibility Support Module) enabled. Secure Boot requires UEFI mode, so make sure Legacy/CSM is disabled in your BIOS settings.
Another factor might be firmware passwords or administrative restrictions preventing changes in BIOS. Check if your PC requires a supervisor password to unlock these settings.
Secure Boot Shows “Enabled” in BIOS But “Off” in Windows
This mismatch usually happens when the BIOS is in Setup Mode rather than User Mode. Setup Mode is a default state where Secure Boot keys aren’t fully enrolled, so Windows doesn’t recognize it as active. To fix this, you may need to reset Secure Boot keys to factory defaults from within the BIOS or firmware settings.
Microsoft’s Secure Boot troubleshooting guide provides detailed instructions for resolving these key enrollment issues.
PC Won’t Boot After Enabling Secure Boot: What Now?
If your PC fails to boot after turning on Secure Boot, it often means your system drive isn’t formatted as GPT, or you have incompatible hardware or software. Reverting the BIOS setting to Legacy temporarily can help you regain access.
Use Windows’ mbr2gpt tool to safely convert your drive from MBR to GPT without losing data — check out Microsoft’s official conversion instructions. Once converted, switch back to UEFI and try enabling Secure Boot again.
Restoring Missing Secure Boot Keys
Sometimes, you might see errors about missing Secure Boot keys or prompts to restore them. Most BIOS interfaces have an option to reset keys to factory defaults or install default Secure Boot keys. Accepting this option usually clears up the problem.
Why Gamers Need to Enable Secure Boot on Windows 11: Boost Your Game Security and Performance
If you’re a gamer, you’ve probably encountered messages telling you to enable Secure Boot on Windows 11 before launching certain titles. This isn’t just a random requirement — Secure Boot plays a crucial role in making your gaming experience smoother and more secure.
Secure Boot and Anti-Cheat Systems: A Winning Combo
Games like Valorant, Call of Duty, and other competitive online titles rely heavily on anti-cheat software to keep gameplay fair. These anti-cheat systems operate at a low level of your PC, close to the operating system kernel. Secure Boot helps protect this layer by preventing unauthorized or malicious programs from loading during startup.
By turning on Secure Boot, you’re essentially locking down your PC’s boot process, making it much harder for cheat software to sneak in and interfere with your game. Riot Games, the developer of Valorant, specifically requires Secure Boot for its Vanguard anti-cheat system to work properly, ensuring a fair playing field.
Fixing Game Launch Errors with Secure Boot
Many gamers have reported encountering errors or being blocked from launching games when Secure Boot is disabled. This has become a common troubleshooting step — enabling Secure Boot often resolves these issues quickly.
If you’re curious about the exact requirements, Riot Games’ official support page outlines why Secure Boot is mandatory for Valorant: Valorant Secure Boot Requirement.
Other Security Benefits for Gamers
Beyond just enabling anti-cheat systems, Secure Boot also reduces your vulnerability to rootkits and bootkits — threats that can degrade your system’s performance or even compromise your personal data. For gamers, this means more stable gameplay and less risk of malicious interference.
Secure Boot FAQs: Quick Answers to Your Burning Questions About Windows 11 Security
Navigating Secure Boot can feel a bit technical at first, but you’re not alone! Here are some of the most common questions people ask about how to turn on Secure Boot Windows 11, answered clearly and with helpful resources.
How Do I Know If My Secure Boot Is On?
You can easily check your Secure Boot status by opening System Information (press Windows + R, type msinfo32, and hit Enter). Look for Secure Boot State — it will say On, Off, or Unsupported. For a step-by-step walkthrough, check out this handy Microsoft guide on checking Secure Boot status.
What Is Secure Boot in BIOS?
Secure Boot is a firmware-level security feature found in the UEFI BIOS. It controls which software can run during the startup process, allowing only trusted programs to load.
What Is the F Key to Enable Secure Boot?
The key to access BIOS/UEFI differs by manufacturer:
- Dell: F2
- Lenovo: F1 (sometimes after pressing Enter)
- HP: Esc then F10
These keys help you reach the firmware settings where Secure Boot can be enabled.
Can I Enable Secure Boot Without UEFI?
No, Secure Boot requires UEFI firmware. If your PC is running Legacy BIOS mode, you’ll need to switch to UEFI first.
How Do I Turn On Secure Boot If It’s Not Supported?
If your PC shows Secure Boot as unsupported, it likely means the firmware or hardware is too old or running Legacy BIOS mode. In some cases, firmware updates from your manufacturer might add support. Check your PC manufacturer’s support page — here are links for Dell, Lenovo, and HP to get started.
Will Enabling Secure Boot Delete My Data?
No, enabling Secure Boot does not delete your data. However, switching from Legacy BIOS to UEFI often requires converting your disk from MBR to GPT. Using Windows’ built-in mbr2gpt tool can convert the partition style without data loss, but backing up important files beforehand is always wise.
How Do I Enable Secure Boot on a Specific Motherboard Brand?
While most steps are similar, manufacturer firmware menus vary. For brand-specific instructions:
- Check Dell’s Secure Boot guide here
- Lenovo instructions can be found here
- HP’s official guidance is available here
Wrapping Up: Secure Boot on Windows 11 — Your Key to a Safer, Smoother PC Experience
As we’ve journeyed through everything you need to know about how to turn on Secure Boot Windows 11, it’s clear that this feature is more than just a technical checkbox — it’s a cornerstone of your PC’s security and compatibility.
Why Enabling Secure Boot Should Be on Your To-Do List
Secure Boot acts as a powerful shield, preventing malicious software from sneaking into your system right when it powers up. It’s a crucial part of the Windows 11 system requirements and helps ensure your device is future-proofed for updates, better performance, and enhanced protection.
Don’t Forget These Important Tips Before You Start
Before tweaking your firmware settings, remember to:
- Back up your important data to avoid any surprises.
- Suspend BitLocker if you’re using it, to prevent encryption-related issues.
- Double-check that your disk is formatted with GPT and your PC is running in UEFI mode (covered in Section 4).
- Consult your PC manufacturer’s support pages for device-specific instructions — here are quick links to Dell, Lenovo, and HP.
Keep Your System Updated and Secure
After enabling Secure Boot, make sure your Windows 11 installation stays up-to-date with the latest security patches and driver updates. Regularly visit the Windows Update page to keep your PC running smoothly and safely.
Final Thought: Secure Boot Is More Than Just a Requirement
Whether you’re upgrading to Windows 11, aiming for hassle-free gaming, or simply want stronger protection against cyber threats, enabling Secure Boot is a smart, proactive move. It’s your PC’s first line of defense, ensuring that your digital world stays safe from the moment you power on.
Visit Our Post Page: Blog Page