
Want to check your Outlook email encryption status? Learn how to verify if an Outlook email is encrypted and confirm your message security with clear, simple steps.
In a digital-first workplace, verifying the security of every message is not optional—it’s essential.
Sensitive data, confidential communications, and regulated information all demand protection.
Outlook supports multiple email encryption technologies, and each presents clear indicators that confirm whether a message is secured.
Understanding these indicators ensures you are not relying on assumptions but on verifiable security controls.
This guide provides a comprehensive, professional breakdown of how to confirm encryption in Outlook—whether you are evaluating a received Outlook email or validating messages you have sent.
How Outlook Shows Encrypted Emails: Key Indicators to Check Email Encryption in Outlook
Outlook incorporates explicit visual and functional markers to help users verify message protection status.
These indicators allow you to identify encryption without needing advanced technical tools or administrative access.
Outlook’s encryption markers are designed to be clear, consistent, and difficult to overlook, ensuring users can quickly determine whether a message is protected before opening, forwarding, or replying.
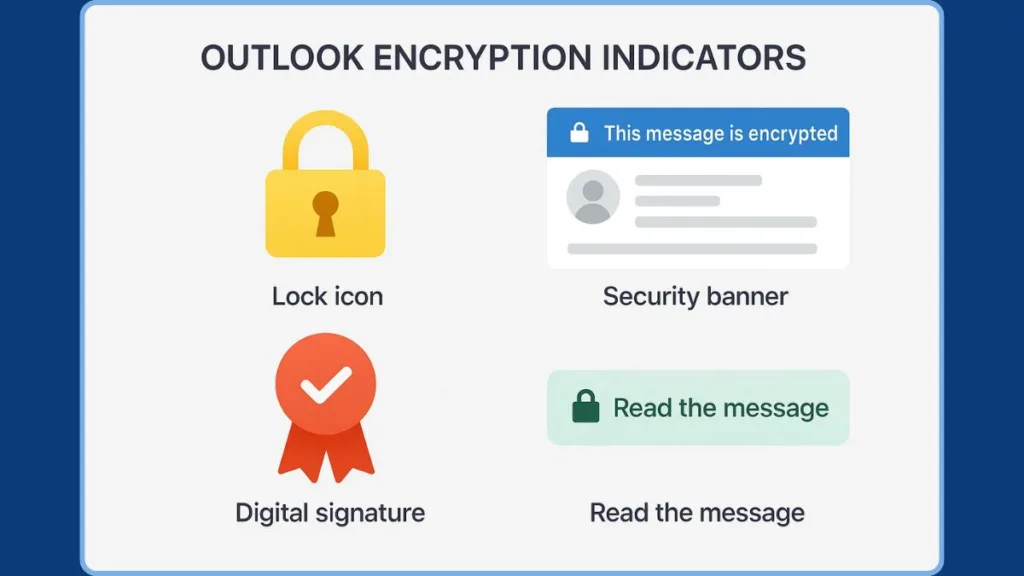
Common Outlook encryption indicators include:
- A lock icon positioned near the subject line or in the message header.
- A banner at the top of the email stating the message is encrypted, protected, or permission-restricted.
- A “Read the message” button redirecting users to a secure Microsoft viewing portal.
- Prompts requiring authentication, certificates, or smart cards before opening the message.
- Labels such as Encrypt-Only, Do Not Forward, and Restricted Access indicating specific security policies.
These indicators vary based on whether the message uses Microsoft 365 Message Encryption (OME) or S/MIME encryption, so both must be examined carefully.
How to Verify Encryption in Outlook for Received Emails: Microsoft 365 Encryption & S/MIME Checks
Verification starts with identifying the type of encryption.
Outlook uses two primary encryption methods, and each presents its own recognizable cues:
- Microsoft 365 Message Encryption (OME)
- S/MIME Certificate-Based Encryption
Understanding these helps you determine the protection level applied to any incoming Outlook message.
How to Confirm Outlook Email Is Encrypted with Microsoft 365: Microsoft 365 Message Encryption (OME)
Microsoft 365 Message Encryption (OME) is the most common encryption method in modern enterprise environments.
It integrates seamlessly into the Microsoft ecosystem and provides clear, authoritative indicators that protection is active.
Look for an Outlook Encryption Banner in Encrypted Emails
Encrypted emails protected with OME display a noticeable banner in the reading pane.
These banners typically state:
- “This message was encrypted.”
- “This message has restricted permissions.”
- “Do not forward.”
These banners confirm that Microsoft-based protection policies are active.
Check the Inbox Snippet for Outlook Encryption Alerts
Outlook may display an encryption summary directly in your email list preview:
- “This message is encrypted. Read the message.”
This indicates that the email cannot be viewed until authentication is completed.
Look for ‘Read the Message’ Secure Viewing Requirements
Some OME-protected emails cannot be viewed directly inside Outlook. Instead, you may see:
- A “Read the message” button
- A prompt to sign in with a Microsoft account
- A request for a one-time passcode
This confirms that the email must be accessed through Microsoft’s secure web viewer, ensuring strong encryption controls remain intact.
What This Confirms About Microsoft 365 Outlook Encryption
If you see any combination of:
- Banner notices
- Restricted-access labels
- Secure viewer prompts
- Authentication requirements
…then Microsoft 365 Message Encryption has been applied.
How to Identify S/MIME Encrypted Emails in Outlook: S/MIME Encryption
S/MIME is a certificate-based, end-to-end encryption method often used in corporate, government, and compliance-heavy environments.
It provides a high level of security, but only if both sender and recipient have valid certificates.
Look for the S/MIME Lock Icon in Outlook Emails
The primary indicator of S/MIME encryption is the lock icon.
It may appear:
- In the mail list beside the email
- In the email header
- On the Outlook ribbon
Color variations (yellow, gray) reflect certificate validation status.
Watch for Outlook Certificate Prompts When Opening Encrypted Emails
When opening an S/MIME-encrypted message, Outlook may request:
- Your encryption certificate
- A smart card
- Access to your private key
These prompts confirm end-to-end encryption.
Do Not Confuse Digital Signatures With Encryption
A red ribbon icon indicates the message is digitally signed, not encrypted.
A digital signature verifies the sender’s identity and maintains message integrity.
It does not encrypt the message content.
An email can be:
- Ribbon + Lock: Signed and encrypted (secure)
- Ribbon Only: Signed but not encrypted (not secure)
- Lock Only: Encrypted without a signature
How to Verify Encryption for Emails You Sent: Confirming Sent Email Encryption in Outlook
Verifying encryption on outgoing messages is essential for compliance and data protection.
Open the Email in the Sent Items Folder to Confirm Encryption
Look for:
- The lock icon
- A security banner
- Labels such as Encrypt-Only, Do Not Forward, Confidential
These confirm that Outlook applied the correct encryption controls.
Check Email Properties for Outlook Encryption Details
To view detailed encryption settings:
- Right-click the email.
- Select Properties.
- Review the Security Settings panel.
This confirms whether:
- Encryption was applied
- A digital signature was added
- A specific protection policy was used
Look for Outlook Ribbon Encryption & Signature Icons
The Outlook ribbon may show:
- A lock icon > Encryption
- A ribbon icon > Digital signature
- A shield icon > Information protection policy
These visual markers confirm the email’s protection status.
Understanding Outlook’s Encryption Indicators: Complete Icon & Notice Reference
A quick-reference summary of Outlook’s security indicators:
| Indicator | Meaning |
|---|---|
| Lock Icon | S/MIME encryption is active |
| Security Banner | Microsoft 365 Message Encryption applied |
| Red Ribbon | Digital signature (not encryption) |
| “Read the message” Button | Requires secure Microsoft viewer |
| Certificate Prompt | S/MIME decryption required |
These icons ensure message confidentiality can be verified at a glance.
What If No Outlook Encryption Indicators Appear? Troubleshooting Missing Encryption Signs
If no encryption markers are visible, it may indicate:
- Encryption was not enabled
- The message used standard delivery
- Your environment lacks S/MIME or OME configuration
- Certificates are missing or incorrectly installed
- The email relied only on TLS (transport encryption, not message encryption)
If the message contains sensitive information, resend it with encryption enabled.
Frequently Asked Questions About Checking Outlook Email Encryption
Is Outlook encryption automatic?
Not always. Some organizations enforce encryption via security policies, while others rely on manual activation.
Can I check encryption in Outlook Web?
Yes—Outlook Web displays the same banners, icons, and secure-viewer prompts.
Is a digital signature the same as encryption?
No. A digital signature verifies identity; encryption protects data.
Why do I receive a passcode for an encrypted email?
This is part of Microsoft 365’s secure message viewing process, confirming OME use.
Does the lock icon always mean encryption?
Yes. The lock icon indicates S/MIME encryption.
Final Tips for Maintaining Secure Email Communication in Outlook
- Always verify encryption indicators before sending sensitive information.
- Use Microsoft 365 Message Encryption or S/MIME for strong protection.
- Ensure your certificates are correctly installed and up to date.
- Double-check Sent Items to confirm encryption was applied.
- Train team members to identify Outlook’s encryption icons for stronger organizational security.
This verification process ensures email confidentiality is confirmed, not assumed, through Outlook’s authoritative and clearly identifiable security indicators.
Useful Resources
- Send encrypted messages with a Microsoft 365 account: A article that explains how to send encrypted emails using a Microsoft 365 / Outlook.com subscription — good for understanding what encryption looks like from the sender’s side.
- Set up Outlook to use S/MIME encryption: Official Microsoft documentation that walks through configuring S/MIME in Outlook (installing certificates, enabling encryption and/or signatures).
- Send S/MIME or Microsoft Purview encrypted emails in Outlook
Microsoft support page covering both S/MIME and the Microsoft Purview Message Encryption (OME) option — helpful for seeing how both encryption types work in Outlook. - Open encrypted and protected messages in Outlook: A guide showing how recipients view encrypted emails — very relevant to your blog post’s “how to verify” perspective (looks for lock icons, banners, actions needed).
Visit Our Post Page: Blog Page