
Wondering why old backups are taking up so much iCloud storage? Learn how to safely delete old iCloud backups, free up space, and protect your data.
Have you recently received that dreaded “iCloud Storage Full” notification and wondered where all your space disappeared to? Or maybe you checked your settings and discovered that old backups are hogging several gigabytes of storage, even though you haven’t used those devices in years.
If so, you are definitely not alone.
One of the most common reasons you might run out of iCloud space is because old iPhone and iPad backups continue lingering in your account long after those devices have been replaced, sold, or retired. It is a very common misconception, but Apple does not automatically remove your old backups when you switch to a shiny new device. Because of this, your storage quota can slowly fill up with outdated files that no longer serve any real purpose.
Things can get even more confusing when your settings report that Backups are using a massive chunk of storage, yet opening the Backups section reveals a much smaller size—or even 0 B. Many users immediately assume something is broken or worry that deleting an old file will permanently erase their current photos, messages, or important documents.
The great news is that deleting old iCloud backups is often one of the absolute fastest and safest ways to free up storage—as long as you know exactly which backups you no longer need.
In this guide, we are going to dive into why these backups become so massive, how to identify outdated ones that are perfectly safe to remove, and what actually happens behind the scenes after you hit delete. We will also clear up some common technical glitches, break down the critical difference between iCloud Backup and iCloud Photos, and set you up for our step-by-step removal tutorials coming up later.
Let’s kick things off by understanding why those old files keep taking up your valuable digital real estate in the first place.
Why Are Old Backups Taking Up So Much iCloud Storage?
Many people naturally assume that when they upgrade to a new iPhone, Apple simply overwrites the backup from their previous device. However, that is one of the biggest misconceptions out there regarding how iCloud works.
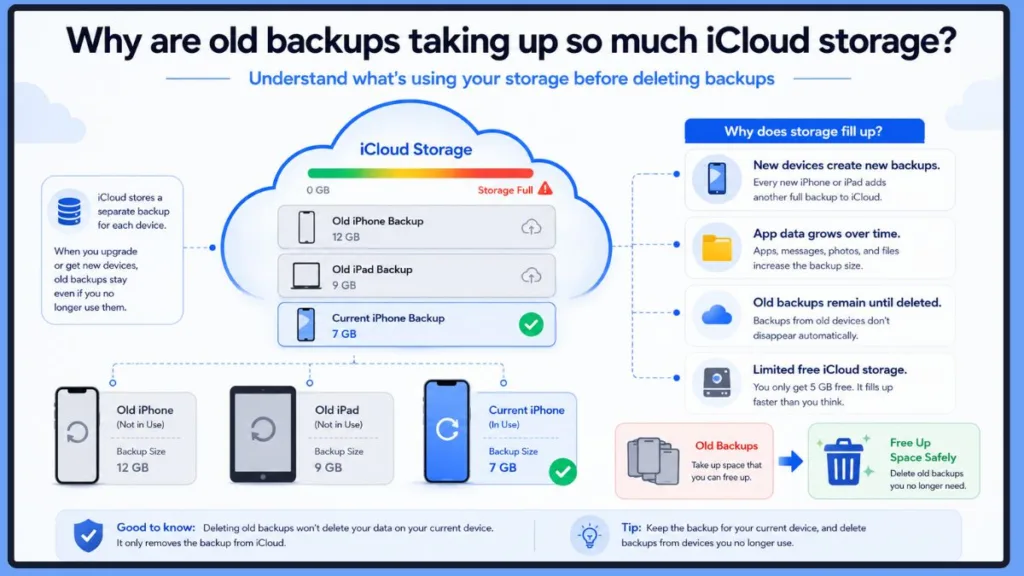
Every single Apple device that has iCloud Backup enabled creates its own separate, dedicated backup inside your account. These files are linked specifically to the individual hardware, not just your overarching Apple ID. This means that getting a new device does not automatically erase the history of your old one. Over the years, these hidden files can quietly accumulate and eat away at your available space.
Every Apple Device Creates Its Own Backup
Imagine you just upgraded from an iPhone 13 to an iPhone 17. After transferring all your data, your new iPhone instantly starts creating its own fresh backup. Meanwhile, the backup from your old iPhone 13 remains securely stored in the cloud until you go in and manually remove it.
If you have upgraded your phone several times over the years, or if you juggle multiple Apple devices at once, your account is likely holding onto data from hardware you no longer even own. This is almost always the primary culprit when you discover mystery data clogging up your storage.
How iCloud Backup Actually Works
To understand the storage drain, it helps to know how the feature functions. iCloud Backup is designed to automatically protect your important data whenever your device meets Apple’s specific conditions. Generally, your iPhone or iPad will quietly create a backup in the background when it is connected to Wi-Fi, plugged into a charger, locked, and connected to the internet.
These safety nets are there to help you seamlessly restore your apps, custom settings, text messages, and other crucial info if you ever replace, factory reset, or lose your phone. Because each eligible gadget makes its own independent copy, seeing multiple backups listed under your single Apple ID is completely normal and expected.
Why Backup Sizes Keep Growing
It is very common to feel surprised when you notice a backup suddenly inflate from a manageable few gigabytes to 20 GB, 30 GB, or even larger.
In almost every situation, this massive jump isn’t a glitch. It is simply a reflection of how much digital clutter your device has accumulated. As you use your iPhone or iPad daily, you naturally download more apps, save new files, send thousands of text messages, and allow your favorite apps to cache local data. Over time, all of these minor additions increase the overall size of your backup.
Your files might also see a size bump after downloading major iOS updates or if you flip the switch to include heavy, data-rich apps in your backup routine.
Tip: A larger backup size does not automatically mean something is broken. It usually just indicates that your device is holding onto more personal data than it did when the previous snapshot was taken.
Why the Free 5 GB iCloud Storage Fills Up So Quickly
When you create an Apple ID, you are generously given 5 GB of free iCloud storage. However, that space is stretched incredibly thin across multiple different services.
Your available free space isn’t reserved exclusively for backups. It is heavily shared with iCloud Drive, Messages in iCloud, synced app files, and any other platform that uses the cloud to store data. Even if you don’t take thousands of photos, a single backup from a modern iPhone can easily consume that entire 5 GB limit all on its own.
This shared storage ecosystem is exactly why so many people get hit with the “iCloud Storage Full” warning much faster than they ever anticipated. Before you commit to paying a monthly fee for an upgraded iCloud+ storage plan, it is always a smart move to check if outdated files are unnecessarily hogging your free space. You can also dive into Apple’s official guide to managing your iCloud storage for more insight on how your space is divided.
Why Old Backups Don’t Delete Automatically
Apple purposefully holds onto your old data because it might still be a lifesaver if you ever need to restore a previous device or recover a specific deleted file.
However, once you are absolutely certain that you will never need that specific data again, Apple places the responsibility on you to clean it up. For example, if you have wiped and sold an old iPhone, traded it in at the store, or permanently transitioned to a newer model, that old backup will just sit in the cloud forever, gathering digital dust.
Routinely reviewing your device list and clearing out outdated files is arguably the easiest and most effective way to recover lost space without touching the data on your active devices.
When Should You Delete Old iCloud Backups?
Hitting the delete button is not something you should do the second you spot a large file in your storage list. First, you need to verify that the file actually belongs to hardware you no longer rely on.
If the file belongs to the iPhone you are holding in your hand right now, or if it is the only restore point you have, you need to keep it. However, there are several very common situations where removing the data is entirely safe and highly recommended.
After Upgrading to a New iPhone
The absolute best time to delete an old file is immediately after you have successfully upgraded to a newer smartphone.
Once you have used Quick Start to transfer your data, verified that all your apps and contacts are present on the new device, and decided you will never restore the old hardware, the previous backup becomes dead weight. Keeping it around simply burns through your storage quota for no reason.
After Selling or Trading In an Old Device
If you recently sold, traded in, or handed your older iPhone or iPad down to a family member, that device’s backup is likely still attached to your Apple ID.
Once you have securely erased the hardware and confirmed your critical data safely made the jump to your new device, there is practically no reason to hold onto the old file—unless you are specifically trying to digitally archive it. Clearing out data from hardware you no longer own is the best way to keep your digital life organized.
After Replacing an Older iPad
The exact same rules apply to Apple’s tablets. After moving your digital life to a brand-new iPad and confirming that your favorite drawing apps and documents transferred without a hitch, you are completely safe to remove the data from your previous tablet to instantly recover gigabytes of space.
When Your iCloud Storage Is Full
A lot of people don’t even realize they are hoarding multiple inactive files until that annoying “iCloud Storage Full” alert pops up on their screen.
Before you pull out your credit card to buy a larger iCloud+ tier, take a minute to review your device list. You might be shocked to discover an outdated file from four years ago eating up a massive chunk of your capacity. Deleting it is often the only fix you need.
When You Have Multiple Old Device Backups
If you have been fiercely loyal to the Apple ecosystem and used the same Apple ID for a decade, it is incredibly common to stumble upon files from hardware you completely forgot existed.
You might find an iPhone 8 you upgraded years ago, an iPad with a cracked screen sitting in a drawer, or even a partner’s device that briefly piggybacked on your account. Periodically auditing this list guarantees you are only dedicating storage to the technology you actively use today.
Best Practice: Make it a habit to check your storage settings every few months. It is especially important to do this right after buying new hardware or whenever you start getting low-storage warnings.
Why Does iCloud Show Backups Taking Up Storage but My Backup Says 0 B?
One of the most anxiety-inducing glitches users run into is when the main storage menu shows backups consuming several gigabytes, but tapping into the actual file reveals a size of 0 B (zero bytes) or something impossibly small.
If you are currently staring at a 0 B screen, take a deep breath. You haven’t lost your data, and this is a known, fairly common quirk.
iCloud Storage May Not Have Refreshed Yet
Any time you manually create, delete, or alter a backup, Apple’s remote servers require a little bit of time to crunch the numbers and recalculate your exact storage usage.
During this brief calculation period, the visual storage graph at the top of your screen and the detailed breakdown list might temporarily disagree and show conflicting numbers. In almost all cases, the interface will automatically correct itself if you just give it a little time.
A Backup May Still Be Processing
If your iPhone recently finished a scheduled backup—or if it is currently in the middle of uploading one—the system might not have finished processing the metadata that tells your screen how large the file is.
Heavier files packed with years of text messages and app data take longer to fully sync, causing a delay before the correct, final size is displayed on your screen.
Temporary Sync Delays
You might also notice wonky storage numbers right after you restore a device, adjust which apps are allowed to save data, or scrub an old file from your account.
Because Apple synchronizes your information across a massive web of servers and services, visual updates don’t always push to your phone screen instantaneously. Waiting an hour or two usually clears up any lingering confusion.
Minor Display or Storage Calculation Issues
Every now and then, the software simply has a minor hiccup and temporarily displays the wrong math.
If the numbers feel completely inaccurate, you can usually force the system to catch up. Try backing out of the menu and reopening it to refresh the page, restarting your phone entirely, ensuring you are connected to a fast and stable Wi-Fi network, and checking the numbers again in a few minutes.
Important Note: Seeing 0 B does not mean your precious data has vanished into thin air. It almost always just means the visual interface hasn’t finished communicating with the servers to display the correct size.
What Is Actually Included in an iCloud Backup?
A lot of folks operate under the assumption that a backup only saves a copy of their contact book and a few text messages. In reality, it captures a massive amount of data.
The entire goal of this feature is to help you restore your iPhone or iPad to a completely familiar, ready-to-use state if disaster strikes and your device is broken or lost. To achieve that seamless transition, Apple packages up a wide variety of locally stored information that isn’t already syncing independently to the cloud.
What Data Does iCloud Backup Save?
When the system runs, it grabs a snapshot of your specific app data, your customized device settings, the exact layout of your Home Screen folders, your SMS and iMessage history, sensitive Health data, Apple Watch configurations, custom ringtones, Visual Voicemail passwords, and other stray files saved directly to the device’s hard drive.
The final size of this package depends entirely on how you have configured your settings and exactly which third-party apps you have permitted to save data. This is precisely why a phone you’ve used for three years will generate a much heavier file than a device you bought last week. Apple explains this in deeper detail within its documentation on what iCloud Backup includes.
What Isn’t Included in an iCloud Backup?
It is just as important to know that not everything on your phone is stuffed into this file.
Any information that is already continuously syncing to the cloud independently—such as your Contacts, Calendars, Notes, Safari bookmarks, iCloud Drive documents, Mail, and your saved passwords in iCloud Keychain—is stored completely separately.
Because this data already lives safely in your Apple ID account, the system is smart enough not to waste space by creating duplicate copies inside your nightly backup. Understanding this separation is crucial because it explains why deleting an old backup does not wipe out your live contacts or calendars.
iCloud Backup vs. iCloud Photos: What’s the Difference?
Perhaps the single biggest point of confusion for Apple users is understanding how device backups interact with your photo library.
It is incredibly common to be terrified that hitting the delete button will permanently erase every single baby picture, vacation photo, and video stored in your account. Thankfully, as long as you understand your settings, that is almost never what happens.
If iCloud Photos Is Enabled
When you have iCloud Photos toggled on in your settings, your entire library of photos and videos is stored independently and synchronizes seamlessly across all your Mac, iPad, and iPhone screens in real-time.
Because these cherished memories are already living safely in their own dedicated section of the cloud, they are strictly excluded from your nightly device backup to save space. Therefore, if you use this feature, deleting an old backup will never delete your photos.
If iCloud Photos Is Disabled
If you have actively chosen to keep iCloud Photos turned off, the system assumes your device’s hard drive is the only place those pictures exist. To keep them safe, it will bundle your entire camera roll directly into your device’s backup file.
If you delete that specific backup, you will lose the emergency cloud copy of those photos. However, it will not delete the original photos that are currently sitting in the Photos app on your physical device.
Should You Worry About Losing Photos?
Before you clear out any old files to free up space, just ask yourself two very simple questions:
- Are my photos currently syncing automatically through iCloud Photos?
- Do I still need this specific backup to restore a broken or retired device?
If your answer to the second question is a firm no, removing an outdated file is generally a perfectly safe, highly effective way to reclaim your storage without putting your current digital life at risk.
Now that you understand exactly how your storage works and why these files get so large, it is time to take action.
How to Identify Which iCloud Backup Is Safe to Delete
Before you hit the delete button on any file, take a few minutes to verify that it truly belongs to a device you no longer need. This is easily the most critical step in the entire process.
Many users see multiple backups listed in their account and immediately delete the largest one to free up space as fast as possible. While that will certainly recover a lot of gigabytes in a hurry, it is not the safest approach. If you accidentally remove the active backup for the phone or tablet you are holding right now, you won’t have a safety net to restore your data if your device gets damaged, lost, or broken.
Fortunately, identifying your old, unused files is incredibly straightforward once you know exactly what clues to look for.
Check the Device Name
The absolute easiest way to recognize an outdated file is by looking at its custom label. When you open your storage settings, every single backup file is stamped with the exact name of the hardware that created it. If you spot the name of an old phone or tablet that you sold, traded in, or threw away years ago, that file is a prime candidate for the digital recycling bin.
For example, if your brand-new smartphone is named “Arpit’s iPhone 17” but you see a lingering file simply labeled “iPhone 13”, it is time to check whether that old data is serving any real purpose.
Tip: If you aren’t completely sure what your current smartphone is named, you can easily verify it. Just head over to Settings → General → About on your active device to view and match its exact name. This quick check will completely prevent you from accidentally deleting the wrong data.
Look at the Last Backup Date
The timestamp of the last successful upload provides another massive clue. A backup file that hasn’t been modified or updated in several months—or even years—is almost certainly tied to a gadget that is no longer active in your daily life. Conversely, a file that shows a timestamp from last night or earlier today is highly likely to be the active lifeline for your current device.
While you shouldn’t rely solely on the date before making your final decision, checking the timestamp helps you instantly separate your active, living data from your historic, stagnant files.
Pro Tip: If you want to confirm that your current device is backing up properly, you can tap on your active device’s name inside the storage menu to see its latest upload timestamp. If it looks outdated, you can manually force a fresh upload right now by navigating to Settings → [Your Name] → iCloud → iCloud Backup and tapping Back Up Now.
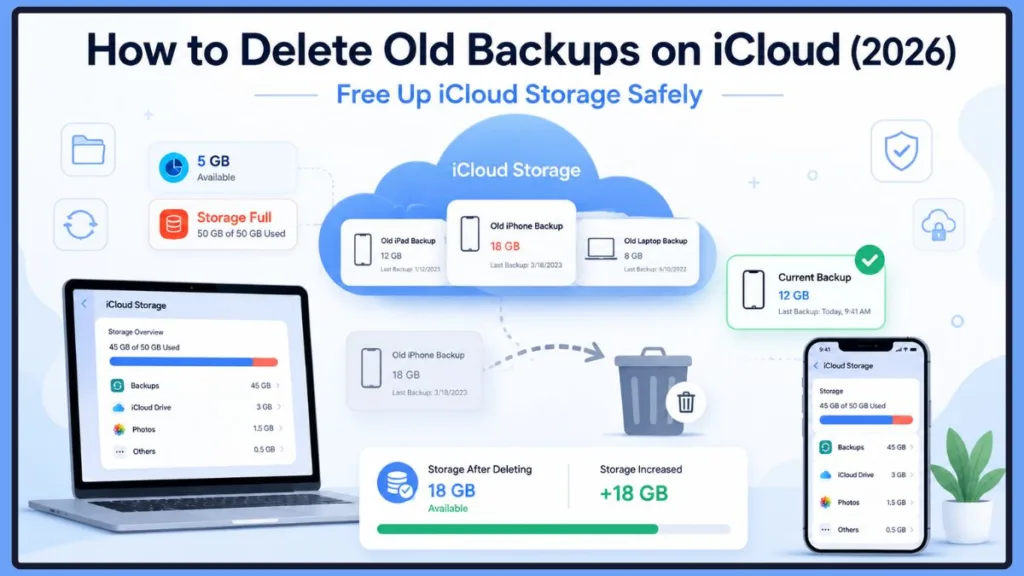
Compare the Backup Size
As you audit your list, you will notice that every individual file displays its exact storage footprint. Large files aren’t automatically bad or unnecessary, but comparing sizes side-by-side gives you a clear picture of where your cloud space is actually going.
For example, your storage breakdown might reveal a snapshot like this:
- Your current, primary phone backup uses 12 GB.
- An old phone backup from three years ago still occupies 18 GB.
- A forgotten tablet backup consumes another 6 GB.
Seeing the data laid out this clearly makes it incredibly easy to decide exactly where you can cut the fat to recover the most space.
Best Practice: If your active device’s backup is growing completely out of control, you don’t have to delete it entirely to save space. Instead, you can manually customize and trim its size. Learn how to toggle off heavy apps by reviewing Apple’s official guide on reducing your iCloud backup size.
Ask Yourself One Simple Question
Before you take the plunge and erase anything, pause and ask yourself this single question: “Will I ever genuinely need to restore an old device using this exact data?”
If your answer is yes, keep the file exactly where it is. If your answer is a firm no—because you have already safely moved your digital life to a newer device, sold the old hardware, or permanently retired it—then it is completely safe to clear it out of your account. Taking five seconds to answer this question will save you from a world of accidental data loss stress later down the road.
Before You Delete an iCloud Backup
It is important to remember that deleting a file from the cloud is an absolute, permanent action. While hitting delete will never erase the photos, messages, or apps that are currently sitting on your physical device, it does completely destroy the emergency historical restore point associated with that backup.
Because there is no “Undo” or “Trash” folder for cloud backups, you should run through a final, rapid checklist before tapping that red text.
Make Sure You’re Deleting the Correct Backup
Verify the following four details one last time before you authorize the deletion:
- The Device Name matches your old hardware.
- The Last Backup Date is weeks or months in the past.
- The Backup Size matches the file you intend to clear.
- You no longer physically own or use the associated hardware.
If every single one of those points aligns with an inactive device, you can confidently proceed to the next step.
Quick Tip: If you manage a large empire of family electronics under a single account, you can see a live directory of your active ecosystem. Head to Settings → [Your Name] and scroll down to the very bottom to see a clean list of every device currently logged into your Apple ID.
Don’t Delete the Only Backup of Your Current Device
If a file belongs to the smartphone or tablet you are using to read this article right now, think very carefully before messing with it. Operating your primary device without a recent cloud backup means that a single accidental drop, water spill, or software failure could result in losing your current messages, app progress, and customized settings forever.
If you are desperately trying to clear up space, always prioritize hunting down and removing data from older, inactive gadgets first.
Safer Alternative: If your current backup is simply too large for your comfort but you don’t want to lose your peace of mind, consider looking into Apple’s iCloud storage upgrade plans to comfortably expand your digital home, or optimize what your apps are storing.
Verify Your Important Data Is Safe
If you are feeling even a tiny bit hesitant about whether an old file contains a rogue document or an old conversation you might want back someday, stop. Take a moment to explicitly verify that those files have already been safely transferred to your new hardware, saved to a computer hard drive, or archived safely elsewhere.
Doing this quick manual verification gives you absolute confidence that once you clear the cloud space, you won’t experience an ounce of regret.
Warning: Deleting an iCloud backup is completely irreversible. The second it is removed from Apple’s remote servers, that specific snapshot is gone forever and cannot be recovered by Apple Support.
How to Delete Old Backups on iCloud
Once you have successfully tracked down your outdated files and verified that they are completely safe to remove, you can delete them using whatever device you prefer.
Apple allows you to manage your storage across your entire ecosystem, meaning you can clean house using an iPhone, an iPad, a Mac, or even a Windows PC. The steps are beautifully uniform across the board. Let’s walk through each method together.
How to Delete Old iCloud Backups on iPhone
If you do most of your digital organizing directly from your phone, this is the quickest and most convenient method available.
Quick Navigation Path: Settings → [Your Name] → iCloud → Manage Account Storage (or Manage Storage) → Backups
Step 1: Open the Settings App
Unlock your phone and launch the primary Settings app. Right at the very top of the screen, tap your Apple ID name card to open up your high-level account and profile management screen.
Step 2: Open Your iCloud Storage Settings
Tap on the iCloud option, and then select Manage Account Storage (on newer iOS versions) or Manage Storage (on older software). This menu provides a beautifully color-coded breakdown of exactly how your cloud space is being utilized.
Step 3: Dive Into the Backups Section
Scroll down through your various apps and storage categories until you locate Backups, then give it a tap. Your screen will populate with a complete list of every single iPhone and iPad backup currently tethered to your Apple ID.
Step 4: Select the Specific File to Remove
Tap on the backup that belongs to the older device you no longer use. Before you touch anything else, do a final visual scan of the Device Name, Last Backup Date, and Backup Size displayed on the screen to guarantee absolute accuracy.
Step 5: Permanently Delete the Backup
Scroll all the way down to the bottom of the detailed breakdown page and tap the red Delete Backup button. When the system throws up a final security prompt, tap Turn Off & Delete to confirm. The file will be instantly wiped from your account.
Expected Screen Result: After confirming, the menu will flash, the old device name will vanish from your backup list, and the storage bar at the top of your screen will dynamically recalculate to reflect your newly recovered free space.How to Delete Old iCloud Backups on iPad
Because iPadOS shares the exact same operational DNA as the iPhone, managing your cloud files on a tablet is an almost identical experience.
Quick Navigation Path: Settings → [Your Name] → iCloud → Manage Account Storage → Backups
- Launch Settings: Open your Settings app and select your Apple ID profile name at the top left of the split-screen layout.
- Access Storage: Tap iCloud, navigate into Manage Account Storage, and select the Backups folder.
- Pick the Target File: Carefully review the listed devices and tap the one you are ready to discard. If you actively use both an iPhone and an iPad, pay extra close attention to the small device icons and names so you don’t confuse your tablet’s active data with your phone’s history.
- Confirm and Wipe: Tap Delete Backup at the bottom of the screen and confirm by selecting Turn Off & Delete. Your tablet will instantly communicate with the cloud to vaporize the file.
How to Delete Old iCloud Backups on Mac
If you prefer working on a larger desktop layout, macOS lets you seamlessly clean out your iCloud account via your system settings.
Quick Navigation Path: Apple Menu () → System Settings → [Your Apple Account Name] → iCloud → Manage → Backups
- Open Settings: Click the Apple logo () in the top-left corner of your desktop screen and select System Settings (or System Preferences if you are running an older macOS version). Click your Apple Account profile name at the very top of the left sidebar.
- Enter iCloud Storage: Click on iCloud on the right side of the window, then click the Manage… button located right next to the visual storage allocation bar.
- Locate Backups: From the sidebar list of storage categories, click on Backups. You will see a clean list of every device currently occupying storage space.
- Select and Delete: Click on the old backup file you want to destroy, then click the Delete Backup button. Confirm your decision when the pop-up warning appears, and your Mac will handle the rest.
How to Delete Old iCloud Backups on Windows PC
You don’t even need to have an active Mac to keep your cloud storage pristine. You can easily manage your entire Apple profile using the official Windows companion application.
Quick Navigation Path: iCloud for Windows App → Storage → Backups
- Launch the Software: Open up the iCloud for Windows application on your PC and sign in using the exact same Apple ID credentials linked to your mobile devices. If you don’t have it yet, you can easily download it directly via Apple’s official iCloud for Windows setup page.
- Open Storage: Click on the Storage button located on the main dashboard to view your overall storage consumption graph, then select the Backups category from the list.
- Highlight and Remove: Scan the available device files, click on the inactive device you want to remove, and click Delete. Confirm your decision in the final dialog box to permanently wipe the file from your account.
Troubleshooting Note: If the “Backups” category appears grayed out or doesn’t show up at all on your Windows app, ensure that your PC has a stable internet connection and that you have enabled “iCloud Drive” within the main application checklist to force a proper account sync.
Did the Backup Delete Successfully?
Once you have completed the deletion process on any of your devices, navigate back out to the main iCloud Storage page to audit your handy work.
In most scenarios, your available storage numbers will update immediately, giving you a satisfying visual confirmation of all the space you just saved. However, if the storage graph doesn’t move right away, do not panic.
Apple’s remote servers frequently require a few minutes to fully process the command, drop the heavy files, and accurately recalculate your remaining capacity across their global network. If your storage allocation looks unchanged, simply force-close your settings app, wait a few minutes for the servers to catch up, and check back in a short while. You can always jump back into Settings → [Your Name] → iCloud to verify the clean, updated breakdown.
Now that you have successfully purged those old, zombie backup files from your account and reclaimed your hard-earned gigabytes, an important question remains: What exactly happens behind the scenes the second you delete a backup, and does it change how your current device behaves?
In our final section, we will answer that exact question, dive into smart ways to shrink your active backup size without deleting anything vital, and share expert strategies to maximize your free iCloud storage.
Visit Our Post Page: Blog Page
Discover more from Izoate
Subscribe to get the latest posts sent to your email.