
Learn how to unlock Drifter in Risk of Rain 2. Find both Prison Matrices, defeat Solus Wing, open the Solutional Haunt vault, and complete Lost in Transit.
Trying to unlock Drifter in Risk of Rain 2? You need to complete the Lost in Transit challenge from the Alloyed Collective DLC. The challenge takes you through Conduit Canyon and Solutional Haunt, where you must defeat Solus Wing, collect two Prison Matrices, and free Drifter from a locked containment unit.
The confusing part is that defeating Solus Wing doesn’t automatically unlock her. You must explore the caves that open after the boss fight, interact with two hidden Solus Coffers, and use the Prison Matrices at two separate terminals.
This guide explains the entire process, including the Access Node route, Sentry Key requirements, Solus Wing’s weak points, both Prison Matrix locations, and the final vault interaction.
Quick answer: Enable the Alloyed Collective DLC, activate the Access Node on an eligible Stage 3 environment, complete the route through Conduit Canyon, and defeat Solus Wing in Solutional Haunt. Collect both Prison Matrices from the Solus Coffers, use the first to open the vault, and use the second to free Drifter.
Drifter Unlock Requirements: Alloyed Collective DLC and Lost in Transit
Before starting the Lost in Transit challenge, make sure the correct DLC is enabled. Drifter is not a free Survivor included in the base game.
You’ll need:
- Risk of Rain 2: Alloyed Collective: The expansion adds Drifter, the Access Node, Conduit Canyon, Solutional Haunt, and the enemies and interactables involved in the unlock.
- A new run with the DLC enabled: Start a normal run with Alloyed Collective active. You can choose your preferred Survivor and difficulty.
- Enough damage and mobility to reach the final area: Conduit Canyon has several required encounters, while Solus Wing has multiple attack phases and dangerous arena hazards.
You can check the official Alloyed Collective DLC page on Steam before starting.
You don’t need to unlock a particular Survivor first. The challenge is about completing the required route and freeing Drifter, not reaching a specific character milestone.
How to Find the Access Node in Risk of Rain 2
The standard route to Drifter begins on Stage 3. Your goal is to find an Access Node, activate it, and use the Encrypted Portal that appears after the regular teleporter event.
Stage 3 Access Node: Where to Find the Red Device
Progress through the first two stages as you normally would. When you arrive at an eligible Stage 3 environment, explore the map for a small, red, mine-like device called an Access Node.
The device can blend into the environment, so don’t focus only on the teleporter itself. Search the surrounding terrain, structures, and side paths as you explore.
The Access Node is a DLC-specific interactable. On eligible normal Stage 3 environments, only one can spawn per stage, so you don’t need to search for several of them.
Once you locate it, approach and interact with the device. It activates and creates a virtual marker around the teleporter, preparing the Encrypted Portal for the next step.
How to Activate the Encrypted Portal on Stage 3
After activating the Access Node, return to the teleporter and begin the regular teleporter event.
Defeat the boss, charge the teleporter completely, and watch the area for the newly spawned Encrypted Portal.
This is an important distinction: activating the Access Node does not immediately transport you to Conduit Canyon. You must finish the teleporter event first.
When the Encrypted Portal appears, enter it rather than taking the ordinary route to the next stage. Doing so takes you into Conduit Canyon, where the Alloyed Collective progression continues.
Common mistake: Leaving through the regular exit before entering the Encrypted Portal can interrupt your intended route. If you want to complete Lost in Transit in the same run, make sure you use the correct portal.
How to Reach Solutional Haunt in Risk of Rain 2
Conduit Canyon is more than a transition stage. You must collect Sentry Keys, disable its security barriers, unlock the teleporter, and clear a mandatory boss encounter before reaching Solutional Haunt.
How to Collect Sentry Keys in Conduit Canyon
After entering Conduit Canyon, explore the interconnected ships and platforms. Defeating elite enemies rewards Sentry Keys, which are needed to interact with the stage’s Sentry Terminals.
Don’t spend time attacking ordinary enemies in the hope that every kill will provide a key. Concentrate on finding and defeating eligible elite enemies while clearing the route.
Mobility is especially valuable here. The level has gaps, elevated walkways, and energy lines that help you travel between sections. Survivors with limited mobility may need to use the environment carefully rather than attempting every jump directly.
How to Disable Conduit Canyon’s Three Security Barriers
Use your first set of three Sentry Keys on the required Sentry Terminals to disable the security barriers blocking progression.
These terminals are important because the locked paths separate parts of the stage. If you reach a barrier and cannot continue, check whether you have collected enough keys and activated the required terminal.
After disabling the barriers, continue into the newly accessible section and prepare to repeat the key-gathering process.
How to Unlock the Encrypted Teleporter in Conduit Canyon
The Encrypted Teleporter requires another set of Sentry Keys. Collect additional keys from elite enemies and use them to complete the teleporter’s security sequence.
In practical terms, plan for two groups of three keys during the standard Conduit Canyon route: one for the three security barriers and another for the teleporter’s decryption sequence.
Once the required terminals are active, you can initiate the encounter that leads to the next stage.
How to Defeat the Solus Control Unit and Alloy Hunter
The teleporter fight in Conduit Canyon has two parts. It begins with a Solus Control Unit, which is replaced by the Alloy Hunter when its health reaches the required threshold.
Don’t assume the encounter is finished when the first enemy disappears. Continue fighting until the Alloy Hunter has been defeated and the teleporter sequence is complete.
After clearing the encounter, use the teleporter to reach Solutional Haunt, the stage containing Solus Wing and the Prison Matrices needed for Drifter.
How to Beat Solus Wing in Risk of Rain 2: Weak Points and Boss Mechanics
Solus Wing is the main boss you must defeat before the Prison Matrix area becomes accessible.
When you enter Solutional Haunt, follow the tunnel down into the arena. The encounter begins as you descend, and the doors close behind you. Destroy the two initial Heat Vents blocking the route forward to open the way into the main arena.
The fight becomes considerably more manageable once you understand the relationship between the boss’s armor, Memory Modules, laser attacks, and environmental hazards.
Solus Wing’s Four Memory Module Weak Points
Solus Wing has a heavily armored main body and four destructible Memory Modules. Three are positioned around its eye, and the fourth sits on top of the boss.
The main body has 1,000 base armor, along with adaptive armor that further reduces the effectiveness of burst damage. Reference stats list 6,069 base health before level scaling, although the boss’s effective durability varies with the run.
This explains why attacking the body directly can feel ineffective during the early part of the fight.
Instead, prioritize the Memory Modules. Each destroyed module deals substantial fixed damage to Solus Wing and permanently reduces its armor by 25% of its base armor value. Destroying all four can remove approximately 80% of its health through the modules’ fixed damage alone, while stripping its base armor.
A practical strategy: Damage the modules evenly, then destroy them in a controlled sequence when you’re ready to handle the next set of attacks. Each destroyed module can push the encounter into a more dangerous phase, so avoid triggering several changes when you’re already struggling to stay alive.
Also, don’t rely exclusively on damage proc chains to destroy the weak points. The December 2025 patch notes reduced the damage Solus Wing’s weak points take from proc chains by 25%, so direct, accurate attacks remain important.
You can find the boss’s published mechanics in the Solus Wing reference and the official December 2025 patch notes.
How to Dodge the Tracking Laser and Solus Wing’s Other Attacks
As Solus Wing loses health, its attack patterns become more dangerous. It can fire slow-moving homing projectiles, send expanding walls across the arena, and use a tracking laser that sweeps toward its target.
The laser is particularly dangerous if you remain in one place while it charges.
When you recognize the charge-up, move immediately. Use ziprails to reposition or hide behind solid terrain that blocks the attack. Do not assume every nearby object will protect you: the Heat Vents and Coolant Distributors are not reliable laser cover.
As the encounter progresses, Solus Wing can also create grids of lasers across the floor or ceiling. Look for the gaps in these patterns and move through them instead of attempting to tank the damage.
A high-damage build helps, but movement is just as important. If you have enough mobility to escape attacks and enough damage to finish the weak points efficiently, the fight becomes far more controllable.
How to Survive Overheat With Heat Vents and Coolant Distributors
The environmental hazards are another major reason players lose runs against Solus Wing.
During the later part of the fight, additional Heat Vents and Coolant Distributors emerge around the arena. Heat Vents create dangerous heat zones that rapidly build Overheat stacks. Once Overheat reaches three stacks, it turns into Burn, which deals damage over time and disables health regeneration.
Don’t stay inside these zones while trying to maintain damage on the boss. When you accumulate Overheat, move out of the affected area before it escalates.
Destroying a Heat Vent creates a safe zone that removes Overheat and Burn, giving you a place to recover and plan your next move.
Coolant Distributors have a different role. They radiate a cooling aura around themselves, protecting nearby entities from heat. They also protect Solus Wing from Overheat and Burn while active. Destroying a distributor expands its cooling aura, giving you a larger safe area.
Expert tip: If your build can survive the encounter without relying heavily on environmental burn damage, prioritize safe positioning and the Memory Modules. If you’re struggling with the heat mechanic, destroy Heat Vents to create safe pockets and use the available cooling zones to manage your debuffs.
Once Solus Wing is dead, you can finally search for the two Prison Matrices. Don’t leave Solutional Haunt before completing that step.
Where to Find Both Prison Matrices in Risk of Rain 2
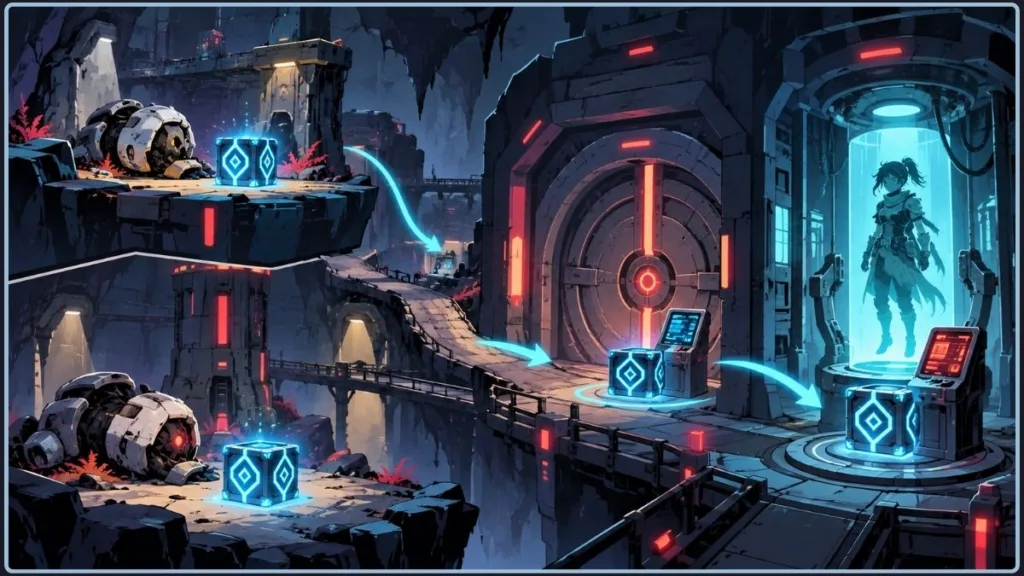
Defeating Solus Wing unlocks access to the side caves around the arena. One contains the two Solus Coffers that provide the Prison Matrices needed to free Drifter.
The other cave houses the TC-280 Prototype drone and the environment logbook. If you enter the drone room and cannot find the keys, you’re searching in the wrong place.
How to Find the Left Cave in Solutional Haunt
After the boss dies, explore the two cave entrances that open around the arena. From the main arena entrance, head into the left cave to find both Solus Coffers.
These interactable objects resemble broken or inactive Solus units. They are not ordinary chests, and the Prison Matrices do not simply appear as random loot scattered across the floor.
Interact with each Coffer to release its Prison Matrix. Be prepared for a swarm of Alloy Vultures to appear when you use the Coffers.
The two locations are separated vertically, so searching only the ground-level area won’t be enough.
First Prison Matrix Location: Lower Solus Coffer
The first Coffer is located near the bottom of the tower in the center of the cave.
Explore the lower section and look around the tower’s base for the inactive Solus unit. Interact with it to collect the first Prison Matrix.
Once you’ve obtained the item, keep moving and watch for the Alloy Vultures that spawn around the area. If your health is already low, clear nearby threats before attempting to reach the second Coffer.
Second Prison Matrix Location: Upper Solus Coffer
The second Solus Coffer is positioned on a higher platform toward the far end of the cave.
Use the available jump pads and vertical routes to reach the elevated platform. Survivors with better mobility may find this easier, but you don’t need a specific Survivor to complete the unlock.
Interact with the second Coffer to collect your other Prison Matrix.
At this point, you should have both items. Don’t leave with only one Prison Matrix, because the vault and Drifter’s prison require separate interactions.
How to Survive the Umbra of MUL-T Ambush
The route out of the cave can become another fight. After looting the distant Solus Coffer, attempting to leave triggers an ambush involving an Umbra of MUL-T, which traps you in the tunnel until you defeat it.
This can be particularly punishing after Solus Wing if you’ve spent most of your health recovering from the boss’s attacks.
Keep your mobility skill ready, avoid standing still in front of the Umbra, and use your remaining damage and healing resources to finish the encounter. Once it is defeated, the route opens and you can return to the main arena.
The Umbra always drops a Shaped Glass lunar item. It doubles your damage but halves your maximum health, making it a powerful but risky pickup. Consider your remaining health and build before taking it.
The exact room layout and encounter sequence are also described in the Solutional Haunt stage reference and the Reddit Drifter unlock discussion.
Solutional Haunt Vault Location: How to Unlock Drifter’s Prison
With both Prison Matrices collected and the Umbra defeated, return to the lower levels of the main boss arena. You now need to locate the vault door and use each Matrix on the correct terminal.
Where to Find the Locked Vault Door in Solutional Haunt
The secret vault is located on the right side of the boss arena entrance, in the lower section of Solutional Haunt.
Look for the locked door and the Matrix Terminal beside it. This is the first required interaction.
Don’t confuse the vault door with the Virtual Portal that appears on Solus Wing’s eye after the boss dies. That portal leads to Computational Exchange, a separate hidden realm. Explore the caves and finish the Drifter unlock before taking that route.
How to Use the First Prison Matrix to Open the Vault
Approach the terminal beside the locked door and insert your first Prison Matrix.
The door opens, giving you access to a loot room containing several optional rewards. The Matrix is consumed when you use it, so don’t expect to recover it from the terminal.
Inside the room, you’ll find a Small Chest, a Large Chest, a broken HAN-D model, Drifter’s Backpack, and a cloaked chest hidden inside a cracked sphere.
These extras are worth exploring if you’re comfortable spending more time in the stage, but none of them replaces the final unlock interaction.
How to Use the Second Prison Matrix to Free Drifter
Look for Drifter’s containment unit inside the vault. She is held in a stasis prison with a separate terminal.
Approach the prison and use your second Prison Matrix on its terminal. This opens the containment unit and completes the Lost in Transit challenge, unlocking Drifter as a playable Survivor.
This distinction is easy to miss: the first Prison Matrix opens the vault, while the second frees Drifter. The two steps are separate, and the Backpack inside the room is not the object that completes the unlock.
Optional Loot in Drifter’s Vault
Once Drifter is free, you can explore the room for additional loot.
- Drifter’s Backpack: Contains four random Temporary Items.
- Broken HAN-D model: Inspecting it provides three Common items.
- Small and Large Chests: Offer the usual chest loot.
- Cloaked Chest: Hidden inside the cracked sphere on the right side of the room.
These rewards are optional. If your only goal is to complete the Lost in Transit challenge, freeing Drifter is the important final step.
Drifter Still Locked? Troubleshoot Lost in Transit Unlock Problems
If Drifter remains unavailable after the boss fight, check the following before starting another run.
Missing One or Both Prison Matrices
Solus Wing’s death opens the side caves, but it doesn’t unlock Drifter directly. Return to the left cave and interact with both Solus Coffers.
Searching the Wrong Cave: TC-280 Prototype Room
The right cave contains the TC-280 Prototype and the environment logbook. Both Prison Matrices are in the other cave, so move to the left entrance and search the tower’s lower section and the elevated platform.
Vault Opened but Drifter Is Still Locked
Opening the vault is only the first half of the unlock. Keep the second Prison Matrix and use it on the terminal connected to Drifter’s containment unit.
Left Solutional Haunt Before Freeing Drifter
The Virtual Portal on Solus Wing’s eye leads to Computational Exchange. If you leave before freeing Drifter, you may need to complete the route again in a later run.
The safest approach is to confirm that both Matrices are collected, both terminals have been used, and the Lost in Transit challenge has registered before leaving the stage.
FAQs: How to Unlock Drifter in Risk of Rain 2
Do You Need Alloyed Collective to Unlock Drifter in Risk of Rain 2?
Yes. Drifter and the Lost in Transit challenge are part of the Alloyed Collective expansion. The DLC must be enabled when starting your run.
Can You Unlock Drifter on Any Difficulty in Risk of Rain 2?
Yes. The normal Lost in Transit route doesn’t require a particular difficulty setting or a specific Survivor. Choose a difficulty and character that give you the best chance of surviving the route and defeating Solus Wing.
How Many Prison Matrices Do You Need to Unlock Drifter?
You need two Prison Matrices. The first opens the vault door, and the second opens Drifter’s containment unit.
Where Are the Two Prison Matrices in Solutional Haunt?
Both are obtained from Solus Coffers in the left cave of Solutional Haunt after defeating Solus Wing. One is near the bottom of the central tower, and the other is on a higher platform at the far end of the cave.
Do You Need to Defeat Solus Heart to Unlock Drifter?
No. Solus Heart is a separate hidden boss. You only need to defeat Solus Wing, retrieve both Prison Matrices, and free Drifter from the vault to complete Lost in Transit.
What Does the Lost in Transit Challenge Reward?
Completing Lost in Transit unlocks Drifter as a playable Survivor and awards three Lunar Coins.
Can You Use a Save Editor or Mod to Unlock Drifter in Risk of Rain 2?
Some save editors and mods can change Survivor unlocks, but they are not required for the normal challenge. For the intended gameplay experience, complete Lost in Transit through the standard route. If you choose to modify save files, back up your profile first and check that any tool or mod supports your current game version.
Conclusion: Complete Lost in Transit to Unlock Drifter
Unlocking Drifter in Risk of Rain 2 is a multi-stage challenge, but it becomes much easier once you understand the route and the two Prison Matrix locations.
Start by activating the Stage 3 Access Node, then complete Conduit Canyon’s security sequence and defeat the Solus Control Unit and Alloy Hunter. In Solutional Haunt, destroy Solus Wing’s four Memory Modules, manage the arena hazards, and explore the left cave for both Solus Coffers.
After defeating the Umbra of MUL-T, return to the vault on the right side of the boss arena. Use the first Prison Matrix to open the door and the second to free Drifter from her containment unit.
Once the Lost in Transit challenge registers, Drifter is available for future runs. You can then experiment with her Junk-based skills and temporary items without having to repeat the unlock route.
Visit Our Post Page: Blog Page
Discover more from Izoate
Subscribe to get the latest posts sent to your email.