
Learn how to install PowerShell 7 on Windows 11 in 2026. Download the latest PowerShell version, verify your installation, configure Windows Terminal, update PowerShell, and fix common setup error.
Introduction
If you’ve opened a terminal on your Windows 11 PC and typed “PowerShell,” you’ve probably already noticed something a little confusing: Windows 11 already comes with PowerShell installed. So why does everyone keep talking about “installing PowerShell” like it’s something you still need to do?
Here’s the short answer: what’s already on your PC is Windows PowerShell 5.1, the older, Windows-only edition that’s been bundled with Windows for years. PowerShell 7 is a completely separate, modern version that you install on top of it. The two don’t conflict with each other, and you don’t have to choose one or the other — they sit side by side, and you can switch between them whenever you want.

In this guide, you’ll walk through every reliable way to get PowerShell 7 running on your Windows 11 PC, including the WinGet command-line method, the Microsoft Store, and the MSI installer from GitHub. You’ll also learn how to check which version you’re currently running, how to update PowerShell once it’s installed, and how to fix the most common installation headaches.
So who actually needs to install PowerShell 7? If you’re a developer, a system administrator, someone working with cloud platforms like Azure, or you just want a faster and more modern scripting experience, this guide is for you. If you only use Windows for everyday tasks and never touch a terminal, you can probably skip this one — Windows PowerShell 5.1 is already doing its job quietly in the background.
Quick Tip: You don’t need to uninstall or remove anything before installing PowerShell 7. It installs into its own folder and leaves Windows PowerShell 5.1 completely untouched.
What Is PowerShell 7?
Understanding PowerShell on Windows 11
Before you install anything, it helps to understand what PowerShell actually is and why there are two different versions floating around on your system.
What Is PowerShell?
PowerShell is a cross-platform task automation framework built on .NET. Think of it as three tools rolled into one: a command-line shell you type commands into, a full scripting language you can write programs with, and a configuration management framework for handling system settings at scale.
PowerShell wasn’t always this flexible. It started out as a Windows-only tool, but Microsoft eventually made it open-source and cross-platform, which means you can now run it on Windows, macOS, and Linux. With PowerShell, you can automate repetitive admin tasks, manage system configurations, control services and processes, and run batch operations through script files ending in .ps1.
What Is PowerShell 7 Windows?
PowerShell 7 is the current, actively developed version of PowerShell on Windows. You’ll often see it referred to simply as “PowerShell” (without “Windows” in front of it) to distinguish it from the older edition. It runs on modern .NET, launches with the command pwsh, and is built for speed, cross-platform compatibility, and newer language features that Windows PowerShell 5.1 will never receive.
Difference Between Windows PowerShell 5.1 and PowerShell 7
The naming here trips a lot of people up, so let’s clear it up once and for all:
- Windows PowerShell 5.1 is the version built into Windows 11 by default. It runs on the full .NET Framework, only works on Windows, and is launched using
powershell.exe. - PowerShell 7 is the newer, independently developed version. It runs on modern .NET, works across Windows, macOS, and Linux, and is launched using
pwsh.exe.
They’re related, but they’re not interchangeable, and that distinction matters more than you might expect once you start writing scripts.
Why Microsoft Recommends PowerShell 7 for Modern Automation
Microsoft has been steadily shifting its own documentation, sample scripts, and cloud tooling toward PowerShell 7. If you’re working with newer Azure modules, following current Microsoft tutorials, or building anything that might eventually need to run outside of Windows, PowerShell 7 is the version you’ll want to be comfortable with. It’s also where all the active feature development is happening — Windows PowerShell 5.1 isn’t getting new capabilities anymore, just the occasional security patch tied to Windows itself.
Benefits of PowerShell Core
Key Benefits of PowerShell 7
So what do you actually gain by installing the newer version? Quite a lot, honestly.
- Cross-platform support PowerShell 7 runs identically across Windows, macOS, and Linux. If you ever switch operating systems or need to manage a mixed environment, your scripts and habits carry over.
- Faster performance Because it’s built on modern .NET rather than the older .NET Framework, PowerShell 7 generally executes scripts faster and handles larger workloads more efficiently.
- Modern .NET support You get access to current .NET libraries and runtime improvements, which matters if you’re doing anything beyond basic scripting.
- Better scripting capabilities Newer language features — like the ternary operator and parallel
ForEach-Objectprocessing — make writing complex scripts noticeably less painful. - Improved remoting and automation PowerShell 7 includes baked-in SSH remoting, which gives you a more flexible way to connect to and manage remote machines compared to the older WS-Management-only approach in Windows PowerShell 5.1.
Pro Tip: You don’t have to abandon Windows PowerShell 5.1 to get these benefits. Keep both installed — use PowerShell 7 for new work and fall back to 5.1 only when an old script specifically needs it.
Does Windows 11 Already Have PowerShell?
What Version of PowerShell Is Installed with Windows 11?
Yes — Windows 11 comes with PowerShell already installed, but it’s important to know exactly what you’re starting with before you go looking for an installer.
- Windows PowerShell 5.1 comes preinstalled. Every standard Windows 11 setup includes this version by default. You don’t need to download or install anything to use it.
- PowerShell 7 must be installed separately. It is not part of the default Windows 11 installation, no matter how recent your build is. If you want it, you’ll need to go through one of the installation methods covered later in this guide.
How to Check Your Current PowerShell Version
The fastest way to check what’s already on your PC is from inside PowerShell itself. Open a terminal and run:
$PSVersionTableThis prints a small table of details about your current session. The line you care about is PSVersion. If you only want the version number by itself, without all the extra detail, use:
$PSVersionTable.PSVersionIf the version starts with 5.1, you’re running the built-in Windows PowerShell. If it starts with 7, you’re already inside PowerShell 7.
How to Check if PowerShell 7 Is Already Installed
If you’re not sure whether PowerShell 7 has been installed at some point in the past, you can check directly without opening it first. From any terminal (Command Prompt, Windows PowerShell, or PowerShell), run:
pwsh --versionIf PowerShell 7 is installed, this returns a version number right away, something like “PowerShell 7.6.3.” If it’s not installed, you’ll see a message saying the command isn’t recognized — which means it’s time to move on to one of the installation methods below.
Windows PowerShell 5.1 vs PowerShell 7
Here’s a side-by-side comparison to make the differences crystal clear:
| Feature | Windows PowerShell 5.1 | PowerShell 7 |
|---|---|---|
| Included with Windows 11 | Yes | No |
| Command | powershell.exe | pwsh.exe |
| Platform Support | Windows Only | Windows, Linux, macOS |
| Best For | Legacy Scripts | Modern Automation |
| Updates | Windows Updates | Independent Updates |
Can PowerShell 7 Replace PowerShell 5.1?
No — and this is genuinely good news, not a limitation. PowerShell 7 installs side-by-side with Windows PowerShell 5.1 rather than replacing it. Both versions can coexist safely on the same PC indefinitely. You don’t need to worry about breaking something that depends on the older version just because you’ve added the newer one.
Important: Some legacy administration modules and older vendor scripts were built specifically for Windows PowerShell 5.1 and may not behave correctly in PowerShell 7. Keep both installed so you always have a fallback option.
PowerShell 11 Installation Methods: Choosing the Best Way to Install PowerShell 7
Before diving into the steps, it’s worth knowing your options upfront so you can pick the one that fits how you like to work. There are three main routes covered in this guide: installing through WinGet from the command line, installing through the Microsoft Store with a graphical interface, and installing manually with the MSI installer downloaded from GitHub. Each one gets you to the same result, but the experience along the way is different enough that your choice should come down to personal preference and your environment.
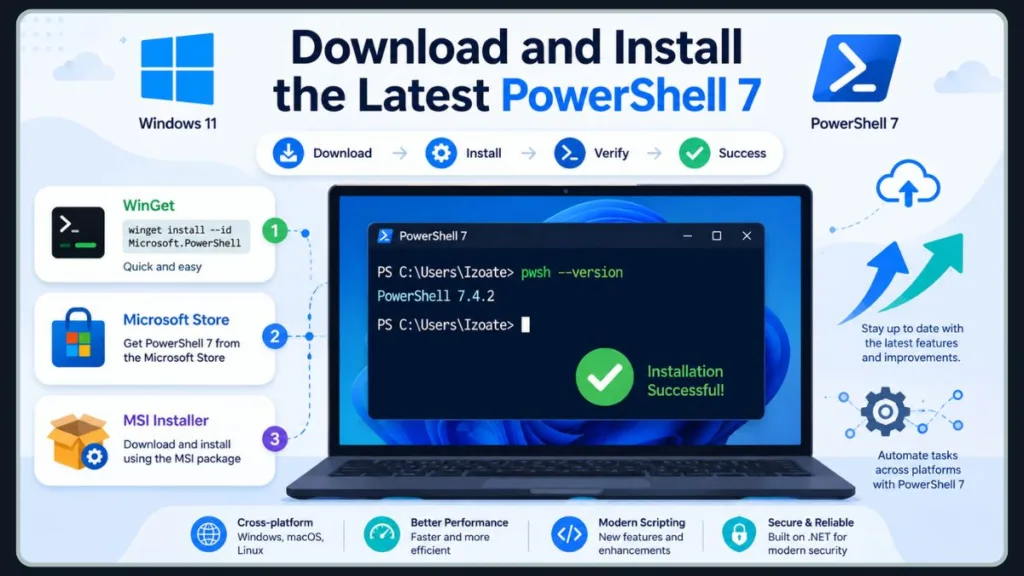
Method 1: Install PowerShell 7 on Windows 11 Using WinGet (Recommended)
If you’re comfortable typing a single command and want the most repeatable, official installation path, WinGet is the way to go. WinGet, short for the Windows Package Manager, is a command-line tool included with modern Windows 11 installations as part of the App Installer package. It’s the same tool Microsoft itself recommends for installing PowerShell on Windows clients.
Step 1: Open Windows Terminal
Right-click the Start button and choose Terminal or Terminal (Admin). A regular, non-elevated terminal window is fine for a normal per-user installation, since WinGet can request elevation automatically when it needs to. If you’d rather install PowerShell for all users on the PC right away, open Terminal (Admin) instead.
Step 2: Check Winget Availability
Before doing anything else, confirm that WinGet is actually available on your system by running:
winget --versionIf this returns a version number, you’re ready to continue. If Windows tells you the command isn’t recognized, you’ll need to install or update App Installer from the Microsoft Store first, then try again.
Step 3: Search for PowerShell
Next, search for the official package to make sure you’re about to install the right thing:
winget search Microsoft.PowerShellYou should see results that look something like this:
Name               Id                           Source
-----------------------------------------------------------------
PowerShell         Microsoft.PowerShell         winget
PowerShell Preview Microsoft.PowerShell.Preview winget
For most people, you’ll want the stable Microsoft.PowerShell package rather than the Preview channel.
Step 4: Install PowerShell 7
With the right package identified, install it using:
winget install --id Microsoft.PowerShell --source wingetYou may be asked to accept a license or source agreement the first time you use WinGet — respond with Y to continue. WinGet will then download the official package from Microsoft’s source and run the installation automatically.
Heads up: As of newer WinGet packages, PowerShell installs as an MSIX package by default rather than MSI. If you specifically need the MSI-based installation instead, run the command with an extra flag:
winget install --id Microsoft.PowerShell --source winget --installer-type wix.
Once the install finishes, close and reopen Windows Terminal so it can detect the newly installed PowerShell profile.
Step 5: Verify Installation
Confirm everything worked by checking the version:
pwsh --versionYou should see a current version number returned, confirming PowerShell 7 is ready to use. You can also launch it directly by typing pwsh in any terminal window.
Why WinGet Is the Best Installation Method
WinGet earns its “recommended” status for a few solid reasons. It’s fast, it’s officially supported by Microsoft, it works the same way whether you’re installing one PC or scripting a deployment across many, and updating later is just as simple as installing in the first place — one command, and you’re current. If you only remember one installation method from this entire guide, make it this one.
Method 2: Install PowerShell 7 from Microsoft Store
If typing commands isn’t your thing, or you just prefer a familiar point-and-click experience, the Microsoft Store is a perfectly solid alternative. This method installs the modern PowerShell 7 release alongside your existing Windows PowerShell 5.1, exactly the same as every other method in this guide.
Steps to Install PowerShell from Microsoft Store
- Open Microsoft Store from the Start menu.
- Search PowerShell in the Store’s search bar.
- Select Microsoft PowerShell — make sure the listing shows Microsoft Corporation as the publisher.
- Click Install (or “Get,” depending on how the listing is labeled).
- Launch PowerShell once the download finishes, either from the Store page itself or from the Start menu.
Benefits of Store Installation
- Automatic updates — the Store keeps PowerShell current without you having to think about it.
- Beginner friendly — no command-line steps, no decisions about installer flags.
- No manual downloads — everything happens inside the Store’s own interface.
Worth noting: The Store version runs in an application sandbox, which means certain advanced features — like all-users PowerShell remoting configuration — aren’t available through this installation method. For everyday scripting and general use, this limitation won’t affect you at all.
Method 3: Download and Install PowerShell 7 Using MSI Installer
If you need an offline installer, you’re deploying PowerShell across multiple machines, or your workplace blocks the Microsoft Store and restricts WinGet, the MSI installer from GitHub gives you full control over the process.
Download PowerShell 7 Installer
Head to the official PowerShell releases page on GitHub at github.com/PowerShell/PowerShell/releases. The newest stable release sits near the top of the page, usually marked clearly. Scroll down to the Assets section — it may be collapsed, so click to expand it if needed.
Download the package that matches your hardware:
- x64 installer — for the vast majority of Windows 11 PCs.
- ARM64 installer — for ARM-based Windows devices, such as certain Surface or Snapdragon-powered laptops.
Run the Setup Wizard
Once downloaded, double-click the .msi file to launch the PowerShell Setup Wizard. Walk through the prompts, and pay attention to the optional installer modules along the way:
- Add PowerShell to PATH — leave this checked so you can launch
pwshfrom any terminal window without extra setup. - Enable PowerShell Remoting — turn this on only if you specifically plan to manage other machines remotely.
- Register Event Logging Manifest — useful if you rely on Windows event logs for administration or troubleshooting.
- Add Explorer Context Menu — adds convenient “Open PowerShell here” and “Run with PowerShell” options to right-click menus.
Complete Installation
Click Install, approve the User Account Control prompt if it appears, and wait for the wizard to finish. Click Finish once the setup completes.
Verify Installation
Open a new terminal window and confirm everything installed correctly:
pwsh --versionIf the command returns a version number, your installation succeeded.
Quick Tip: For repeated or unattended installations across multiple PCs, the same MSI can be run silently from an elevated command line with
msiexec.exe, passing in the installer properties you need (PATH registration, remoting, context menus, and so on) without any user interaction at all.
Where Is PowerShell 7 Installed in Windows 11?
If you ever need to track down the actual installation folder — for troubleshooting, for creating a manual shortcut, or just out of curiosity — PowerShell 7 lands in a predictable, consistent location.
Default location:
C:\Program Files\PowerShell\7\Inside this folder, you’ll find pwsh.exe, the executable that actually launches PowerShell 7. During installation, assuming you left the PATH integration option checked, this folder gets added to your system’s PATH environment variable, which is exactly what allows you to type pwsh from any terminal window and have it work instantly, regardless of which folder you’re currently in.
The installer also creates Start Menu shortcuts automatically, so you’ll see a dedicated PowerShell 7 entry alongside the existing Windows PowerShell entry once installation finishes.
How to Open PowerShell 7 After Installation
Once PowerShell 7 is installed, you’ve got several equally valid ways to actually open it.
Launch PowerShell from Start Menu Click Start, type “PowerShell,” and look for the entry that simply says “PowerShell” (rather than “Windows PowerShell”) — that’s your PowerShell 7 shortcut.
Launch PowerShell from Windows Terminal Open Windows Terminal, click the small dropdown arrow next to the tab bar, and select the PowerShell profile that points to pwsh.exe.
Launch PowerShell Using Run Command Press Windows + R, type:
pwshand press Enter. A new PowerShell 7 window opens immediately.
Set PowerShell 7 as the Default Windows Terminal Profile
If you find yourself opening PowerShell 7 constantly, it’s worth setting it as your default so you don’t have to pick it manually every time.
Steps
- Open Windows Terminal Settings by clicking the dropdown arrow next to the tab bar and selecting Settings.
- Navigate to Startup in the left-hand menu.
- Select PowerShell 7 as the default profile (it should appear listed separately from Windows PowerShell).
- Save changes.
From now on, every new Windows Terminal window or tab opens directly into PowerShell 7.
Useful PowerShell Commands for Beginners
Once you’re up and running, a handful of commands will get you comfortable navigating PowerShell quickly:
| Command | Purpose |
|---|---|
Get-Help | View command help |
Get-Command | List commands |
Get-Process | Show running processes |
Get-Service | View services |
Get-Location | Show current directory |
Pro Tip: If you ever forget how a specific cmdlet works, just run
Get-Help <cmdlet-name>— PowerShell’s built-in help system will walk you through the syntax and usage examples right there in the terminal.
Configure PowerShell for Scripts
By default, Windows applies a safety measure that prevents scripts from running freely, which is exactly the kind of thing that trips up new users the first time they try to run a .ps1 file.
Check Execution Policy
To see your current setting, run:
Get-ExecutionPolicy -ListAllow Local Scripts
For most personal setups, the following command strikes a good balance between safety and convenience:
Set-ExecutionPolicy RemoteSigned -Scope CurrentUserThis allows scripts you’ve written yourself to run freely, while still requiring downloaded scripts to be properly signed or manually unblocked first. Using -Scope CurrentUser keeps the change limited to your own account rather than affecting every user on the PC.
Install Useful PowerShell Modules to Expand What PowerShell Can Do
Modules are what take PowerShell from “useful command-line tool” to “genuinely powerful automation platform.” They add new commands for everything from cloud services to Git integration to advanced Windows administration.
Find Modules
Search the PowerShell Gallery for a module by name:
Find-Module AzInstall Modules
Once you’ve found what you need, install it for your own user account:
Install-Module Az -Scope CurrentUserUpdate Modules
Keep your installed modules current with:
Update-ModuleQuick Tip: Some older modules were built specifically for Windows PowerShell 5.1 and may not behave correctly in PowerShell 7. If a module throws unexpected errors, check whether a PowerShell 7-compatible version exists, or fall back to running that specific task in Windows PowerShell 5.1.
How to Update PowerShell on Windows 11
Keeping PowerShell updated matters more than people think — you get security patches, .NET runtime improvements, and new features without lifting much of a finger. How you update depends entirely on how you originally installed it.
Update Using WinGet
If you installed through WinGet, updating is just as quick as the original install:
winget upgrade --id Microsoft.PowerShellYou can also check what updates are available across all your WinGet-managed apps first by running winget upgrade on its own and reviewing the list before committing to anything.
Update Using Microsoft Store
If you installed through the Store, open the Microsoft Store app, go to Library, and select Get updates. Any available PowerShell update downloads and installs automatically from there.
Update Using MSI Installer
If you installed using the MSI package, simply download the newer stable MSI from the official GitHub releases page and run it. The newer installer upgrades your existing PowerShell 7 installation in place, while leaving all your settings and Windows PowerShell 5.1 completely untouched.
Important: Close any open PowerShell 7 windows before running an update through any method. Running sessions can lock files the installer needs to replace, which leads to the dreaded “files in use” error covered below.
Common PowerShell Installation Problems on Windows 11 (And How to Fix Them)
Even straightforward installations occasionally hit a snag. Here are the issues people run into most often, along with the fixes.
Winget Is Not Recognized
Fix
- Install App Installer from the Microsoft Store, which is what actually delivers the WinGet tool.
- Restart Terminal after installing, since an already-open window won’t pick up the newly added command automatically.
pwsh Is Not Recognized
Fix
If installation succeeded but the pwsh command still doesn’t work, the most common cause is simply that your terminal window was already open before installation finished, and it hasn’t refreshed its environment variables yet. Close and reopen Windows Terminal first.
If that doesn’t resolve it, verify the installation path directly:
C:\Program Files\PowerShell\7\If pwsh.exe exists in that folder but the command still isn’t recognized, you can launch it directly by pointing to the full path, or manually confirm that this folder has been added to your system’s PATH environment variable.
PowerShell 7 Missing in Windows Terminal
Fix
Restart Windows Terminal first — this resolves the issue most of the time. If the profile still doesn’t show up, add a profile manually inside Windows Terminal’s settings, pointing the command line directly to C:\Program Files\PowerShell\7\pwsh.exe.
Installer Reports Files Are In Use
Fix
This almost always means something is still actively using PowerShell 7 in the background.
- Close PowerShell — shut down every open PowerShell 7 window and Windows Terminal tab running it.
- Close VS Code terminals — integrated terminals in code editors count too, and are easy to forget about.
- Restart Windows if the files remain locked even after closing everything you can find, then run the installer again before opening PowerShell.
How to Uninstall PowerShell 7 in Windows 11
If you ever decide you no longer need PowerShell 7, removing it is straightforward — and importantly, it has zero effect on Windows PowerShell 5.1, which stays installed as part of Windows itself.
Uninstall Using WinGet
winget uninstall --id Microsoft.PowerShellUninstall from Settings
Navigate to Settings > Apps > Installed Apps, search for PowerShell, click the three-dot menu next to the entry, and select Uninstall.
Remove Microsoft Store Version
If you installed through the Store, you can uninstall it the same way you’d remove any other Store app — through Settings > Apps > Installed apps, or by right-clicking the app entry in the Start menu and choosing Uninstall directly.
FAQ About Installing PowerShell on Windows 11
How Do I Install PowerShell on Windows 11?
Use one of three reliable methods: WinGet from a terminal window, the Microsoft Store for a graphical install, or the MSI installer downloaded from the official PowerShell GitHub releases page. All three install PowerShell 7 alongside your existing Windows PowerShell 5.1.
How Do I Install PowerShell 7?
The fastest route is opening Windows Terminal and running winget install --id Microsoft.PowerShell --source winget. This downloads and installs the current stable release in just a few minutes.
Can I Install PowerShell 7 on Windows 11 Home?
Yes. PowerShell 7 installs the same way on Windows 11 Home as it does on Pro or Enterprise editions — there’s no edition-specific restriction.
Does Windows 11 Have PowerShell?
Yes, Windows 11 includes Windows PowerShell 5.1 by default. PowerShell 7 is a separate, modern version you install on top of it.
What Is PowerShell 7 Windows?
It’s the current, actively developed, cross-platform version of PowerShell, launched using the pwsh command and built on modern .NET rather than the older .NET Framework.
How Do I Install the Latest Version of PowerShell?
WinGet automatically installs whichever version is currently marked stable on Microsoft’s package source, so running the standard WinGet install command always gets you the latest release without needing to track version numbers manually.
Where Is PowerShell 7 Located in Windows 11?
By default, it’s installed at C:\Program Files\PowerShell\7\, with pwsh.exe as the executable inside that folder.
What Version of PowerShell Is Installed with Windows 11?
Windows 11 ships with Windows PowerShell 5.1 preinstalled. PowerShell 7 does not come preinstalled and must be added separately.
Can I Pip Install in PowerShell?
PowerShell itself doesn’t use pip — that’s a Python package manager. However, you can absolutely run pip install commands from inside a PowerShell session, since PowerShell can execute any command-line tool that’s installed and available on your system, including Python’s pip.
Can PowerShell 7 Replace Windows PowerShell 5.1?
No, and it’s not designed to. PowerShell 7 installs side-by-side with Windows PowerShell 5.1 rather than replacing it, so both remain available on your system at the same time.
How to Install PowerShell 7 on PS7?
If you mean installing an additional or specific version of PowerShell 7 alongside one you already have, the ZIP package method is your best option — it lets you extract PowerShell 7 to a separate folder so multiple versions can coexist without conflicting with each other.
Final Thoughts: Which PowerShell Installation Method Should You Choose?
If you’re still deciding which installation method fits you best, here’s the simple breakdown: WinGet is the preferred method for most people — it’s fast, official, and just as easy to update later as it was to install in the first place. The Microsoft Store is ideal if you’re newer to all this and want a graphical, beginner-friendly experience with automatic updates handled for you. The MSI installer is the right call for offline installs or enterprise deployments where you need more control over exactly how PowerShell gets installed across multiple machines.
Whichever method you choose, take a moment afterward to verify everything worked by running $PSVersionTable, and from there, start exploring what PowerShell modules and automation can actually do for you. Once you get past the initial setup, you’ll likely find yourself reaching for PowerShell far more often than you expected.
Official Documentation & Downloads
- Microsoft Learn: Windows Installation Guide — The definitive, evergreen source from Microsoft that details WinGet flags, system prerequisites, and technical edge cases.
- GitHub: Official PowerShell Releases Page — The best direct hyperlink to give your readers who want to safely download the standalone 64-bit and ARM64 MSI installer packages.
Core Framework Deep Dives
- Microsoft Learn: What’s New in PowerShell 7.6 — Perfect to link when you are explaining why your readers should upgrade to the current generation. It outlines the specific speed metrics and language benefits of the new engine.
- Microsoft DevBlogs: The PowerShell Product Blog — A fantastic reference for tech enthusiasts who want to track upcoming preview features or read official architectural breakdowns directly from Microsoft’s engineering team.
Real-World Automation Modules
- Microsoft Learn: Installing the Azure PowerShell (Az) Module — A natural follow-up for cloud engineers. This guide details how to expand a baseline PowerShell 7 environment to manage cloud databases and virtual infrastructure.
- Microsoft Learn: Microsoft Teams PowerShell Guide — An invaluable bookmark for system administrators who plan to use their newly configured shell to manage enterprise users, compliance features, and communication tools.
Visit Our Post Page: Blog Page
Discover more from Izoate
Subscribe to get the latest posts sent to your email.