
Stuck on the Beating Heart quest? Learn exactly how to activate the power plant in Crimson Desert with step-by-step lever, kick, and hold walkthrough.
If you’re currently standing in the center of the Krall Foundry, staring at a massive machine that refuses to budge while Valgash waits impatiently, don’t worry—you aren’t doing anything wrong. The Beating Heart quest in Crimson Desert Chapter 10 features one of those puzzles that feels completely unintuitive until someone explains the secret handshake.
The game doesn’t always go out of its way to tell you that a specific sequence of “pulling, kicking, and holding” is required to get things moving. If you’ve been pulling every lever in sight and getting no response, this is the guide you need. We are going to walk through how to activate the power plant in Crimson Desert, covering the exact controls for PC and consoles, and ensuring you’re ready for the chaos that follows once the generator finally roars to life.
Quick Solution: The Activation Sequence
Important Tip: The Quick Solution Sequence
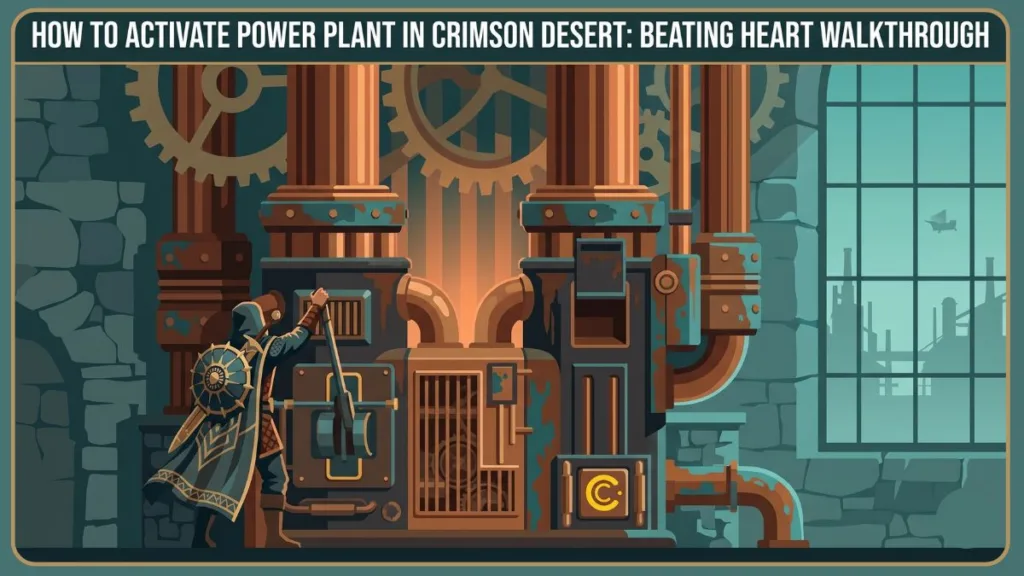
- Pull the Left Lever: Face the machine and interact with the handle on the left.
- The Lantern Kick: Aim your lantern at the yellow circle/cube on the bottom right and perform a Kick (Ctrl+F on PC / L2+Triangle on PS5).
- The Ignition Hold: A second lever will drop from a chute above the kick-point. Pull it and hold it down for several seconds until the cutscene triggers.
Quest Background: Why the “Beating Heart” Matters
To understand why we’re doing this, we have to look at the broader scope of Chapter 10: Counterattack. This is the 143rd main mission in the game, specifically sitting within the Greater Firepower sub-chapter.
After the intense combat of the Clockwork Insect Clash, you find yourself in the Gorthak Ironworks. Your ally, the legendary weaponsmith Valgash, is prepping a long-range artillery cannon. This isn’t just for show—this weapon is the only thing capable of taking down the Sky Galleon threats looming over the territory. However, a cannon of that magnitude needs a massive surge of energy. That energy comes from the Thermal Power Plant machine hidden within the foundry.
Essentially, you are acting as the spark plug for the entire resistance effort in Gorthak Territory. If the “heart” doesn’t beat, the cannon doesn’t fire, and the mission stalls.
How to Reach the Krall Foundry & Power Plant Location
Navigating the Gorthak Territory can be a bit of a maze if you haven’t explored it thoroughly yet. To get started:
- Starting Point: You’ll likely be coming from the Delesyia region heading into Gorthak.
- The Landmark: Head straight to the quest marker in Regent’s Rise. You are looking for a large, industrial-looking building that houses the foundry.
- Internal Navigation: Once you enter, head to the ground floor. The room containing the Thermal Power Plant is dedicated specifically to this machine—it’s a massive hunk of iron and brass that dominates the space. You’ll know you’re in the right spot when the objective updates to “Activate the power plant / Activate the generator.”
Pro Tip: If you’re coming from the Stefan Lanford Musket Outpost, keep an eye out for local patrols. While the foundry itself is relatively clear for the puzzle phase, the surrounding area is still very much a war zone.
Detailed Walkthrough: Crimson Desert Power Plant Puzzle Solution
The reason most players get stuck here is that the machine provides very little visual feedback if you do things in the wrong order. It’s a “strict sequence” puzzle. Let’s break it down step-by-step so you can move on to the next phase of the Beating Heart quest.
Step 1: The Initial Power Draw (Left Lever)
Walk up to the front of the generator. On the left-hand side, there is a prominent handle. Interact with it to pull it down. You might hear a hiss of steam or a low hum, but the machine won’t fully engage yet. This “primes” the system for the next two interactions.
Step 2: The Infamous “Yellow Mark” Kick
This is where 90% of the community hits a wall. Look at the bottom-right section of the machine. You will see a small cube or button marked with a yellow circle symbol.
You cannot simply “interact” with this button using your standard action key. You have to kick it. More importantly, you need to be aiming your lantern at the mark to ensure the prompt registers correctly.
Control Guide for the Kick Mechanic:
| Platform | Controls |
| PC | Hold Ctrl (Aim Lantern) + Press F (Kick) |
| PlayStation 5 | Hold L2 (or L1) + Press Triangle (or Square) |
| Xbox Series X/S | Hold LB + Press X |
When done correctly, you’ll hear a mechanical clunk, and a small chute just above the button will open, dropping a second lever into reach.
Step 3: The Ignition Sequence (The Hidden Lever)
The final step is the “Ignition.” Now that the second lever has dropped from the chute, you need to grab it.
Important Tip: The “Hold” Requirement
Crucial Warning: Do not just tap the interaction button. If you tap it, the lever will snap back up, and the gas won’t ignite. You must hold the button down for approximately 3 to 5 seconds.
Watch the machine closely; you’ll see gauges start to climb and hear the sound of gas rushing through the pipes. Once the ignition sparks, a cutscene will automatically trigger, showing the power plant roaring to life and the “heart” of the foundry glowing with energy.
The Defense Phase: Protecting the Turbine
Don’t get too comfortable once the cutscene ends. Activating the generator makes a lot of noise, and in Crimson Desert, noise attracts trouble.
As soon as the power is on, speak with Valgash. He will warn you that a swarm of Clockwork Insects is converging on the facility, drawn by the hum of the power plant. If these insects reach the turbine, they will destroy it, and you’ll have to start the activation process all over again.
Using the A.T.A.G. War Machine
Fortunately, you aren’t defending the plant on foot.
- Head to the Hangar: There is an A.T.A.G. (All-Terrain Armored Guardian) war machine parked in the nearby hangar. Mount it immediately.
- The Objective: You must protect the turbine for 180 seconds (3 minutes).
- Combat Strategy: The Clockwork Insects move in swarms. Use the A.T.A.G.’s primary cannons to swat them out of the air before they can land on the turbine. Keep your eyes on the “Turbine Health” bar—if it hits zero, the mission fails.
Once the timer hits zero, the defense phase ends, and you’ll follow Valgash up to the fortress walls to witness the fruits of your labor: using the artillery cannon to take down the Sky Galleons.
Troubleshooting: Why is the Generator Not Starting?
If you’ve followed the steps and are still stuck, check these three common issues:
- The Order Check: Did you pull the left lever before kicking the button? If you kick the button first, the lever won’t drop. Reset by walking away and returning to the machine.
- The Lantern Requirement: Many players forget to have their lantern active or aimed. The “Kick” prompt is contextual; if the game doesn’t think you’re looking at the yellow mark, the kick won’t trigger the lever drop.
- The “Hold” vs. “Tap”: This is the most frequent point of failure in the Crimson Desert Beating Heart generator steps. You must hold the final lever until the cinematic starts. If you let go too early, the gas fails to ignite.
FAQ: Everything You Need to Know About Quest 143
What is the reward for the Beating Heart quest?
While this specific main quest (Mission 143) doesn’t typically drop a unique weapon or gear piece as a direct reward, it is the mandatory gateway to the Invaders from the East mission. Completing it grants significant XP and progresses the Chapter 10 Counterattack storyline.
Where is the Krall Foundry?
The foundry is located in the Gorthak Territory, specifically within the Regent’s Rise area. It is part of the Gorthak Ironworks complex.
How do I fix the “lever not dropping” bug?
If the second lever doesn’t drop after kicking the button, it’s usually because the left lever wasn’t fully “engaged.” Go back to the left side, interact with that lever again, and then re-attempt the kick on the right side.
What comes after the Beating Heart mission?
Once the power plant is secure and the Sky Galleons are dealt with, the sub-quest transitions into Invaders from the East. You’ll continue working with Valgash to push back the enemy forces using the newly powered artillery.
Final Thoughts for Izoate Readers
The Beating Heart quest is a perfect example of how Pearl Abyss likes to mix mechanical puzzles with high-octane combat. It can be frustrating to get stuck on a simple lever puzzle when you’re ready to jump into an A.T.A.G. and blast some insects, but hopefully, this walkthrough has cleared the path for you.
Important Tip: The Golden Rule
Remember: Left Lever -> Lantern Kick -> Hold the Right Lever.
Keep this guide open as you head into the turbine defense phase, and you’ll have Chapter 10 cleared in no time. If you found this helpful, check out our other Crimson Desert guides, including our deep dive into the Gyrfalcon Pet location and our combat tips for the Gorthak Ironworks.
Are you stuck on another Chapter 10 puzzle? Let us know in the comments, and we’ll get a guide up to help you through the next hurdle!
Visit Our Post Page: Blog Page
Discover more from Izoate
Subscribe to get the latest posts sent to your email.