
Are you getting the “Java is not recognized” error while installing or running an application? Learn how to check your Java version in Command Prompt, verify your JDK, and fix common Java command error on Windows 11 and 10.
You’re halfway through setting up a new tool, and it stops you cold: it needs a specific Java version. Maybe you’re spinning up a Minecraft server, installing Android Studio, opening IntelliJ IDEA or Eclipse for the first time, adding Maven or Gradle to a project, or just trying to launch another Java-based application that refuses to start. Whatever the trigger, the pattern is the same — something needs to know your Java version before it’ll continue, and java -version is almost always the first troubleshooting step a developer, a support article, or an installer will ask you to run.
So you open Command Prompt, type in the command everyone recommends, and either get a wall of version info you don’t fully understand — or an error saying Windows has no idea what “java” even means.
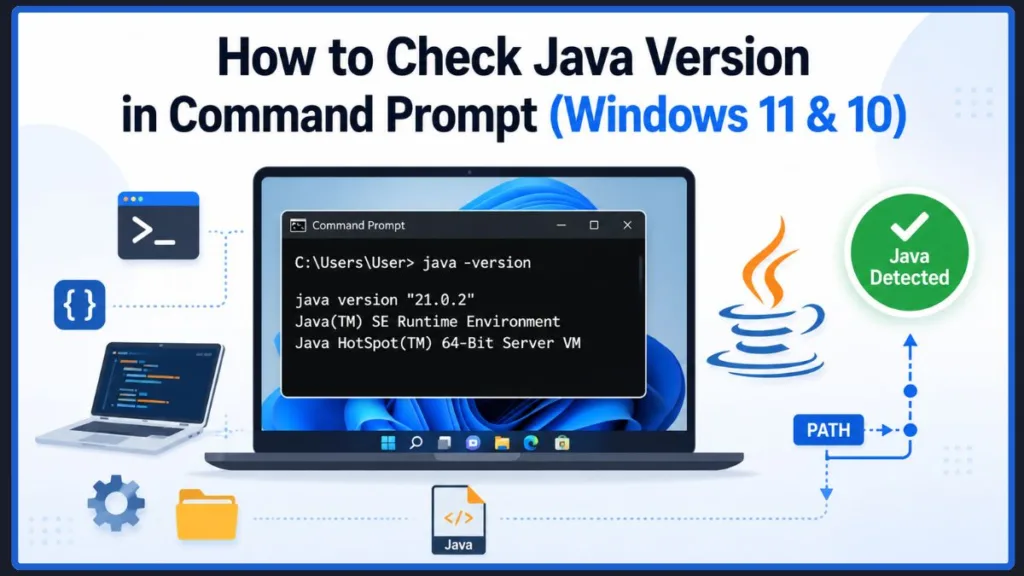
Checking your Java version is supposed to take one line and five seconds. Most of the time, it does. But Java has a habit of quietly breaking itself: old installations lingering in the background, a missing PATH entry, or a version installed today that Windows still refuses to see.
This guide covers both sides of that. You’ll get the quick command first, then a full walkthrough of what the output actually means, and a troubleshooting section for when Command Prompt won’t cooperate.
Quick Answer: Check Your Java Version in CMD
If you just need the fast version, open Command Prompt and run:
java -version
You’ll see three lines of text back, starting with something like java version "21.0.2". That confirms Java is installed and tells you exactly which version.
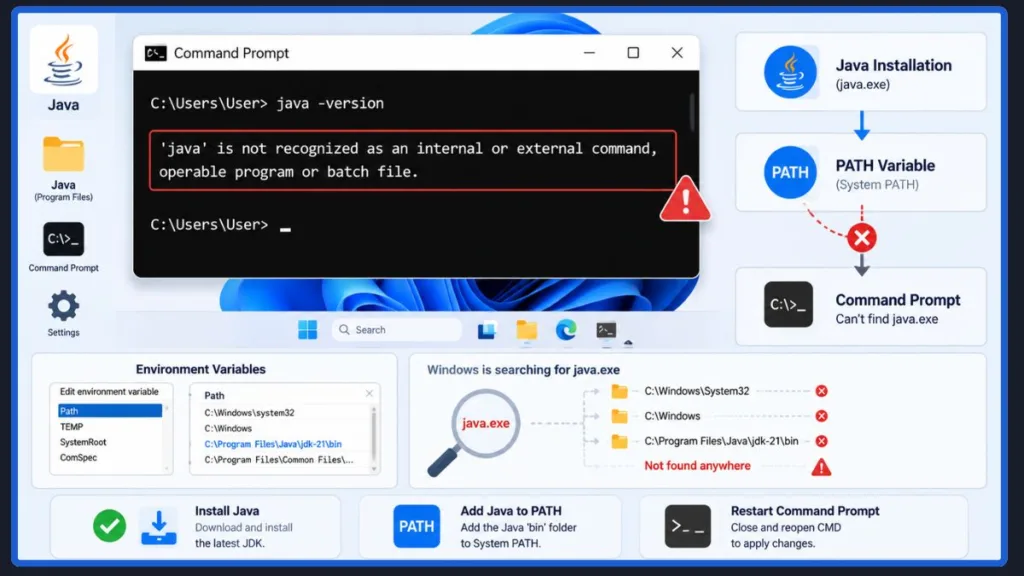
If instead you see a line saying 'java' is not recognized as an internal or external command, don’t worry — that’s one of the most common Java errors out there, and it’s almost always a quick fix. The troubleshooting section further down covers exactly how to resolve it.
What Does java -version Actually Do (and Why Does It Matter)?
When you type java -version, Windows doesn’t check some file on your desktop — it searches your PATH, a system-wide list of folders Windows checks whenever you run a command. If Java’s folder is on that list, Windows finds java.exe and runs it. If it’s not, you get the “not recognized” error, even if Java is sitting right there on your hard drive.
This command comes up constantly because so many things depend on it. Software installers check it before letting you proceed. IDEs like Eclipse and IntelliJ need to know which version you’re pointing at. And if you’ve ever tried running a Minecraft server, you’ve probably met this command’s evil twin, UnsupportedClassVersionError, which basically means “your Java is too old for this.”
In other words, checking your Java version usually isn’t the end goal — it’s step one in figuring out why something else isn’t working.
Method 1: Check Your Installed Java Version
- Open Command Prompt. Press
Windows + R, typecmd, and hit Enter. You can also search “Command Prompt” from the Start menu. - Type the command and press Enter:
java -version - Read the result. If Java is installed correctly, you’ll see three lines of output similar to this:
java version "21.0.2" 2024-01-16 LTS
Java(TM) SE Runtime Environment (build 21.0.2+13-LTS-58)
Java HotSpot(TM) 64-Bit Server VM (build 21.0.2+13-LTS-58, mixed mode, sharing)
That’s it — Java is installed, and you now know exactly which version is running. (This exact command works the same way in PowerShell too, if that’s what you have open instead.)
If you saw an error instead of version info, skip ahead to the “Command Not Working?” section below.
Method 2: Check Your JDK Version
It’s easy to assume java -version tells you everything, but it only confirms the Java Runtime Environment (JRE) — the part that runs Java programs. If you’re coding, you also need the Java Development Kit (JDK), which includes the compiler.
To check whether the JDK is installed, run:
javac -version
If you get back something like javac 21.0.2, you’re set — the JDK is installed and ready for development work. If instead you see the same “not recognized” error, it usually means you only have the JRE installed, not the full JDK. That’s fine if you’re just running Java programs, but you’ll need the JDK if you plan to write or compile Java code yourself.
Quick way to remember it: the JRE runs Java programs. The JDK builds them. If you’re not writing code, you probably only need the JRE.
Method 3: Find Which Java Installation Windows Is Using
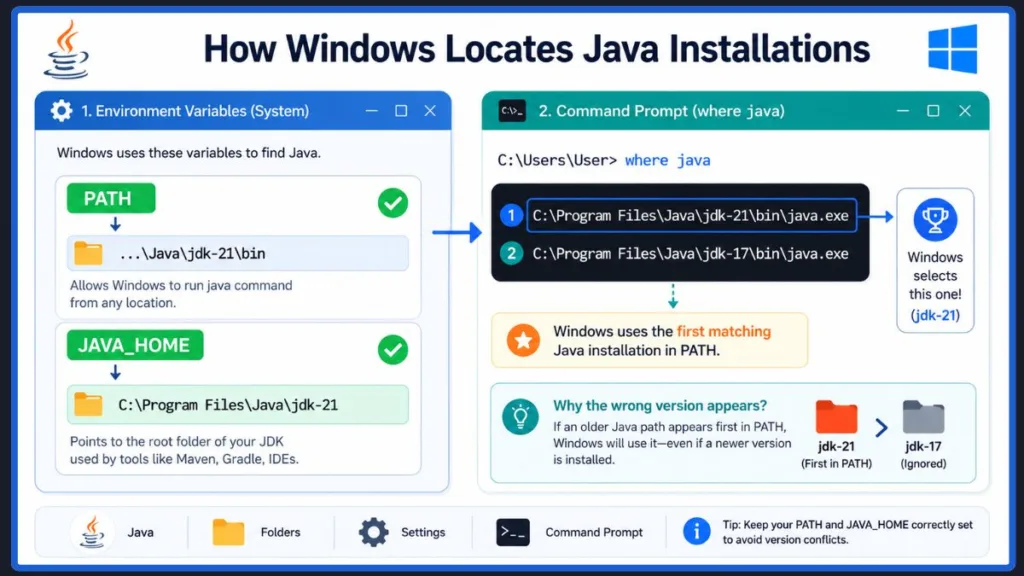
If you’ve installed Java more than once — which happens more often than you’d think — Command Prompt might be reading from an installation you forgot about. To see exactly which java.exe Windows is running, use:
where java
This returns the full file path Windows is using, something like:
C:\Program Files\Eclipse Adoptium\jdk-21.0.2.13-hotspot\bin\java.exe
If you’ve just installed a new Java version and java -version still shows the old one, this command tells you why: Windows is quietly running whichever copy of Java it finds first, not necessarily the newest one on your system.
Method 4: Check Your JAVA_HOME Variable
Some tools don’t check PATH at all — they look for a separate variable called JAVA_HOME, which points to your JDK’s installation folder. Development tools like Maven, Gradle, IntelliJ IDEA, Android Studio, and Tomcat rely on it directly.
To check its value, run:
echo %JAVA_HOME%
If it’s set correctly, you’ll see a folder path. If the line comes back empty, JAVA_HOME isn’t configured — which is fine for basic Java use, but it will cause problems the moment a tool that depends on it tries to run.
PATH vs. JAVA_HOME — what’s the difference? PATH is what lets Windows find and run the
javacommand at all. JAVA_HOME is a separate variable that specific tools look for to locate your JDK folder directly. You can have one set up without the other, and fixing one won’t automatically fix the other.
Command Not Working? Here’s How to Fix It
If any of the commands above gave you an error instead of a version number, don’t worry — this is one of the most common Java hiccups, and the cause is almost always one of the six things below.
Fix 1: You Typed the Command Wrong
Before touching any system settings, double-check what you actually typed. java -version needs a space between java and -version. Type java-version or javaversion without the space, and Windows reads it as a completely different, nonexistent command — one that throws an error that looks just like a real installation problem:
'java-version' is not recognized as an internal or external command...
Notice the error names 'java-version', not 'java'. That’s your clue — it’s a typo, not a broken setup. Retype the command with the space, and it should work fine.
Tip: This mix-up is more common than you’d expect, especially when copying commands from somewhere that dropped the space by accident. Always check the exact wording of the error message — it usually tells you exactly what Windows thinks you typed.
Fix 2: Java Isn’t Installed
If the error names 'java' itself (not 'java-version'), and you’re not sure Java is even on your computer, that’s the next thing to confirm. Open Settings > Apps > Installed apps (or Control Panel > Programs and Features on older Windows versions) and search for “Java.” If nothing shows up, you’ll need to install it.
You have two main options:
- Oracle JDK — the official version from Oracle, free for personal use.
- OpenJDK (via distributions like Eclipse Adoptium) — a free, open-source build that works the same way for almost all everyday purposes.
Either one gets java -version working. Download the installer, run it with the default settings, and restart Command Prompt afterward.
Fix 3: Windows Can’t Find Java (PATH Issue)
This is the classic cause of the “not recognized” error, and it happens even when Java is fully installed. Windows only looks for commands in folders listed in the PATH environment variable — if Java’s bin folder isn’t one of them, CMD has no way to find it.
To fix it:
- Press
Windows + R, typesysdm.cpl, and press Enter. - Go to the Advanced tab and click Environment Variables.
- Under System variables, find and select Path, then click Edit.
- Click New and add the path to your Java
binfolder — usually something likeC:\Program Files\Java\jdk-21\bin. - Click OK on every window to save the change.
- Close and reopen Command Prompt, then try
java -versionagain.
Not sure of your exact Java folder path? Check
C:\Program Files\Java(orC:\Program Files\Eclipse Adoptiumfor OpenJDK builds) in File Explorer — the folder name usually includes the version number.
Fix 4: JAVA_HOME Isn’t Configured Correctly
Some errors have nothing to do with PATH at all — instead, a tool complains that JAVA_HOME isn’t set, or that it’s pointing to the wrong folder. This mostly affects development tools rather than everyday Java use, but it’s worth fixing if you’re getting build errors in Maven, Gradle, or an IDE.
To set it:
- Open the same Environment Variables window as above (
sysdm.cpl> Advanced > Environment Variables). - Under System variables, click New.
- Set the variable name to
JAVA_HOME. - Set the value to your JDK’s install folder — for example,
C:\Program Files\Java\jdk-21(this is the main folder, not the\binsubfolder inside it). - Click OK, then restart Command Prompt and confirm with
echo %JAVA_HOME%.
Fix 5: Command Prompt Shows the Wrong Java Version
This one trips people up constantly: you install a newer Java version, run java -version, and CMD stubbornly shows the old one. It’s almost always because you have multiple Java versions installed, and PATH is pointing to the older one first.
Run where java (from Method 3 above) to see every Java installation Windows can find, listed in the order it checks them — Windows always uses the first one on the list. To fix it, go back into your PATH environment variable (Fix 3) and move the entry for your newer Java version above the older one, using the Move Up button in the Edit Environment Variable window.
If you don’t actually need the old version anymore, it’s usually cleaner to uninstall it entirely through Settings > Apps rather than juggling PATH order — one less thing that can go wrong later.
Fix 6: Restart Command Prompt
This sounds too simple to matter, but it’s one of the most common reasons a fix doesn’t seem to work: Command Prompt only reads environment variables when it opens. If you edit PATH or JAVA_HOME while a Command Prompt window is already open, that window won’t see the change.
Close every open Command Prompt window completely, then open a new one and try again. If you’re working from an IDE’s built-in terminal, restart the IDE too — it can hold onto old environment variables the same way.
How to Understand the Output of java -version
Once java -version runs successfully, the output tells you more than just a number. Here’s what each line means, using this example:
java version "21.0.2" 2024-01-16 LTS
Java(TM) SE Runtime Environment (build 21.0.2+13-LTS-58)
Java HotSpot(TM) 64-Bit Server VM (build 21.0.2+13-LTS-58, mixed mode, sharing)- Line 1 — Version number:
21.0.2is the specific release. LTS means it’s a Long-Term Support version, which gets updates for years rather than months. - Line 2 — Runtime Environment: confirms which JRE build is installed and running.
- Line 3 — Virtual Machine (JVM): shows which Java Virtual Machine is executing your code, plus whether it’s running in 64-bit mode.
You don’t need to memorize any of this — but if an app tells you it “requires Java 17 or higher,” this is exactly where you check whether you qualify.
Useful Java Commands Every Beginner Should Know
| Command | Purpose |
|---|---|
java -version | Check installed Java (JRE) version |
javac -version | Check JDK compiler version |
where java | Locate the Java executable currently in use |
echo %JAVA_HOME% | View the JAVA_HOME variable |
java --help | Display available Java command options |
How to Update Java on Windows
If your version check shows an old release, updating is usually simple. Here are two reliable ways to do it.
Option 1: Use winget (fastest for most people)
Windows 11 (and recent Windows 10 updates) include winget, the built-in Windows Package Manager, which can install or update Java directly from Command Prompt:
- Open Command Prompt as administrator (right-click it in the Start menu and choose “Run as administrator”).
- Run
winget search javato see which Java packages are available. - Install the version you need using the package ID from that list — for example,
winget install EclipseAdoptium.Temurin.21.JDK. - Restart Command Prompt and confirm with
java -version.
Option 2: Download the installer manually
- Head to the official Oracle Java or Adoptium OpenJDK download page and grab the installer for the version you need.
- Run it — the installer typically updates your PATH automatically.
- Restart Command Prompt and check
java -versionto confirm.
Should you always install the newest version? Not necessarily. If an app or project specifies a version (like “requires Java 17”), match that instead of jumping to the newest release. Newer isn’t always compatible with older software.
Frequently Asked Questions
How do I check if Java is installed in CMD?
Open Command Prompt and run java -version. If Java is installed, you’ll see version details. If not, you’ll get a “not recognized” error, which means Java either isn’t installed or isn’t in your PATH.
How do I know which Java version I have installed?
Run java -version — the first line of the output shows the exact version number, like 21.0.2. If you have multiple versions installed, use where java to see exactly which one Windows is currently using.
Why is java -version not working?
It’s usually one of three things: a typo in the command (check for the space between java and -version), Java not being installed, or Java’s folder missing from your PATH variable. Work through the fixes above in order.
Why does CMD say “Java is not recognized”?
This means Windows can’t find java.exe anywhere in your PATH. Either Java isn’t installed, or it’s installed but its bin folder was never added to PATH. Fix 3 above walks through the exact steps.
What’s the difference between java and javac?
java runs compiled Java programs and confirms your JRE version. javac is the compiler — it turns source code into a runnable program and confirms your JDK is installed. You need javac for development, but not just for running existing Java software.
How do I check if I have the JDK or just the JRE?
Run javac -version. If it returns a version number, you have the full JDK. If it gives a “not recognized” error while java -version works fine, you only have the JRE installed — enough to run Java programs, but not to write or compile your own.
Why does Command Prompt show the wrong Java version?
You likely have more than one Java version installed, and PATH is pointing to an older one first. Use where java to see which installation is active, then reorder PATH (or uninstall the old version) to fix it.
Can I install multiple Java versions on Windows?
Yes, and it’s common for developers working across different projects. Just know that only one version is “active” at a time by default, based on PATH order — you’ll need to manage that order if you switch between versions often.
Do I need JAVA_HOME?
Not for basic Java use. But if you use development tools like Maven, Gradle, or certain IDEs, they may specifically look for JAVA_HOME rather than relying on PATH, so it’s worth setting if you run into build tool errors.
How do I update Java?
The fastest way on Windows 11 is winget upgrade (or winget install) from an administrator Command Prompt. Otherwise, download the latest installer from Oracle’s or Adoptium’s official site and run it — most installers update your PATH automatically.
Conclusion
Checking your Java version really does come down to one line, java -version, most of the time. When it doesn’t work, the cause is almost always something on this list: a typo in the command, Java not being installed, a missing PATH entry, an unset JAVA_HOME, multiple versions competing for attention, or a Command Prompt window that just needs a restart.
Work through the fixes in order, and you’ll usually land on the answer within a couple of minutes. If you’re still stuck, drop your exact error message in the comments — the wording of the error itself usually points straight to the fix.
Visit Our Post Page: Blog Page
Discover more from Izoate
Subscribe to get the latest posts sent to your email.