
Need quick feedback from your team? Learn how to create a poll in Outlook Web and get responses without the usual back-and-forth email chain.
Have you ever needed your coworkers or clients to choose a date, pick an option, or give quick feedback, but ended up with a long chain of “I prefer Monday” and “Tuesday works for me” email replies?
That is exactly where an Outlook poll can save you time. Instead of asking everyone to reply individually, you can create a poll directly inside an email and let recipients submit their answers from the message or through a browser.
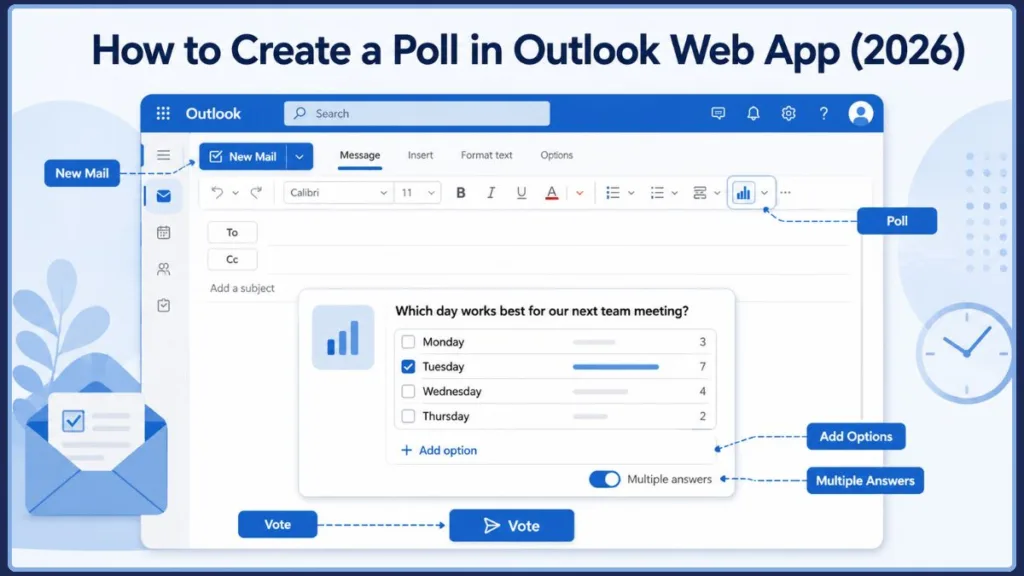
With Outlook on the web, eligible Microsoft 365 users can add a question, provide answer choices, allow single or multiple answers, and send the poll without leaving the email composer. According to Microsoft’s official documentation, recipients can vote directly in the email or select a link to vote in a browser, while poll results can be checked in the voting card.
In this guide, you’ll learn how to create a poll in Outlook Web, how recipients vote, how to check results, how to see who responded, how to close a poll, and what to do when the Poll option is missing.
Quick Answer
To create a poll in Outlook Web:
- Open Outlook on the web and select New mail.
- Open Poll from the Message or Insert area, or through Apps/More apps.
- Enter your question and at least two answer options.
- Select + Add option when you need additional choices.
- Turn on Multiple answers when recipients should be able to select more than one option.
- Add the poll to your email and review it.
- Add your recipients and select Send.
The exact location of the Poll command can vary slightly depending on the Outlook Web interface, so it may appear directly in the toolbar or inside the Apps/More apps menu.
According to Microsoft’s official documentation, the current Outlook on the web workflow is More apps > Poll from the Message or Insert tabs, followed by entering the question and options and configuring Multiple answers when needed. (Microsoft Support)
Tip: If you cannot find the Poll option at all, check your account type and your organization’s Microsoft Forms settings before assuming Outlook is broken.
What Is an Outlook Poll?
An Outlook Poll is an email-based voting tool that lets you collect quick responses without creating a separate survey first.
You can add a question and answer options directly while composing an email. Depending on how you configure the poll, respondents can select one answer or multiple answers.
The response experience can also vary. Some recipients can vote directly inside the email as an actionable message, while others receive a link that opens the poll in a browser.
According to Microsoft’s official documentation, recipients can receive the poll directly in the body of their email or receive a link that takes them to a browser-based voting experience.
Behind the scenes, the poll uses Microsoft Forms to collect and manage the responses. Outlook provides the convenient email-based voting experience, while Microsoft Forms provides more detailed response management.
After people vote, you can see aggregated results in the voting card inside the email. Selecting Refresh updates the results, while View in Forms opens the detailed response view in Microsoft Forms.
That makes Outlook Poll useful when you need a quick decision, while Microsoft Forms is generally a better choice for a larger or more detailed survey.
Who Can Create a Poll in Outlook Web?
Before you start clicking through the Outlook menus, make sure your account is eligible.
According to Microsoft’s official documentation, creating a Poll in Outlook is available with a work or school account. The feature is not supported for personal Outlook.com accounts or third-party accounts such as Gmail, Yahoo, or iCloud.
There can also be an organization-level requirement. Your Microsoft 365 administrator may need to go to the Microsoft 365 admin center and enable “Send a link to the form and collect responses” under External sharing. Microsoft provides additional administrator guidance for Microsoft Forms.
The broader Outlook Poll feature is documented across supported Outlook experiences, including Microsoft 365, Outlook 2016-2024, New Outlook, and Outlook on the web. This guide, however, focuses specifically on the Outlook Web experience.
Important: If you’re using a personal Outlook.com account and don’t see Poll, changing the location of the button will not solve the problem. The account itself may not support Outlook Poll creation.
How to Create a Poll in Outlook Web
Now that you know the requirements, let’s create the poll.
The basic process takes only a few steps, but there are several options worth understanding before you send your email.
Step 1: Open Outlook Web and Start a New Email
Sign in to Outlook on the web using your supported work or school account.
Select New mail to open a new message.
You can write some context before adding your poll. This is especially useful when recipients need to understand why you’re asking the question.
For example:
Which day works best for our next team meeting?
You might add a sentence above it:
We’re planning next week’s meeting and would like to choose a time that works for everyone. Please select your preferred day below.
Keeping the introduction short makes the purpose of the poll immediately clear.
Step 2: Open the Poll Option
With your new email open, look at the Message or Insert area of the compose window.
Depending on the current Outlook Web interface, you may find the command through:
Message > Poll
or
Insert > Poll
According to Microsoft’s official documentation, the specific Outlook on the web path is More apps > Poll from the Message or Insert tabs.
If you don’t see Poll as a visible button, check the Apps, More apps, or three-dot overflow menu.
Once you select Poll, the Poll pane opens and is ready for you to enter your first question and two answer choices.
Tip: Outlook’s interface can change the location of app commands. If an older tutorial tells you to click a button that isn’t visible, look inside the Apps or overflow menu before assuming the feature has been removed.
Step 3: Add Your Poll Question and Answer Options
The Poll pane starts with a field for your first question and two answer options.
Type the question you want to ask.
For example:
Which day should we hold the team meeting?
Then add your first two choices:
Monday
Tuesday
Outlook lets you add more choices later, so you don’t need to enter every possible option immediately.
Try to write the question so that someone can understand it without reading a long explanation. A poll works best when the question is specific, direct, and easy to answer.
For example, this is clearer:
Which day works best for our next team meeting?
than:
Please let us know your availability and what you think might work best for everyone for the upcoming meeting we’re trying to arrange next week.
The first version gives the recipient one obvious task.
Step 4: Choose Single or Multiple Answers
Once you’ve added the question and options, decide whether recipients should be able to select one answer or multiple answers.
By default, you can use the poll for a single choice. To let respondents choose more than one option, turn on Multiple answers.
According to Microsoft’s official Outlook Poll documentation, you can toggle Multiple answers on when you want respondents to select more than one option.
For example, leave multiple answers off for:
Which day should we meet?
You normally want each person to choose one preferred day.
Turn multiple answers on for:
Which topics would you like us to cover in the next workshop?
In that case, someone may be interested in several topics.
Choosing the correct setting matters because it changes how respondents can answer your poll.
Step 5: Add More Questions
For a more detailed poll, you can use + Add question to continue adding questions.
Depending on the Outlook Poll experience available to you, supported question types can include Multiple choice, Word cloud, Rating, and Ranking.
A Multiple choice question is useful when you want a structured answer. A Word cloud can be useful for collecting short ideas or keywords. A Rating question lets people rate something on a scale, while Ranking lets respondents put choices in their preferred order.
For example, a short employee feedback poll could ask:
How satisfied are you with the new workflow?
Then follow it with:
Which parts should we improve?
Adding multiple questions gives you more information, but remember that a longer poll can also make the message less convenient to answer.
Tip: Use Outlook Poll for quick feedback. When you need a long questionnaire, detailed survey logic, branching, advanced customization, or extensive reporting, build the survey in Microsoft Forms instead.
Step 6: Add Images or Media
Some Outlook Poll experiences also let you add images to questions or answer choices using the Insert media option.
This can be useful when you’re asking people to choose between visual alternatives.
For example, you could show several design concepts and ask:
Which design do you prefer?
Visual questions can be much easier to answer when people can see the choices instead of reading descriptions.
However, keep the images reasonably sized. Very large images can contribute to situations where the poll is not displayed directly inside an email and recipients instead receive a browser link.
Step 7: Configure Poll Settings
Before sending the poll, check the available Settings or gear icon.
Depending on your Outlook Poll experience, you may have options such as:
Record names of respondents
and
Share aggregated results with respondents.
The first setting determines whether respondent identities are recorded for detailed results. The second controls whether participants can see aggregated results.
Microsoft Forms provides settings for recording names and controlling who can respond, and the available options depend on the account and form configuration. You can review Microsoft’s Microsoft Forms settings documentation.
If you need to know which person submitted which response, pay particular attention to the respondent-name setting before sending the poll.
Tip: Decide whether you need anonymous or identified responses before sending your poll. Changing expectations after people have already voted can create confusion.
Step 8: Preview the Poll
If your current Outlook Poll interface provides a Preview option, use it before sending the message.
This gives you a final opportunity to check whether the question and answer options make sense.
Look at the wording, confirm that the correct choices are included, make sure Multiple answers is set properly, and check that any images appear as expected.
Previewing is especially useful when you have added several questions or visual options.
Step 9: Insert the Poll Into the Email
Once the poll is complete, insert it into your message.
The completed poll will appear in the email body as an interactive experience or as a poll link, depending on the Outlook experience and recipient environment.
According to Microsoft’s official documentation, recipients can either receive the poll in the body of their email or get a link directing them to vote in a browser.
At this point, read through the entire message once more.
You want the email to make sense even before someone reaches the poll. If there is a deadline, a reason for the question, or an important instruction, put that information in the message itself.
Step 10: Add Recipients and Send
Add the people who need to answer the poll.
You can include a short instruction such as:
Please vote by Friday at 5 PM.
Then select Send.
Your poll is now live, and recipients can begin submitting their responses.
How Does an Outlook Poll Work for Recipients?
After you send the message, the voting experience can differ depending on the recipient’s Outlook version, account, and email environment.
When the interactive experience is supported, recipients see the poll directly inside the email. According to Microsoft’s official documentation, this is also called an actionable message. The recipient can select an answer and submit the vote without opening another site.
In other situations, the recipient receives a link to the poll. Selecting that link opens the poll in a browser window.
Microsoft specifically notes that recipients may receive a link instead of seeing the poll embedded when the poll is too lengthy, such as when the title is too long or there are too many options. Sending a poll from a work or school account to people outside the organization can also cause the browser-based experience to be used.
The recipient’s email client can also affect how the poll appears.
A browser link does not mean the poll is broken. The recipient can still open the link and vote.
How to Vote on an Outlook Poll
Voting is straightforward.
If the poll appears directly in the email, open the message, select the answer or answers that apply to you, and submit the response.
If the message contains a link instead, select the poll link and complete the response in your browser.
If the poll creator has enabled result sharing, respondents may also be able to see the aggregated results after submitting their responses.
The exact appearance can differ between Outlook versions and email environments, but the basic voting process remains the same.
How to Check Poll Results in Outlook Web
Creating the poll is only half the job. Once people begin voting, you’ll probably want to know which option is winning.
Outlook provides a quick summary through the poll card, while Microsoft Forms provides a more detailed view of responses.
Check Results From the Poll Card
To see your results, open Sent Items and find the email containing your poll.
Open the message and look at the poll or voting card.
You’ll see the aggregated responses collected so far.
Select Refresh when you want to update the displayed results. You can also select View in Forms to open the associated poll in Microsoft Forms and review more detailed responses. According to Microsoft’s official documentation, the voting card provides aggregated results, while View in Forms opens the detailed responses.
This makes the Outlook voting card useful when you simply need to answer a question such as:
Is Monday or Tuesday currently winning?
You don’t need to leave Outlook just to see the basic totals.
View Detailed Results in Microsoft Forms
When you need more detail, select View in Forms.
This opens the associated poll in forms.office.com, where you can review the responses through the Forms results interface.
You can also reach the more detailed results through the poll link in the email.
Microsoft’s View results documentation explains how to review response summaries and individual results in Forms.
Tip: Use the Outlook poll card for a quick summary and Microsoft Forms when you need to inspect the collected responses in more detail.
Can You See Who Voted in an Outlook Poll?
This is one of the most common questions about Outlook polls.
The answer depends on how the poll was configured.
If Record names of respondents is enabled, respondent identity can be included with responses.
The Outlook poll card is designed mainly for viewing the aggregated results. For detailed individual-response information, open the associated poll in Microsoft Forms.
In Forms, you can open the response results and use the individual-results view to inspect each person’s response.
You can go to:
My forms > View results > Check individual results
This lets you review individual responses and, when respondent names have been recorded, see the name associated with each response.
Microsoft’s Forms response settings explain how Record name affects collected responses, while its results guide covers individual response details.
Important: If knowing who selected each option matters, check the response settings before sending the poll.
How to Close a Poll in Outlook
Sometimes you only want to collect responses until a particular deadline.
For example, you may need everyone to vote before a meeting, project decision, or event deadline. Once you’ve collected enough responses, you may want to stop accepting new ones.
To close the poll, open your Sent Items folder and find the email containing the poll.
Open the poll card and select Close poll when that option is available.
Closing the poll prevents additional voting while allowing you to continue reviewing the responses that have already been collected.
Tip: Even when you plan to close the poll later, include the deadline in the original email. A clear message such as “Please vote by Friday at 5 PM” makes the expected cutoff obvious.
Why Is the Poll Option Missing in Outlook Web?
If you’re following the steps but cannot find Poll, there are several things to check.
Check Your Account Type
Start with the simplest possibility: your account may not support the feature.
According to Microsoft’s official documentation, creating a Poll in Outlook requires a work or school account. Personal Outlook.com accounts and third-party accounts such as Gmail, Yahoo, and iCloud are not supported for creating Outlook Polls.
If you’re using an unsupported account, searching through the menus will not make the Poll feature appear.
You can confirm the current requirements in Microsoft’s Create a poll in Outlook documentation.
Check the Correct Menu
In Outlook on the web, check the Message and Insert areas.
According to Microsoft’s official documentation, the current Outlook on the web workflow is More apps > Poll from those tabs.
If Poll isn’t immediately visible, open the Apps, More apps, or three-dot overflow menu.
This is particularly important if you’re following an older guide that shows Poll as a large standalone button.
Check Your Outlook Version
Make sure you’re using a supported and updated version of Outlook.
Older or unsupported versions may not expose the same Poll functionality or interface.
Because Microsoft changes the Outlook interface over time, the location of an app can also differ from older screenshots and tutorials.
Check Microsoft Forms Administrator Settings
Your administrator may need to enable “Send a link to the form and collect responses” under External sharing in the Microsoft 365 admin center.
According to Microsoft’s official documentation, this administrator setting can affect the ability to use Outlook Polls with Microsoft Forms.
If you’re using a work or school account but the feature is still unavailable, ask your Microsoft 365 administrator to check the Forms settings for your organization.
Refresh Your Outlook Session
If your account should support polls and your organization allows them, refresh Outlook on the web and sign in again.
A temporary session or interface issue can sometimes prevent an app command from appearing correctly.
If you’re also using Outlook desktop, switching between supported and unsupported accounts can sometimes affect how account-specific features appear. Restarting the application can help refresh the interface.
Use Microsoft Forms as a Fallback
If you still can’t access the built-in Outlook Poll feature, you can create the poll directly in Microsoft Forms and then share the link through an Outlook email.
This is more than a workaround. Microsoft Forms can also be the better choice when you need longer surveys, advanced question types, branching, anonymous responses, or more detailed response management.
Why Is My Outlook Poll Showing as a Link Instead of the Poll?
There is an important difference between not being able to create a poll and creating the poll successfully but having recipients receive a link.
If the recipient sees a link, the poll itself can still be working correctly.
According to Microsoft’s official documentation, a poll may appear as a link when it is too lengthy, such as when the title is too long or there are too many options. Sending a poll from a work or school account to people outside the organization can also result in the browser-based version.
The recipient’s email client and account environment can also affect whether the interactive card is displayed.
Very large images can create another problem as well.
The important part is that the browser link still gives recipients a way to vote.
Tip: Keep quick polls short and focused. If you’re asking many questions or collecting detailed feedback, use Microsoft Forms directly and share the form link.
Outlook Poll vs Microsoft Forms
The two tools overlap, but they are most useful in different situations.
| What you need | Best option |
|---|---|
| One quick question | Outlook Poll |
| Simple yes/no feedback | Outlook Poll |
| Simple multiple-choice feedback | Outlook Poll |
| Multiple questions | Outlook Poll or Microsoft Forms |
| Detailed survey | Microsoft Forms |
| Advanced question types | Microsoft Forms |
| Branching | Microsoft Forms |
| Anonymous survey | Microsoft Forms |
| Detailed reporting | Microsoft Forms |
An Outlook Poll is convenient because you can create it while you’re already writing the email.
Microsoft Forms becomes more useful when the survey itself is the main task and you need more control over the questions, settings, responses, or analysis.
Frequently Asked Questions
Can I create a poll in Outlook Web?
Yes. In Outlook on the web, start a new email and select Poll from the available Message or Insert area, or open More apps > Poll. You can then add your question, answer options, and the Multiple answers setting. See Microsoft’s Outlook Poll guide.
Is Outlook Poll available with a personal Outlook.com account?
According to Microsoft’s official documentation, creating a Poll in Outlook is available with a work or school account. It is not supported for personal Outlook.com or third-party accounts such as Gmail, Yahoo, or iCloud.
Can an Outlook poll have multiple answers?
Yes. Turn on Multiple answers when creating the poll if respondents need to choose more than one option.
How do I add more options to an Outlook poll?
Open the Poll pane while composing your email and select + Add option. You can then enter additional choices for the question.
Can I add multiple questions to an Outlook poll?
In supported Poll experiences, you can use + Add question to build a poll or survey with additional questions. Available question types can include Multiple choice, Word cloud, Rating, and Ranking.
How do I see poll results in Outlook?
Open the poll email from Sent Items and check the voting card. Select Refresh for updated aggregated results or View in Forms to see more detailed responses. Microsoft’s View results documentation also explains the Outlook workflow.
Can I see who voted in an Outlook poll?
You can review individual responses through Microsoft Forms when the poll/form is configured to record respondent names. Use the individual results view to inspect the responses. See Microsoft’s Forms response settings and results guide for more information.
How do I close an Outlook poll?
Open the poll message from Sent Items and use Close poll on the poll card when that option is available. Closing the poll stops additional responses while leaving existing results available.
Why is the Poll button missing in Outlook?
Check that you’re using a supported work or school account, then look under Message/Insert > More apps > Poll. If the option is still unavailable, your organization’s Microsoft Forms settings may need attention. Microsoft’s Outlook Poll documentation covers the current requirements.
Why does my recipient see a poll link instead of the poll?
According to Microsoft’s official documentation, this can happen when the poll is too lengthy or when a work or school account sends a poll to people outside the organization. The recipient can still open the link and vote in a browser.
Can I create a survey in Outlook?
Yes. You can add more questions to supported Outlook Poll experiences, but Microsoft Forms is generally better for a detailed survey with more question types, settings, customization, and response management.
Can I create a quiz in Outlook?
Supported Outlook Poll experiences can work with quizzes through the associated Forms functionality. For more advanced quiz creation and management, Microsoft Forms provides the dedicated quiz experience.
Can I create a poll from Outlook Mobile?
The Outlook mobile app does not provide the same built-in Poll insertion experience in the compose window. One workaround is to create the poll on Outlook on the web, save it as a draft, let the draft sync, and then send it from your phone. Another option is to create the poll in Microsoft Forms and paste its link into an Outlook mobile email.
Conclusion: Create, Send, and Track Your Outlook Poll
Creating a poll in Outlook Web is a convenient way to collect quick feedback without filling your inbox with long reply chains.
The basic workflow is simple:
Create > Customize > Send > Collect votes > Check results > Close when finished
Start by opening a new email and finding Poll through the Message or Insert area or the More apps menu. Add your question and answer choices, decide whether respondents should be able to select one or multiple answers, configure the available response settings, and send the message.
According to Microsoft’s official Outlook Poll documentation, recipients can vote in the email or use a browser link, while you can check aggregated results from the voting card and use View in Forms for detailed responses.
If you need to know who voted, check the Record names of respondents setting and review individual responses through Microsoft Forms. When you’re finished collecting feedback, close the poll so no additional responses are submitted.
And if the Poll option is missing, start with your account type, the current Apps/More apps location, your Outlook version, and your organization’s Microsoft Forms settings.
For quick questions and simple decisions, Outlook Poll can be all you need. For larger surveys, advanced question types, branching, anonymous responses, or detailed reporting, Microsoft Forms is the better choice.
Have you tried creating a poll in Outlook Web, or is the Poll option missing from your account?
Visit Our Post Page: Blog Page
Discover more from Izoate
Subscribe to get the latest posts sent to your email.