
Are you only getting solid purple blocks from geodes? Learn exactly how to get Amethyst Shards in Minecraft, avoid common mining mistakes, and start farming!
Stumbling upon your first glowing, purple geode while strip mining is an exciting moment. Naturally, your first instinct is to pull out your pickaxe and start hacking away at the walls to gather those beautiful new resources. But then you run into a frustrating issue: your inventory is filling up with solid purple blocks, and you haven’t collected a single shard.
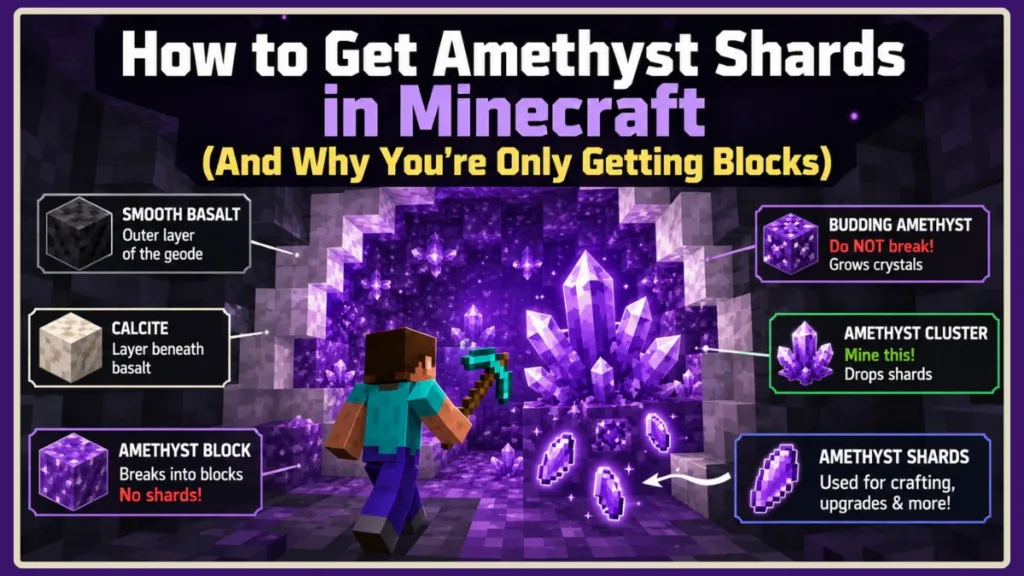
If you’re experiencing this issue, don’t worry. People dealing with the same problem often find that Amethyst simply doesn’t behave like traditional Minecraft ores such as iron, diamond, or coal. To get the materials you actually need for crafting, you have to treat this resource more like a farmable crop.
Here is everything you need to know about how to get Amethyst Shards in Minecraft, why your current mining strategy might be failing, and how to build a reliable crystal farm.
Why Am I Not Getting Amethyst Shards? (The Big Mistake)
If you are only getting solid blocks when mining, it is because you are breaking the structural walls of the geode rather than the actual growing crystals. Unlike standard ores that drop their respective items the moment you break the main block, Amethyst Geodes are made up of three very distinct types of blocks.
To successfully gather shards, you need to know exactly what you are looking at:
- Amethyst Blocks: These are the solid, smooth purple blocks that make up the outer walls and floor of the hollow geode. When you break them, they only drop themselves. They are fantastic for building and decoration, but they will never drop shards.
- Budding Amethyst: These blocks look very similar to standard Amethyst but feature a distinct cracked, cross-shaped texture on all of their faces. Never break these blocks! These are the geode’s “generators” that grow the crystals. If you break them, they drop absolutely nothing and are destroyed forever.
- Amethyst Clusters: These are the 3D, protruding crystals that slowly grow out of the sides of the Budding Amethyst blocks. This is your actual target. Breaking fully grown clusters is the only way to get shards in the game.
How to Get Amethyst Shards in Minecraft: Step-by-Step
Now that you know what to avoid breaking, you can start safely harvesting. You can follow these simple steps to start gathering shards without accidentally destroying your geode.
1. Find an Amethyst Geode Geodes generate underground anywhere between Y-level 30 and Y-level -64. As you explore caves or dig your strip mines, keep an eye out for a large, spherical wall of dark Smooth Basalt. Once you mine through the basalt, you will hit a white layer of Calcite. Dig through that, and you will find the hollow, purple center.
2. Locate the Budding Blocks Once you are inside the geode, carefully clear out a walking path. Inspect the walls and floor to locate the cracked Budding Amethyst blocks. You will usually notice small, baby crystals already growing on their sides.
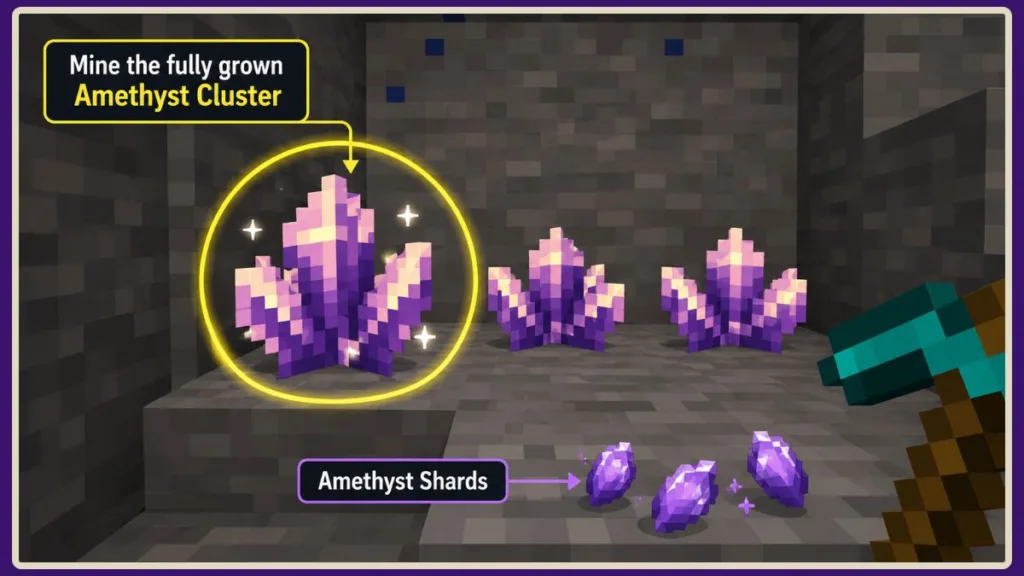
3. Wait for the Final Growth Stage This is where patience comes in. Crystals grow in four distinct stages. If you break the crystals during stages one, two, or three, they will drop nothing. You must wait for them to reach the fourth stage, known as an Amethyst Cluster. You will know they are fully mature because they are quite large, take up a significant portion of the block space, and emit a faint light.
4. Mine the Cluster Properly Once the cluster is fully grown, strike the protruding crystal directly using any pickaxe. Breaking a mature cluster with a pickaxe will successfully drop four Amethyst Shards. If you try to break it with your bare hands or a different tool, it will only drop two shards, so always keep your pickaxe handy!
Pro Tips for Maximizing Your Amethyst Harvest
If you want to set up a permanent farming station and gather resources much faster, keep these advanced harvesting rules in mind.
- Use the Fortune Enchantment: You can massively boost your yield by bringing an enchanted pickaxe. While a standard pickaxe drops four shards, using Fortune III gives you a chance to drop up to 16 shards from a single cluster!
- Put Away the Silk Touch: If you hit a fully grown Amethyst Cluster with a Silk Touch pickaxe, it will drop the physical 3D crystal block as a decorative item instead of the individual shards. While these look amazing as decorations for your base, they won’t help you craft the items you need. Keep a standard or Fortune pickaxe nearby specifically for harvesting.
- Clear the Area for Growth: Budding Amethyst can grow crystals on all six of its sides. To maximize your farm’s efficiency, carefully mine away the standard solid Amethyst Blocks surrounding the buds so the crystals have empty air blocks to grow into.
- Mark Your Coordinates: Because you cannot pick up Budding Amethyst blocks with any tool—and because trying to move them with Pistons will instantly destroy them—your farm is permanently stuck where it generated. Be sure to press F3 (on Java Edition) or turn on the Show Coordinates setting (on Bedrock Edition) to write down the exact location so you can return every few in-game days to harvest.
What to Do With Your New Amethyst Shards
Once your chests are full of shards, a whole new tier of crafting and game mechanics opens up to you.
- Craft a Spyglass: By combining one Amethyst Shard with two Copper Ingots at a crafting table, you can build a Spyglass to zoom in and scout distant terrain or structures.
- Create Tinted Glass: If you build mob farms or redstone contraptions, you often need to block out sunlight while still being able to see inside. Combine four Amethyst Shards with a standard block of Glass to create Tinted Glass, which is visually transparent to players but completely blocks game light from passing through.
- Upgrade to Calibrated Sculk Sensors: If you love dabbling in redstone, you can combine a standard Sculk Sensor with three shards to create a Calibrated Sculk Sensor. This allows you to filter specific vibration frequencies for highly advanced contraptions.
- Duplicate Your Allays: If you rescued an Allay from a Pillager Outpost or Woodland Mansion, you can hand it an Amethyst Shard while a Jukebox is playing music to duplicate the mob!
- Customize Your Armor: You can use shards as a color material in the Smithing Table to apply vibrant purple Armor Trims to your gear.
Getting your hands on Amethyst Shards is incredibly rewarding once you understand the farming mechanics. Have you successfully crafted your first Spyglass, or are you hoarding shards to build massive Tinted Glass windows? Let me know in the comments below, and feel free to ask if you run into any other issues while exploring your geodes!
Visit Our Post Page: Blog Page
Discover more from Izoate
Subscribe to get the latest posts sent to your email.