
Learn how to remove duplicates in Excel Power Query using single or multiple columns. Keep unique values, fix duplicate rows, use Table.Distinct, Table.Buffer, and troubleshoot Power Query duplicate issues.
If you regularly work with data, you already know the sinking feeling of opening a fresh spreadsheet only to find it riddled with duplicate records. Whether you are pulling a massive report from your CRM, merging weekly sales CSVs, or dealing with the aftermath of a colleague’s manual entry mistakes, duplicate rows are a nightmare. They inflate your totals, break your data models, and ruin your analysis.
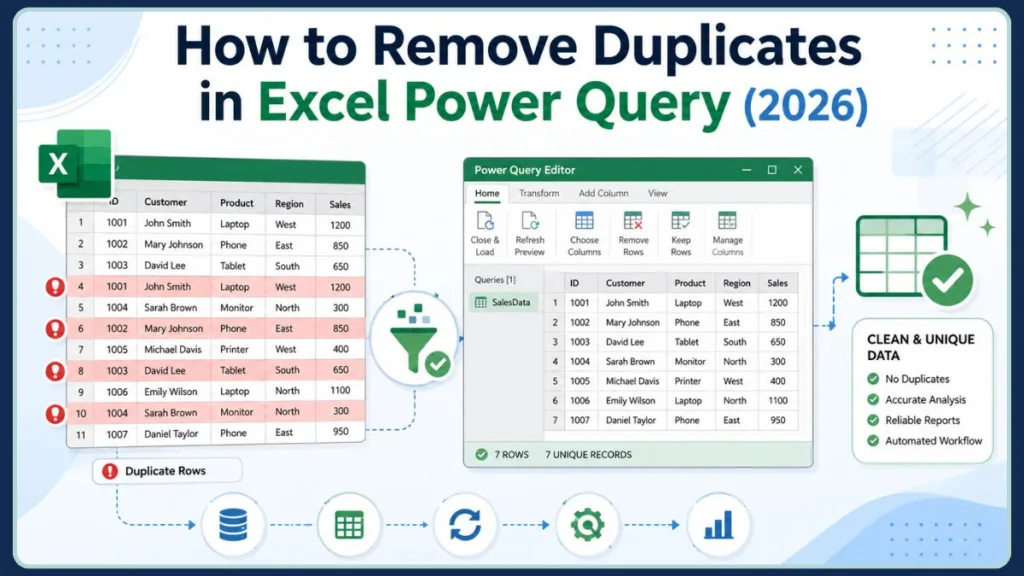
Mastering how to remove duplicates in excel power query is an essential skill for robust data preparation. Cleaning up these repeated entries before you begin reporting ensures your metrics are perfectly accurate, your pivot tables are reliable, and your dashboards reflect reality.
While you might be tempted to use the standard Excel ribbon to clean things up, learning how to handle this in Power Query is an absolute game-changer. It is faster, safer, and completely automated. In this guide, you will learn exactly how to remove duplicates from single and multiple columns, how to selectively keep specific records (like the newest date or highest value), and how to troubleshoot when Power Query refuses to delete stubborn duplicate rows.
Why Remove Duplicates in Excel Power Query?
Before diving into the clicks and formulas, it helps to understand why your data is duplicating in the first place and why the Power Query Editor is the ultimate tool to fix it. Data cleansing is rarely a one-time task, so building an automated workflow is critical.
Common Causes of Duplicate Records
Duplicate records often sneak into your workflow during routine data handling.
- Data imports: When you download reports from platforms like Salesforce, Shopify, Google Analytics, or even internal SQL databases, overlapping date ranges can easily pull the same record twice.
- Merged datasets: Combining files—like appending January and February reports—often results in overlapping entries, especially if the data extraction dates overlapped.
- Manual entry errors: Human error is unavoidable. Typing the same customer name or invoice number twice happens all the time.
- Duplicate rows after joins: If you are merging queries, having multiple matching IDs in your lookup table will accidentally multiply your rows.
Note: Because Excel and Power BI share the same backend engine, understanding these causes will help you prevent duplicate data across multiple Microsoft platforms.
Benefits of Using Power Query Instead of Excel Remove Duplicates
Using excel power query remove duplicates offers massive advantages over the standard spreadsheet approach:
- Preserves source data: Power Query never deletes your original data. All cleanup happens in the background, keeping your raw files completely safe.
- Refreshable workflow: Once you build your cleanup steps, you never have to repeat them. Just hit Refresh next month, and the duplicates vanish automatically.
- Better for large datasets: Power Query processes millions of rows without freezing or crashing your computer, making it ideal for heavy spreadsheet cleanup.
- Tracks every transformation step: The Applied Steps pane acts as a time machine. If you make a mistake, simply delete the step instead of furiously hitting the undo button.
How to Remove Duplicates in Excel?
If you only need a quick, one-time fix on a small table, Excel has a built-in feature to remove duplicate data in excel. You simply highlight your data, go to the Data tab on the ribbon, and click Remove Duplicates.
While this is incredibly easy, it comes with major limitations. It permanently deletes rows from your spreadsheet, meaning if you make a mistake and save the file, that data is gone forever. It also lacks an audit trail and cannot be easily automated without writing complex VBA macros. For a professional, repeatable data cleaning process, Power Query is always the preferred method.
How Do I Remove Duplicate Values From a Dataset Using Power Query?
Getting rid of basic duplicates takes just a few clicks once you are inside the query editor. You will find that table transformations like this are incredibly intuitive.
Load Your Data Into Power Query
To begin your imported data cleanup, you first need to bring your information into the editor:
- Click anywhere inside your Excel dataset.
- Navigate to the Data tab on the Excel ribbon.
- Click From Table/Range.
- If prompted, verify your data range and click OK on the Create Table dialog box. This will immediately open the Power Query Editor.
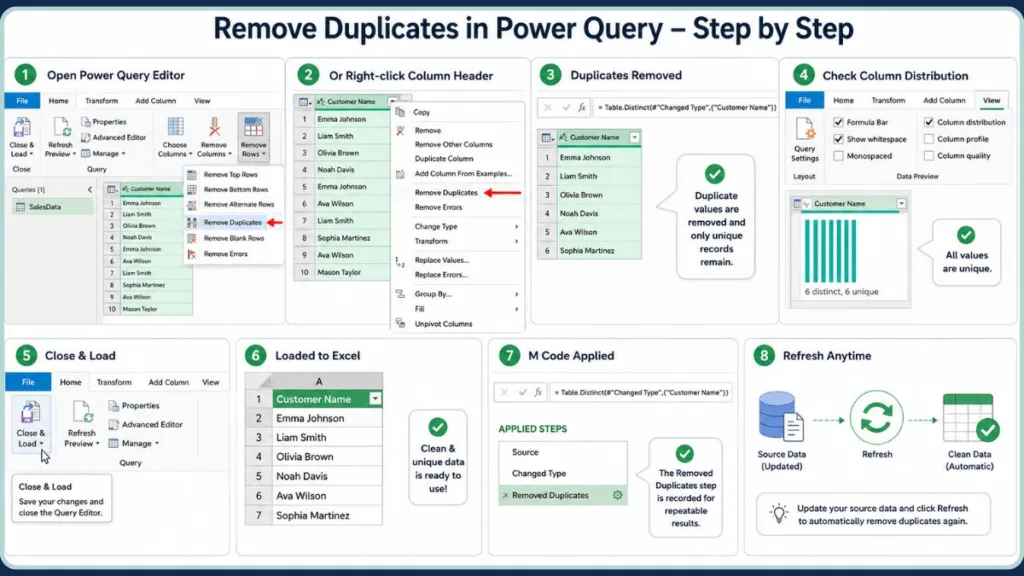
Remove Duplicates From a Single Column
If you have a straightforward list, like a column of unique Invoice IDs, cleaning it is simple. This method helps you isolate power query distinct values:
- Right-click the header of the column containing the duplicates.
- Select Remove Duplicates from the drop-down menu.
- Alternatively, you can select the column, go to the Home tab, click Remove Rows, and choose Remove Duplicates.
Tip: To verify your work, you can open the View tab and check Column distribution to visually ensure your column now only contains unique values.
Remove Duplicate Rows From Multiple Columns
Sometimes, a true duplicate is a combination of fields. For instance, two people might share the first name “John,” so you need to check both the First Name and Last Name columns together. To remove duplicate rows in power query based on multiple criteria:
- Click the header of your first column.
- Hold down the Ctrl key on your keyboard.
- Click the headers of any other columns you want to evaluate.
- Right-click any of the highlighted headers and select Remove Duplicates. Power Query will now only delete rows where the exact combination of those selected columns is repeated. This ensures you maintain true power query unique records.
How Does Power Query Remove Duplicates Work?
To truly master this tool, you need to understand what is happening behind the scenes when you click that button. Excel automation relies on specific underlying commands.
Understanding Table.Distinct
When you remove duplicates, Power Query writes a line of M-code using the Table.Distinct function. This formula scans your specified columns, identifies the first instance of a value, and actively filters out any subsequent rows that match it exactly.
Important: The syntax looks like
Table.Distinct(Source, {"ColumnName"}). If you omit the column name, it evaluates the entire table.
Difference Between Unique and Distinct Values
When profiling your data using the column distribution tool, you will often see these two terms. It is important to know the difference:
- Distinct values: The total count of all different values in a column, including the first instance of a duplicate. For example, if you have [“Apple”, “Apple”, “Orange”], your distinct count is two.
- Unique values: Values that appear exactly once in your entire dataset with no duplicates at all. In the previous example, only “Orange” is unique.
- Duplicate records: The extra rows that appear more than once.
How Power Query Decides Which Record to Keep
By default, Power Query is designed to keep the first matching row it encounters as it scans from top to bottom. However, because of how the engine optimizes processing speed in the background, your visual sort order isn’t always guaranteed unless you force it to be.
How to Remove Duplicates Based on Multiple Columns in Power Query
Handling complex datasets often requires evaluating more than just a single ID column. Knowing how to remove duplicates from multiple columns power query is vital for accurate reporting.
Remove Duplicates Using Selected Columns
As covered earlier, simply holding the Ctrl key allows you to select specific columns. Power Query ignores unselected columns entirely when deciding if a row is a duplicate.
Keep Unique Combinations of Values
If you are analyzing sales data and want to see a list of every product sold per region, you can select both the “Region” and “Product” columns. Removing duplicates here will leave you with a clean matrix of unique region-and-product combinations, regardless of how many times those products were actually sold.
Remove Duplicate Records After Merging Queries
If you perform a merge (a join) and your lookup table contains duplicate IDs, your main table will suddenly expand with duplicate rows. To fix this, simply select your primary key column in the merged result and remove duplicates to restore your original row count.
How to Remove Duplicates Case-Insensitive in Power Query
One of the most common headaches analysts face is dealing with inconsistent data entry. By default, table transformations can be tripped up by typing habits.
Why Capitalization Can Create Hidden Duplicates
Power Query is strictly case-sensitive. To the engine, “Los Angeles”, “los angeles”, and “LOS ANGELES” are three completely different cities. A standard duplicate removal will keep all three, failing to fully remove repeated values.
Use Comparer.OrdinalIgnoreCase
To make your cleanup case-insensitive, you need to slightly adjust the formula in the formula bar.
Change your standard code from:
= Table.Distinct(Source, {"City"})
To:
= Table.Distinct(Source, {"City", Comparer.OrdinalIgnoreCase})
Tip: This simple M-code addition allows the engine to ignore capitalization while evaluating rows.
Remove Duplicates Across Multiple Columns Regardless of Case
If you are evaluating multiple columns, you must apply this rule to each one individually within the M-code:
= Table.Distinct(Source, {{"City", Comparer.OrdinalIgnoreCase}, {"State", Comparer.OrdinalIgnoreCase}})
Conditionally Remove Duplicates in Power Query
Often, you don’t just want to keep the first duplicate; you want to keep the best duplicate based on a specific condition. This is where you leverage advanced power query data cleaning.
Keep the First Occurrence
To guarantee you keep the absolute first occurrence based on a specific criteria, you must sort your data appropriately, buffer the table, and then remove duplicates.
Keep the Last Occurrence
Sort your target column in Descending order so the last occurrence floats to the top. Buffer the table, then remove duplicates on your ID column.
Keep the Earliest Date
Sort your Date column in Ascending order (oldest to newest). Buffer the table, then remove duplicates based on your identifier.
Keep the Latest Date
Sort your Date column in Descending order (newest to oldest). Buffer the table, then remove duplicates to keep the most recent transaction.
Keep the Lowest Value
Instead of the standard remove duplicates button, use the Group By feature to harness the power of Table.Group. Group by your main category, perform an All Rows operation, and adjust the M-code to use Table.Min([Column Name]) to extract the lowest value.
Keep the Highest Value
Follow the exact same grouping steps as above, but swap the M-code formula to Table.Max([Column Name]) to pull the highest sales figure or test score.
Using Sort Order and Table.Buffer
The key to conditionally removing duplicates based on sort order is Table.Buffer. Because Power Query sometimes ignores manual sorting to process data faster, you must wrap your sorting step in = Table.Buffer( #"Sorted Rows" ) in the formula bar. This locks the exact visual order into your computer’s memory before the duplicates are removed, preventing inconsistent results.
Power Query Keep Only Duplicates
Sometimes, the goal isn’t to delete the bad data, but to isolate it so you can investigate why it is happening.
Difference Between Remove Duplicates and Keep Duplicates
While “Remove” deletes the repeated rows and leaves you with a clean dataset, “Keep Duplicates” does the exact opposite. It filters out all the unique records, leaving you with a table containing only the rows that have repeats.
When You Should Keep Duplicate Records
You should use this feature when you are auditing your systems. If a database shouldn’t have duplicate employee IDs, keeping the duplicates allows you to easily export an error report to send to your IT or HR department for correction.
How to Identify Duplicate Values Before Removing Them
To do this, select your column, go to the Home tab, click Keep Rows, and select Keep Duplicates. You can now safely review your problem children before going back to delete them.
Power Query Not Removing Duplicates? Try These Fixes
If you clicked the button but your table is still full of repeating rows, one of these issues is likely the culprit during your data transformation.
Hidden Spaces and Non-Printable Characters
A space at the end of a word (“Apple” vs “Apple “) makes the values different. Right-click your column, go to Transform, and click Trim to wipe out hidden whitespace before removing duplicates.
Capitalization Differences
As mentioned earlier, case sensitivity will cause duplicates to stick around. Ensure you use Comparer.OrdinalIgnoreCase or simply transform the entire column to UPPERCASE or lowercase before cleaning.
Duplicate Rows After Query Merges
If you joined two tables and got duplicates, the issue is in your secondary lookup table. You must go back to that specific query and remove the duplicates there before the merge happens.
Query Folding and Inconsistent Results
If you are connected to a SQL database, Power Query might pass the workload back to the server (a concept known as query folding). This can sometimes scramble the exact row you expected to keep.
Use Table.Buffer for Consistent Results
Whenever your output looks unpredictable, apply Table.Buffer just before your Table.Distinct step to force Power Query to handle the math locally and consistently.
Excel Remove Duplicates vs Power Query Remove Duplicates
Here is a quick breakdown of why you should transition your workflow and choose to power query remove duplicate records:
| Feature | Excel Remove Duplicates | Power Query Remove Duplicates |
| Changes Original Data | Yes | No |
| Refreshable | No | Yes |
| Suitable for Large Datasets | Limited | Excellent |
| Tracks Steps | No | Yes |
Choosing Power Query over standard Excel protects your original datasets and saves you from repetitive manual labor.
Best Practices for Removing Duplicate Data in Power Query
To keep your workflows running smoothly, integrate these habits into your daily routine.
Clean Data Before Removing Duplicates
Always trim whitespace, clean non-printable characters, and standardize your text casing before you attempt to drop duplicates.
Check Column Distribution
Use the View > Column distribution tool to visually confirm that your unique count matches your distinct count after your transformations are complete.
Review Applied Steps
Periodically check your Applied Steps pane. Ensure you aren’t needlessly sorting or buffering data if a simple single-column duplicate removal is all you actually need.
Refresh Queries After Data Updates
Always remember that your query is alive. When your source CSV or database updates, just right-click your output table in Excel and hit Refresh to run all your duplicate-removing logic instantly.
Frequently Asked Questions
How do I remove duplicates in Excel Power Query?
To quickly remove duplicate values excel, select your column in the Power Query Editor, right-click the header, and choose Remove Duplicates.
How do I remove duplicate rows in Power Query?
To evaluate the whole row rather than a single field, select all columns by pressing Ctrl+A, right-click any header, and select Remove Duplicates.
How do I remove duplicates based on one column?
Click the specific column header you want to evaluate, right-click, and select Remove Duplicates. The rest of the row will be deleted alongside the duplicate value.
How does Power Query remove duplicates work?
It uses the Table.Distinct function to scan your data top-to-bottom, keeping the first instance of a value and filtering out the rest to leave you with distinct values.
What is Table.Distinct in Power Query?
It is the core M-code function generated when you use the Remove Duplicates button. It identifies and filters out repeated values.
Does Power Query keep the first record?
Yes, by default it keeps the first matching record it finds as it scans down the table.
Can Power Query keep the latest record instead?
Yes. Sort your dates newest to oldest, wrap the step in Table.Buffer, and then remove duplicates to securely keep the latest entry.
How do I remove duplicates regardless of capitalization?
Edit the M-code in the formula bar to include Comparer.OrdinalIgnoreCase. This tells the engine to treat “apple” and “APPLE” as the same word.
Why is Power Query not removing duplicates?
You likely have hidden trailing spaces (fix with the Trim tool) or capitalization differences. Ensure you clean the data fully before attempting to remove duplicates.
Can I keep only duplicate rows in Power Query?
Yes, use the Home > Keep Rows > Keep Duplicates button to isolate them for review and troubleshooting.
Conclusion
Cleaning messy data is a vital skill for anyone working in Excel, and knowing how to remove duplicates in excel power query will save you countless hours of manual frustration. By relying on Power Query, you guarantee that your original data remains safe, your steps are fully trackable via applied steps, and your entire process is perfectly repeatable.
Whether you are executing a simple single-column cleanup or using advanced techniques like Table.Buffer to conditionally keep the absolute latest records, you now have the tools to ensure your datasets are perfectly accurate. Remember to build your queries thoughtfully, and the next time your source data updates, all you have to do is hit refresh!
Visit Our Post Page: Blog Page
Discover more from Izoate
Subscribe to get the latest posts sent to your email.