
Can’t find the BCC field? Discover how to add BCC in Outlook, keep email addresses private, and manage hidden recipients across 365, Web, Desktop, and Mobile.
If you’ve ever sent an email to a group of people and realized too late that everyone could see each other’s email addresses, you already know why BCC matters. Whether you’re sending a company-wide announcement, a job posting, a marketing update, or simply want to loop in your manager without anyone else knowing, the BCC field in Microsoft Outlook is one of the most useful — and most overlooked — features in your email toolkit.
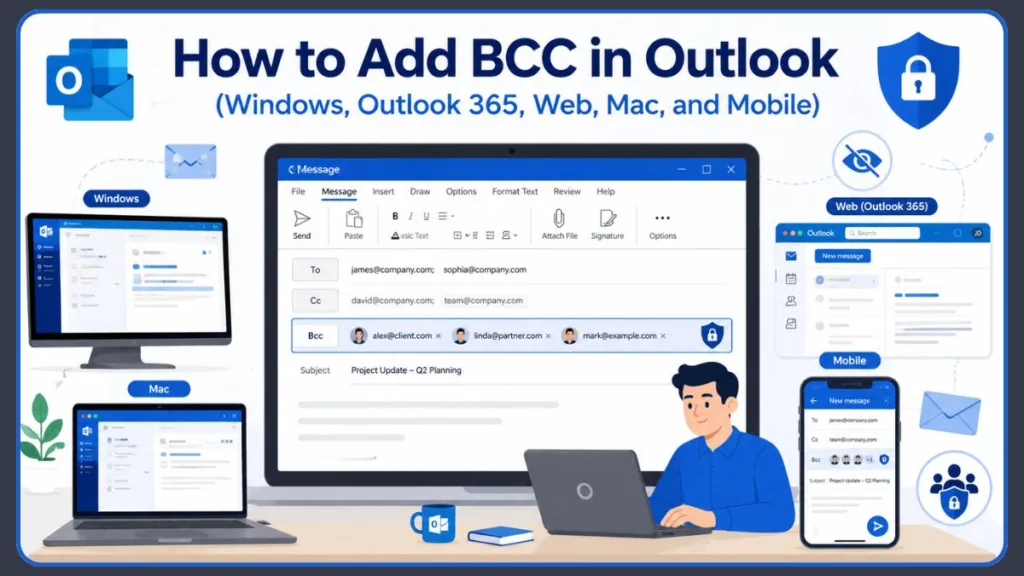
The good news is that adding BCC in Outlook is quick once you know where to look. The not-so-great news is that Outlook hides the BCC field by default, which leaves a lot of people searching for it. This complete guide walks you through every version — Classic Outlook, New Outlook, Outlook 365, Outlook on the web, Mac, and mobile — so you can use blind carbon copy with confidence no matter where you’re checking email.
Quick Answer: How to Add BCC in Outlook in Seconds
If you’re in a hurry and just need to find the BCC button fast, here’s the short version by platform:
- Classic Outlook (Windows): Open a new email → click the Options tab → click BCC
- New Outlook (Windows): Open a new email → click Options in the toolbar → go to Show Fields → select Show BCC
- Outlook on the Web: Open a new email → click the BCC link on the right side of the “To” field
- Outlook for Mac: Open a new email → click BCC next to the “To” field
- Outlook Mobile (Android/iPhone/iPad): Open a new email → tap the arrow or expand icon next to the “To” field to reveal the BCC and CC fields
Now let’s dig deeper so you know not just how to find BCC, but how to use it well.
What Is BCC in Outlook and Why Does It Matter?
What Does Blind Carbon Copy Mean?
The term BCC stands for blind carbon copy. It’s a way of sending someone a copy of your email without letting the main recipients — or any other BCC’d people — know that person received it. Think of it as a silent loop-in.
In email terms, CC (carbon copy) is the transparent version. When you CC someone, every other recipient can see that person’s name and email address in the message header. BCC does the opposite — it hides the recipient completely.
The phrase “carbon copy” is a nod to the old days of physical carbon paper used to make duplicate documents. Today it just refers to sending a copy of an email. “Blind” carbon copy means that copy is invisible to everyone else.
Does BCC Hide Email Addresses From Everyone?
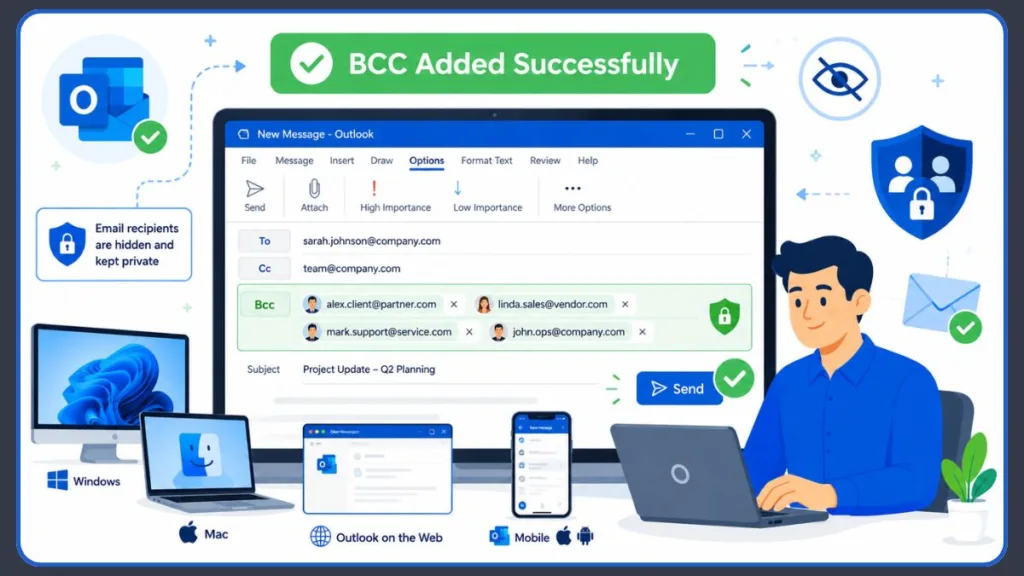
Yes — and this is the part that surprises people. When you BCC someone on an Outlook email:
- The people in the To and CC fields cannot see the BCC recipient’s address
- Other BCC recipients cannot see each other either
- Only you, the sender, can confirm who was BCC’d by checking the Sent Items folder
Note: A technically savvy recipient might realize they were BCC’d if they notice their own email address doesn’t appear in the To or CC fields of the message they received. But there’s no way for them to see who else was included in the BCC field — that information is stripped from the message before delivery.
BCC vs CC in Outlook: Which One Should You Use?
Difference Between CC and BCC
Both CC and BCC let you copy additional recipients on your email, but the key difference comes down to visibility.
| Feature | CC (Carbon Copy) | BCC (Blind Carbon Copy) |
|---|---|---|
| Visibility | All recipients can see CC addresses | No one can see BCC addresses |
| Reply All | CC recipients are included | BCC recipients are excluded |
| Inbox Rules | Rules based on To/CC fields work | Rules based on To/CC fields won’t trigger |
| Primary Use | Transparency and open collaboration | Privacy and discreet inclusion |
| Risk | Reply-All threads spiral quickly | Can trigger spam filters if overused |
When Should You Use CC?
Use CC when you genuinely want everyone in the conversation to know who else is reading the email. Common CC scenarios include team updates, project status reports, or any communication where transparency benefits everyone involved. If you CC your teammate on a client reply, that client knows your colleague is aware of the conversation — and that’s fine.
When Should You Use BCC?
Use BCC when recipient privacy matters, or when you want to prevent the chaos of Reply-All emails. It’s especially helpful for:
- Mass announcements where recipients don’t know each other and shouldn’t see each other’s addresses
- Newsletters or event invitations where you want to protect your contact list
- Keeping a manager silently informed without alerting the main recipient
- Logging emails to a CRM like Salesforce without showing that address to clients
- Preventing Reply-All storms in large group threads
How to Hide Email Addresses When Sending to Multiple Recipients
If you’re sending to a large group and want to keep everyone’s email address private, put your own email address in the To field and move all the recipients to BCC. This way, each person receives the message without seeing anyone else on the list.
Tip: If you move the group to BCC, it’s polite to mention it in your message — something like “I’ve moved the group to BCC to protect everyone’s privacy.” This prevents confusion if recipients wonder why Reply All isn’t working.
Can’t Find It? Here’s Where the BCC Option Lives in Outlook
Why Is My BCC Field Hidden in Outlook?
Outlook hides the BCC field by default to keep the compose window clean and uncluttered. Most emails don’t need it, so Microsoft chose to tuck it away rather than show it permanently. You haven’t done anything wrong — it’s just not visible until you turn it on.
Where Is the BCC Button in New Outlook vs Classic Outlook?
The location of the BCC button depends on which version of Outlook you’re using. Since 2025, Windows users have had access to two versions of Outlook — the familiar Classic version with its wide ribbon, and the newer, sleeker New Outlook that more closely resembles the web interface.
Not sure which version you have? Look at the top of your screen: Classic Outlook has a full ribbon with tabs like Home, Send/Receive, and View. New Outlook has a narrower toolbar. The steps differ between them, so it’s worth confirming before you start.
Classic Outlook
In Classic Outlook, the BCC option lives under the Options tab in the ribbon at the top of the new email compose window. Look for the “Show Fields” section.
New Outlook
In New Outlook, click Options in the toolbar and then navigate to Show Fields → Show BCC.
Outlook Web App
On Outlook.com or Office 365 in your browser, the BCC link appears on the right side of the To field in the compose window. It’s subtle and easy to miss if you’re scanning quickly.
Outlook Mobile
On Android, iPhone, and iPad, look for a downward arrow or expand icon next to the To field. Tapping it reveals both the CC and BCC fields at the same time.
How to Add BCC in Outlook Desktop Without Exposing Recipient Addresses
Show BCC Field in Outlook Classic
If you’re working in Classic Outlook for Windows (versions 2016, 2019, 2021, or Microsoft 365), you have two methods to reveal and use the BCC field.
Method 1: Enable BCC Using the Message Options Tab
This is the fastest approach for most people.
- Open Outlook and click New Email to start composing
- In the compose window, click the Options tab in the ribbon at the top
- In the “Show Fields” section of the ribbon, click BCC
- The BCC field will now appear below the CC line in your compose window
- Type the email addresses of your hidden recipients in the BCC field
- Compose your message normally and click Send
Good to know: Once you toggle BCC on this way, it typically stays visible for all future emails until you deliberately turn it off by clicking the BCC button again in the ribbon.
Method 2: Add BCC Recipients From the Address Book
If you prefer to pick recipients from your contact list rather than typing addresses manually, this method works well.
- Open a new email compose window
- Click the To or CC button to open the Select Names / Address Book window
- Use the drop-down at the top to choose your address book
- Find and select the contact you want to BCC
- Click the BCC button at the bottom of the window (it’s easy to miss — look carefully)
- Add more recipients to To, CC, or BCC as needed
- Click OK to close the address book
- The BCC field will now appear in your compose window with your chosen contact already added
Using New Outlook? Here’s How to Show and Add BCC
Show BCC Field in Outlook New
If you’ve been migrated to New Outlook on Windows — or you’ve chosen to switch — the steps look slightly different from the Classic version.
- Open a new email by clicking New Mail or the compose button
- In the compose toolbar, click Options
- From the dropdown, select Show Fields
- Click Show BCC
- The BCC field will appear in your compose window
Add BCC Recipients and Send Your Email
Once the field is visible:
- Click inside the BCC field
- Type the email address of each hidden recipient (separate multiple addresses with a semicolon or comma)
- Alternatively, start typing a name to search your contacts and select from the suggestions
- Finish writing your email as usual
- Click Send
Remember: The recipients you added to BCC will receive the email without appearing anywhere in the visible message headers.
How to Add BCC in Outlook 365 Across Desktop and Web
How to Add BCC in Outlook 365 Desktop
If you’re using Outlook as part of a Microsoft 365 subscription on your Windows PC, the steps follow the same pattern as Classic Outlook:
- Launch Microsoft Outlook and click New Email
- Click the Options tab in the ribbon
- Click BCC in the Show Fields group
- Add your recipients to the BCC field
- Complete and send your email
How to Add BCC in Outlook 365 Web Version
If you access your Microsoft 365 account through a browser rather than a desktop app, you’re using what’s sometimes called Outlook on the Web or Outlook Web App (OWA). Here’s how to add BCC there.
- Go to outlook.office.com and sign in with your Microsoft 365 account
- Click New Mail to open the compose window
- Look for the BCC link on the right side of the To field
- Click it — the BCC field will appear below the CC line
- Type in the email addresses for your hidden recipients
- Write your email and hit Send
BCC in Outlook 365 Web App
Important: Unlike the Classic desktop version, enabling BCC in an Outlook 365 web compose window doesn’t carry over to the next message automatically. You’ll need to click the BCC link each time — unless you configure it to always show (more on that below).
Sending Email From a Browser? Here’s How to Use BCC in Outlook on the Web
Show BCC in Outlook Web App
Whether you’re using a personal Outlook.com account or a work account via Office 365 in your browser, accessing BCC is the same.
Method 1: Use the BCC Link Beside the To Field
- Open a new message
- On the right side of the To field, click the word BCC
- The BCC input line appears below CC
- Enter your recipient addresses and send as normal
Method 2: Show BCC Through More Options
Some versions of Outlook on the web show a three-dot menu (⋯) in the compose toolbar. If you don’t see the BCC link immediately:
- Click the three-dot More options button inside the compose window
- Look for a Show BCC option
- Click it and the field will appear
How to Show and Use the BCC Field in Outlook for Mac
Show BCC Outlook Mac
If you’re composing email in Outlook for macOS, the BCC field is just as straightforward to access.
- Open Outlook for Mac and click New Email (or press ⌘ + N)
- In the compose window, look for the BCC label — it often appears as a clickable text link on the right side near the CC field
- If you don’t see it there, click Options in the ribbon and select Bcc
- The BCC field will appear in your compose window
Tip: To make BCC visible by default every time you compose, go to Outlook menu → Settings → Composing and check the box for “Show BCC field by default”.
Add Email Recipients to the BCC Field
Once the field is visible on Mac:
- Click inside the BCC field
- Type the recipient’s email address directly, or begin typing their name to search your contacts
- Select the correct contact from the suggestions that appear
- Add as many BCC recipients as needed and click Send
How to Add BCC in Outlook Mobile on Android, iPhone, and iPad
Add BCC on Android
The Outlook mobile app on Android keeps things clean by collapsing the CC and BCC fields to save screen space. Here’s how to use them:
- Open the Outlook app on your Android device
- Tap the compose button (pencil or + icon) to start a new email
- Tap the downward arrow or expand icon on the right side of the To field
- Both the CC and BCC fields will appear below To
- Tap inside the BCC field and type your hidden recipient’s address
- Write your message and tap the Send button
Add BCC on iPhone and iPad
The process is identical on iOS devices:
- Open the Outlook app and tap the compose button
- Tap the arrow icon to the right of the To field
- The CC and BCC fields expand below
- Enter addresses in the BCC field
- Compose and tap Send
Where Is BCC on Outlook Mobile?
If you’re tapping around and can’t find it, remember: on mobile, BCC is hidden inside the expandable To field section. It does not appear as a separate button or tab. Just tap the small expand arrow next to “To” and both CC and BCC will appear.
Limitation: The Outlook mobile app doesn’t have a setting to permanently show the BCC field. You’ll need to expand it manually every time you compose a new message. It’s a minor inconvenience, but the functionality is fully there.
Want BCC Visible All the Time? Here’s How to Always Show It
How to Always Show BCC in Outlook 365 Permanently
New Outlook
- Click the gear icon (Settings) in the top-right corner of Outlook
- Select Mail from the settings menu
- Click Compose and reply
- Find the Message format section
- Check the box for Always show BCC
- Click Save
Tip: This setting syncs between New Outlook on Windows and Outlook on the web — configure it once and it applies to both environments.
Outlook Web
The steps are identical to New Outlook above because they share the same settings backend. You’ll find the Always show BCC checkbox under Settings → Mail → Compose and reply → Message format.
Always Show BCC in Outlook Classic
In Classic Outlook, you don’t need a settings menu. Simply click the BCC button in the Options tab ribbon once while composing any email. From that point forward, the BCC field remains visible whenever you compose a new message.
Note: No separate “permanent” setting is needed in Classic Outlook — the toggle remembers your preference across sessions.
Need to Double-Check? Here’s How to View BCC Recipients After Sending
Outlook View BCC Recipients After Sending
If you need to confirm who was BCC’d on a message you already sent, here’s where to look:
- Open your Sent Items folder in Outlook
- Find and open the specific email you want to check
- Look at the message header — BCC recipients appear alongside the To and CC fields
- If there are many recipients, you may see a + indicator (like “+11 more”) — click the expand icon to see the full list
Important: The Sent Items folder is the only place where BCC information is preserved after sending. If you’re ever unsure whether someone received a hidden copy, that’s your source of truth.
Can Recipients See BCC Addresses?
No. Recipients in the To and CC fields have no way to see who was BCC’d on a message. BCC recipients also cannot see each other. The only exception is if a recipient is technically sophisticated and notices that their own address doesn’t appear in any visible field of the email — that alone could signal they were BCC’d, but they still won’t know who else was on the list.
How to Automatically BCC Yourself in Outlook for Better Record Keeping
Can Outlook Automatically BCC All Emails?
Outlook doesn’t have a built-in “auto BCC every email” setting that you can toggle on with one click. However, there are a couple of ways to set it up — depending on which version of Outlook you’re using.
Auto BCC Outlook Rule
In Classic Outlook for Windows, you can create a rule to automatically BCC a specific address on every outgoing email. This is useful if you want to log sent emails to a CRM inbox, archive mailbox, or your own address.
Auto BCC Myself Outlook
Create Rule to BCC Outlook Emails
- In Classic Outlook, go to File → Manage Rules & Alerts
- Click New Rule
- Under “Start from a blank rule,” select Apply rule on messages I send and click Next
- On the conditions screen, leave all checkboxes unchecked (this ensures the rule applies to every outgoing email) and click Next
- Outlook will warn you this applies to every message — click Yes
- Check the action BCC the message to people or public group
- In the rule description at the bottom, click the underlined people or public group link
- Select your own email address (or any other address you want to auto-BCC) and click OK
- Click Next, name your rule (something like “Auto BCC Myself”), then click Finish and Apply
Every outgoing email from Classic Outlook will now automatically include a hidden copy to your chosen address.
Important Limitation: This automatic BCC rule only works in Classic Outlook for Windows. The New Outlook desktop app and Outlook on the web do not currently support outgoing auto-BCC through built-in rules. If you need this functionality in those versions, third-party add-ins like Sperry Software Always BCC or Ablebits Auto BCC can fill the gap. For enterprise environments, Microsoft 365 administrators can also configure mail flow rules at the Exchange level to auto-BCC all outgoing messages — a much more reliable option for organizations with compliance requirements.
Looking for an Outlook Shortcut for BCC? Start Here
Outlook doesn’t have a single dedicated keyboard shortcut that opens the BCC field directly. However, you can use Quick Steps or workflow shortcuts to speed things up significantly.
Use Quick Steps to BCC Yourself Faster
Quick Steps is a built-in feature in Outlook (versions 2013 through 365) that lets you automate a sequence of actions with one click or keyboard shortcut. Here’s how to set up a Quick Step to BCC yourself:
- On the Home tab, in the Quick Steps group, click Create New
- Give it a name, such as “BCC Myself”
- Under Actions, select Reply from the dropdown
- Click Show Options
- Click Add BCC
- Type your email address in the BCC field
- Assign a keyboard shortcut key if you’d like
- Click Finish
Keyboard Shortcut Workflow
Once your Quick Step is configured, press the assigned shortcut key while composing any email to instantly add your address to the BCC field. You’ll still need to click Send manually, but the BCC entry happens in one keystroke.
Limitation: This isn’t fully automatic — you have to press the shortcut every time before sending. For fully hands-free auto-BCC, the rule method described above is more reliable.
Smart Ways to Use BCC in Outlook Like a Pro
Protect Recipient Privacy
Anytime you’re emailing a group of people who don’t know each other — or who shouldn’t have access to each other’s contact details — BCC is the right call. Job seekers on an announcement, clients from different companies, support contacts, survey respondents — all of these are cases where BCC protects privacy and avoids awkward situations.
Sending an Email to Multiple Recipients
When you need to reach a large list, put a single address (like your own) in the To field and everyone else in BCC. This keeps the recipient list clean, avoids overwhelming people with a wall of email addresses, and prevents someone from accidentally replying to the entire group.
Using BCC for Mass Email
For newsletters, product announcements, or event invites sent directly through Outlook (rather than a dedicated email platform), BCC is the standard approach to maintain recipient privacy.
Warning: Mass BCC emails sent from personal or business email accounts can sometimes trigger spam filters — more on that below.
Prevent Reply-All Storms
One of the most practical uses of BCC is stopping reply-all chaos before it starts. If you’re sending to a large distribution list and you know someone will inevitably hit “Reply All,” move the whole list to BCC and put only your own address in the To field.
Best Practice: Mention in the body of the email that you’ve moved the group to BCC to reduce inbox noise. Recipients can still reply directly to you — they just can’t accidentally blast 200 people.
Keep Distribution Lists Private
If your business uses email distribution lists, adding the list to BCC instead of To prevents recipients from extracting those addresses and using them without permission. It also protects the organization from email harvesting.
Reduce Email Harvesting and Spam
When you BCC a large group, none of those recipients can forward the email and expose the full list to others. This is particularly important if your contact list includes personal email addresses — protecting those is both an ethical and, in many regions, a legal consideration under data protection regulations like GDPR.
Before You Use BCC, Know These Important Outlook Limitations
BCC Deliverability Outlook Considerations
Because spammers frequently use BCC to hide massive recipient lists, some email servers and spam filters treat BCC-heavy messages with suspicion. If you’re sending to large groups and getting reports that your emails are landing in junk folders, ask recipients to add your address to their Safe Senders list and ensure your domain has a solid sending reputation.
BCC Limits in Outlook
BCC recipients count toward your email provider’s per-message recipient limit. Most Microsoft 365 accounts cap this at around 500 recipients per message (across To, CC, and BCC combined), while Exchange Server limits can vary by configuration.
Tip: If you need to reach thousands of people, a dedicated email marketing platform is a much better tool than Outlook BCC.
Distribution List Rule Issues
If you add a distribution list to BCC, any recipients who have inbox rules set up to sort messages based on the list name appearing in their To or CC field won’t have those rules trigger. Their message will arrive in the inbox without being sorted — which can cause confusion. When possible, keep distribution list addresses visible in the To field if recipients rely on inbox rules.
Why Some Inbox Rules Stop Working
If someone you BCC’d reports that your message ended up in an unexpected folder — or didn’t get sorted the way they expected — this is likely the cause. Their rule looks for their address (or a group name) in the To or CC fields. Since BCC strips those from their view of the message, the rule has nothing to match against.
Note: This is not a bug in Outlook; it’s how BCC is designed to work.
Can You Add BCC in Outlook Meeting Invites?
How to Add BCC in Outlook Meeting Invite
How to Add BCC in Outlook Calendar Invite
This is one of the most commonly requested features — and unfortunately, it’s not available natively. Outlook calendar invites do not support a BCC field for attendees. You can add attendees as Required or Optional, but both of those are visible to everyone else on the invite.
If you need someone to know about a meeting without appearing on the attendee list, your best workaround is to send the invite normally and then send a separate email with the meeting details BCC’d to the people you want to include quietly. You can also mark additional attendees as Optional, which sends a softer signal without listing them as required participants.
Note: Microsoft has acknowledged this limitation, and users can submit feedback through the in-app help menu if you’d like to see this feature added in a future update.
BCC Not Working? Try These Outlook Troubleshooting Fixes
Why Can’t I See the BCC Field in Outlook?
BCC Option Missing in Outlook
If the BCC field isn’t appearing even after you’ve tried to enable it, here are the most common fixes depending on your version.
Show BCC Field Outlook Classic
- Click New Email to open a fresh compose window
- Go to the Options tab in the ribbon at the top
- Look for the Show Fields group and click BCC
Troubleshooting Tip: If the Options tab isn’t visible, make sure you’re in the compose window, not the reading pane — the ribbon changes depending on context.
Show BCC Field Outlook New
- In the compose window, click Options in the toolbar
- Select Show Fields, then click Show BCC
Troubleshooting Tip: If you don’t see this option, check whether you’re in New Outlook or Classic — they have different interfaces and the steps differ.
Outlook 365 BCC Not Appearing
- If you’ve configured “Always show BCC” in settings but it’s not showing up, try signing out and back into Outlook 365 to sync the settings
- Make sure you saved the setting after checking the box — it’s easy to click away without saving
Outlook Web BCC Missing
- In the Outlook web compose window, the BCC link is on the far right of the To field row — it’s small and easy to overlook
- If you’re using the three-dot More options menu, look for a “Show BCC” or “Bcc” option there
- If the compose window is narrow or on a small screen, the BCC link may be hidden — try expanding the compose window to full size
Frequently Asked Questions About BCC in Outlook
What Is BCC in Outlook?
BCC stands for Blind Carbon Copy. It lets you send a copy of an email to a recipient without revealing their address to anyone else on the message — not to the main recipients in the To field, not to CC recipients, and not to other BCC recipients.
How Do I Add a BCC to an Email?
Open a new email, enable the BCC field for your version of Outlook (see the relevant section above), click in the BCC field, and type the email address of your hidden recipient. Fill in the rest of your message and click Send.
How Do I Add a BCC Field in Outlook?
In Classic Outlook, go to the Options tab in the compose window ribbon and click BCC. In New Outlook or the web, click Options → Show Fields → Show BCC. On Mac, click BCC next to the To field. On mobile, tap the expand arrow next to the To field.
How Do I Add Someone to BCC in Outlook?
Once the BCC field is visible, click inside it and type the person’s email address. You can also start typing their name if they’re in your contacts and select them from the auto-suggestions. You can add multiple people by separating addresses with a semicolon.
How Do I Show the BCC Field in Outlook?
Each platform has a slightly different path. Classic Outlook: Options tab → BCC button. New Outlook: Options → Show Fields → Show BCC. Outlook Web: click the BCC link beside the To field. Mac: click BCC near the To field. Mobile: tap the expand arrow on the To field.
Can I Make BCC Always Visible in Outlook 365?
Yes. Go to Settings → Mail → Compose and reply → Message format and check Always show BCC, then save. This applies to both New Outlook on Windows and Outlook on the web.
How Do I Automatically BCC Myself on Every Email in Outlook?
In Classic Outlook, set up a rule via File → Manage Rules & Alerts → New Rule → Apply rule on messages I send → action: BCC the message to people or public group → enter your own email. This doesn’t work in New Outlook or the web version natively — a third-party add-in is needed for those.
How Can I See Who I BCC’d in an Outlook Email?
Open the Sent Items folder, find the message, and open it. The BCC recipients will appear in the message header alongside the To and CC fields.
Does BCC Hide Email Addresses From Everyone?
Yes — from all recipients, including other BCC’d people. Only the sender can see the BCC list, and only from their Sent Items folder.
Will Using BCC Mark My Email as Spam?
It can. BCC is a popular technique among spammers, so aggressive email filters sometimes flag messages that use it, especially if you’re sending to large groups. To reduce this risk, send from a domain with a good reputation and encourage recipients to add your address to their Safe Senders list.
Can I Send an Email Using Only the BCC Field?
Technically yes — you can leave the To field empty or put only your own address there and BCC everyone else. However, this approach may look suspicious to email servers and could increase the chances of your message being marked as junk.
Can I Use CC and BCC Together?
Absolutely. You can have recipients in all three fields — To, CC, and BCC — in the same email. The CC’d people will be visible to everyone, and the BCC’d people will be invisible to everyone except you.
What Happens If a BCC Recipient Clicks Reply All?
If a BCC recipient hits Reply All, their reply goes only to the original sender and anyone in the visible To and CC fields. It does not go to the other BCC recipients because their addresses aren’t visible in the message headers.
Final Thoughts on Using BCC in Outlook Effectively
BCC is one of those small email features that makes a big difference when you know how to use it. Whether you’re protecting the privacy of your contacts, keeping a quiet record of sent emails, preventing a reply-all avalanche, or simply sending a mass update without exposing everyone’s inbox to strangers — the blind carbon copy field handles it cleanly.
The key is knowing where to find it in whichever version of Outlook you’re working with, and understanding when BCC is the right tool versus when CC or a direct email would serve you better. Now that you have the full picture — from Classic Outlook on Windows to the mobile app on your phone — you’re set to use it confidently every time.
Useful Official Resources for Managing BCC in Outlook
Here are the useful official resources for finding reliable, Microsoft-backed information about adding and managing BCC in Outlook. These cover everything from showing the BCC field for the first time to automating it with rules and managing recipients across all devices.
Show, Hide, and View the BCC Field in Outlook for Windows – Official Overview: Microsoft’s primary support page explaining how to enable or disable the BCC field in both New Outlook and Classic Outlook for Windows. It covers how to open the BCC box in a new compose window, how to show it when replying from the Reading Pane, and how to view BCC recipients of messages you’ve already sent from the Sent Items folder. This is the best starting point if you’re new to BCC or need a quick official reference.
Show, Hide, and View the BCC Field in Outlook for Mac – Official Mac Guide: Microsoft’s dedicated Mac support page covering how to show and hide the BCC field in Outlook for macOS, including how to enable the “Show BCC field by default” option inside Outlook Settings → Composing so the field appears automatically every time you start a new message. Essential reading if you switch between Windows and Mac and need consistent BCC behaviour on both.
Manage Suggested Recipients in the To, CC, and BCC Fields – Auto-Complete Reference: An official Microsoft guide explaining how Outlook’s contact suggestion system works when you begin typing in the To, CC, or BCC fields. It covers how the Auto-Complete list is built from personal contacts, your organisation’s Global Address List, and previously used addresses — and how to manage or clear those suggestions across New Outlook, Classic Outlook, and Outlook on the web. Useful if BCC recipients aren’t appearing as expected when you start typing a name.
Manage Suggested Recipients in the BCC Field in Outlook for iOS and Android – Mobile Reference: Microsoft’s mobile-specific support page detailing how contact suggestions appear in the BCC field when composing email in the Outlook app on iPhone and Android. It also explains how to hide specific contacts from your suggestion list on both platforms — useful for keeping your BCC recipient list tidy and preventing accidental address auto-fills on mobile.
Manage Email Messages by Using Rules in Outlook – Rules Reference: Microsoft’s full rules documentation covering how to create, edit, and manage rules in Classic Outlook, New Outlook, Outlook on the web, and Outlook.com. This is the official reference for setting up outgoing email rules, including the BCC action that lets you automatically send a hidden copy of sent messages to a specific address — directly relevant if you want to auto-BCC yourself or a CRM inbox.
Mail Flow Rules (Transport Rules) in Exchange Online – Enterprise Auto-BCC: Microsoft Learn’s in-depth technical reference for configuring mail flow rules in Exchange Online. Mail flow rules process messages while they’re in transit rather than after delivery, making them significantly more powerful than standard Outlook inbox rules. This is the recommended approach for IT administrators and Microsoft 365 organisations that need to automatically BCC all outgoing messages to a compliance mailbox, archiving system, or manager’s inbox — server-side and fully reliable across all Outlook versions.
Manage Mail Flow Rules in Exchange Online – Step-by-Step Admin Guide: A practical walkthrough from Microsoft Learn on how to create, copy, modify, and manage mail flow rules in the Exchange Admin Center (EAC) or via Exchange Online PowerShell. Covers navigation to the rules page, permission requirements, and an important note that new or updated rules can take up to 30 minutes to apply after being saved — worth knowing if your auto-BCC rule doesn’t seem to be working immediately after setup.
Visit Our Post Page: Blog Page
Discover more from Izoate
Subscribe to get the latest posts sent to your email.