
Learn how to create a Facebook business page in under 20 minutes. Follow this step-by-step 2026 guide to set up your profile, add admins, and grow your brand.
If you’ve been putting off setting up a Facebook Business Page for your brand, now is genuinely the best time to get it done. With over 3 billion active users on Facebook every month, your potential customers are already on the platform — and if your business isn’t there to greet them, you’re leaving real opportunities on the table.
The good news? Creating a Facebook Business Page is completely free, takes less than 20 minutes, and gives you access to powerful tools like Meta Business Suite, Facebook Ads, Facebook Shop, and detailed audience analytics. Whether you’re a small business owner in Lucknow, a freelancer building your personal brand, or running an ecommerce store, a well-optimised Facebook Page can become one of your most reliable channels for reaching new customers.
This guide walks you through every step of the process — from creating your page to optimising it for search, adding admins, connecting Instagram and WhatsApp, and growing your following organically.
What Is a Facebook Business Page?
A Facebook Business Page is a public profile designed specifically for businesses, brands, organisations, and public figures. Unlike your personal Facebook profile — which represents you as an individual — a Business Page is your brand’s official presence on the platform.
Facebook Page vs Personal Profile: What’s the Difference?
Your personal profile is for connecting with friends and family. Your business page, on the other hand, is a commercial space where you showcase your products or services, post updates for customers, run ads, and track engagement data.
One important thing to know: your personal account information is never shared publicly from your Business Page. Visitors see your business content, not your personal life. The two remain completely separate to anyone browsing.
Here’s why using a Page instead of a personal account matters for your business:
- Pages are indexed by Facebook’s search engine, making your business discoverable
- You can run Facebook and Instagram ads only through a Business Page
- Pages give you access to detailed insights and analytics
- Multiple team members can manage a Page without sharing passwords
- You can connect a Facebook Shop, WhatsApp, and Instagram directly to your Page
Benefits of Creating a Facebook Business Page
Before getting into the steps, it’s worth understanding exactly what a Facebook Business Page can do for you.
Brand Awareness: Every time someone searches for your business name or category on Facebook, your Page can show up. A well-optimised page with complete information builds instant credibility.
Customer Engagement: You can post updates, share stories, run polls, go live, and interact with your audience through comments and Messenger — all in one place.
Lead Generation: With a properly set up call-to-action button, visitors can contact you, book appointments, visit your website, or start an order directly from your Page.
Website Traffic: Every post, bio link, and CTA button is an opportunity to drive people back to your website.
Meta Ads: Running Facebook or Instagram ads requires a Business Page. Without one, you simply can’t advertise on Meta’s platforms.
Facebook Shop: If you sell products, you can set up a Facebook Shop directly on your Page and tag products in posts — turning your Page into a social storefront.
Insights and Analytics: Facebook gives you detailed data about your audience demographics, post performance, reach, and engagement — all for free.
Before You Create a Facebook Business Page
What You Need Before Getting Started
Getting everything ready before you open Facebook will make the setup process much smoother. Here’s what to have on hand:
- A personal Facebook account (required to create and manage a Page)
- Your business name exactly as you want it to appear publicly
- A logo or profile image (ideally square, at least 360 x 360 pixels)
- A cover photo (more on sizing below)
- Your website URL
- Contact details — phone number, email address, and physical address if applicable
- A short business description (up to 255 characters)
- Business hours
Can You Create a Facebook Business Page Without a Personal Profile?
This is one of the most common questions people ask — and the short answer is no. Facebook requires a personal account to create and manage a Business Page.
That said, your personal account is not visible to the public through your Page. You don’t need to use your personal name, photo, or any private details in your business page content. Your Page operates entirely independently in terms of what visitors see.
If you’re worried about privacy, you can create a separate personal account using a professional email address dedicated to your business. What you cannot do is create a standalone Business Page that exists on its own without any personal account attached on the back end.
People often search for things like “create Facebook business page without profile” or “can I have just a business page on Facebook?” — and while it makes sense that you’d want to keep things separate, Facebook’s current structure simply doesn’t allow for a Page to exist without a linked personal account.
How to Create a Facebook Business Page (Step-by-Step)
Step 1: Log Into Your Facebook Account
Head to facebook.com and log into your personal account. If you’re on a desktop browser, you’ll use the left-hand navigation menu. If you’re on the Facebook mobile app, tap your profile picture in the bottom-right corner of the screen.
Step 2: Click Create and Select Page
On desktop, look for the grid icon (the menu) in the top navigation bar and select “Page” from the options. You can also go directly to facebook.com/pages/create in your browser.
On mobile, after tapping your profile picture, select “See more” to find the Pages tab, then tap “Create.”
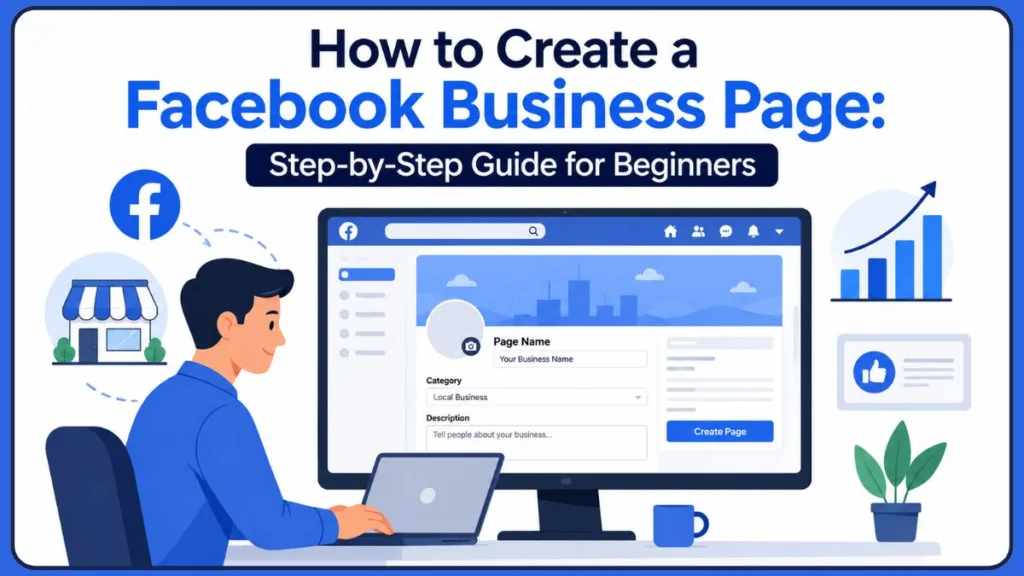
Step 3: Enter Your Business Information
You’ll be asked to fill in three key details:
Page name: Use your exact business name as customers would search for it. This is important because renaming a Page after it gains significant followers requires Facebook approval — so get it right from the start. If you ever need to update your business name, follow our detailed guide on changing your Facebook business page name.
Category: Start typing your industry (for example, “restaurant,” “clothing store,” or “digital marketing agency”) and Facebook will suggest matching categories. You can add up to three categories, which helps Facebook place your Page in the right search results and recommendations.
Description: Write a clear, concise summary of what your business does (up to 255 characters). Include relevant keywords naturally — for example, if you run a bakery in Delhi, mentioning “bakery in Delhi” helps your Page appear in local searches. This text is indexed by Facebook’s search engine.
Pro Tip: Keep your description short, keyword-rich, and location-specific. Including your city or neighbourhood alongside your business type (e.g., “digital marketing agency in Calofornia”) helps your Page appear in local Facebook searches and increases your chances of being discovered by nearby customers.
What Is the Best Category for My Facebook Business Page?
Choose the category that most accurately describes what your business actually does. If you’re a restaurant, select “Restaurant.” If you’re a freelance photographer, “Photographer” or “Photography Studio” works well. Avoid picking broad categories just because they sound good — accurate categories help Facebook recommend your Page to the right people.
Once you’ve filled in these three fields, click “Create Page” to save your progress.
Step 4: Upload Your Profile Picture
Your profile picture is the image that appears next to every post, comment, and search result associated with your Page. For businesses, your logo is almost always the best choice here.
Facebook displays profile pictures at 170 x 170 pixels on desktop and 128 x 128 pixels on mobile, cropped into a circle. When designing or uploading your image:
- Use a square image (at least 360 x 360 pixels) to avoid cropping issues
- Keep your logo centered with padding on all sides — the circular crop can cut off edges
- Use a PNG file for transparency support if your logo has a non-white background
Pro Tip: Give your logo visual breathing room — padding of at least 15% on all sides prevents the circular crop from cutting into your logo mark. Preview how it looks in the circle before saving.
Step 5: Upload a Cover Photo
Your cover photo is the large banner image at the top of your Page — and it’s often the first thing visitors notice before reading a single word.
Facebook Page Cover Photo Size Guide
The recommended dimensions for a Facebook Business Page cover photo are:
- Upload size: 851 x 315 pixels (JPG, under 100KB for fastest loading)
- Desktop display: 820 x 312 pixels
- Mobile display: 640 x 360 pixels
- Safe zone (works across both): Keep important content within the center 640 x 312 pixels area
Because Facebook crops the cover photo slightly differently on desktop and mobile, place your most important text, logo, or design elements in the center-top portion of the image. Avoid putting essential content at the very bottom, as it can get obscured by your profile picture overlay on desktop.
Tools like Canva have ready-made Facebook cover photo templates with built-in safe zones, which makes this step much easier.
Best practices for cover photos:
- Use an image that visually represents your business — a product photo, a team shot, a lifestyle image, or a branded graphic
- Update your cover photo seasonally or for promotions to keep your Page looking fresh
- Make sure it complements your profile picture in terms of colour palette and branding
- Avoid putting too much text — Facebook’s algorithm can reduce reach for image-heavy text
Pro Tip: Update your cover photo for seasonal promotions, special events, or new product launches. It’s one of the quickest ways to signal to returning visitors that something new is happening with your business.
Step 6: Add Contact Details and Business Hours
Click “Edit Page Info” in your settings to access all the contact fields. Fill in as many as apply to your business:
- Website URL
- Phone number
- Email address
- Physical address (if you have a brick-and-mortar location)
- Business hours
Important: It’s not uncommon for a Facebook Business Page to rank higher in Google search than the business’s own website, given Facebook’s domain authority. Keeping your contact details accurate and complete means potential customers can find and reach you easily, whether they’re discovering you on Facebook or via Google.
Step 7: Create Your Facebook Username
Your Facebook username (also called your Page handle) gives you a clean, custom URL like facebook.com/yourbusinessname.
To set this up, go to your Page settings and look for the Username option. Keep it:
- Consistent with your business name
- Easy to type and remember
- The same as or similar to your handles on Instagram and other platforms
Pro Tip: Set up your username (page handle) immediately after creating your Page — it gives you a clean URL like facebook.com/yourbusinessname that you can put on business cards, email signatures, and other marketing materials right away.
Step 8: Add a Facebook Page CTA Button
The CTA (call-to-action) button appears prominently below your cover photo on both desktop and mobile. It’s the main action you want visitors to take when they land on your Page.
To add one, click the ellipsis (…) button on your Page, then select “Add Action Button.”
Your options include:
- Message — great for service businesses, consultants, and anyone who prefers direct enquiries
- Book Now — ideal for restaurants, salons, clinics, and appointment-based businesses
- Contact Us — works for most businesses and links to your website’s contact page
- Shop Now — best if you have a Facebook Shop or ecommerce website
- Sign Up — useful for newsletters, courses, or membership programmes
- Call Now — for businesses that prefer phone enquiries
- Send WhatsApp Message — excellent if your team primarily communicates via WhatsApp
Which Facebook Page CTA Button Should You Choose?
Think about what action would create the most value for your specific business. A restaurant benefits from “Book Now.” A freelance designer might prefer “Send Message” or “Contact Us.” An online store should go with “Shop Now.” Choose based on what converts best for your business model, and remember you can always update it later.
Step 9: Publish Your Page
Once you’ve added your basic information, images, and CTA button, your Page is technically live. Before announcing it to the world, do a quick review:
- Does your profile picture look good in the circular crop?
- Is your cover photo displaying correctly on both desktop and mobile?
- Are your contact details and business hours accurate?
- Is your description clear and keyword-friendly?
If everything looks good, your Page is ready to go.
Step 10: Create Your First Facebook Post
Before inviting people to your Page, publish a few posts so that new visitors have content to engage with. Some ideas for your first posts:
- A welcome post introducing your brand and what you offer
- A photo or video of your product or service in action
- A behind-the-scenes look at your business or team
- A post addressing a common question or problem your customers have
Pro Tip: Aim for two or three posts before you start promoting the Page, so it doesn’t look empty to first-time visitors. A Page with content already live makes a much stronger first impression than a blank one.
Step 11: Invite People to Follow Your Page
Facebook gives you an option to invite your existing Facebook friends to follow your new Page. Look for the ellipsis (…) menu on your Page and select “Invite people to connect.”
You can also:
- Share your new Page on your personal Facebook profile
- Add your Page link to your email signature
- Mention your new Page on Instagram, LinkedIn, or X (Twitter)
- Ask your WhatsApp contacts to follow you
How to Create a Facebook Business Page and Add Admin
Why Add Multiple Admins?
If you have a team, a social media manager, or an agency handling your Page, you’ll want to give them access without sharing your personal login credentials. Adding admins keeps your personal account secure while allowing others to manage content, respond to messages, and run ads.
How to Add an Admin to a Facebook Page
- Go to your Page Settings
- Click “Page Setup” → “Page Access”
- Click “Add New”
- Search for the person by their Facebook name or email
- Select their access level and confirm
Facebook Page Access Levels Explained
Facebook offers three levels of access:
Business Tools Only: The person can post content, manage comments, and set up ads through Meta Business Suite and Ads Manager — but only via those business tools, not directly on the Page.
Partial Access (Facebook and Business Tools): This gives full access to business tools plus the ability to switch into your Page persona and interact on Facebook as the Page.
Full Facebook Access: Complete access to everything — page settings, business tools, full Page persona, and admin controls. Reserve this for trusted team members only.
How to Create a Facebook Business Page With Multiple Admins
If you’re managing a larger team or working with an agency, you can add multiple people at different access levels. Each person uses their own Facebook login to access the Page — no shared passwords needed.
Important: Never share your personal Facebook login credentials to give someone Page access. Always use the Page Access settings to assign team members their own roles — it’s safer, more organised, and lets you remove access at any time without affecting your personal account.
How to Connect Instagram and WhatsApp to Your Facebook Business Page
One of the biggest advantages of a Facebook Business Page is how seamlessly it integrates with other Meta platforms.
Connect Instagram
From your Page’s Professional Dashboard (visible in the left-hand sidebar), click “Linked accounts” and follow the prompts to connect your Instagram business account. Once linked, you can manage Instagram posts, messages, and ads from the same dashboard.
Connect WhatsApp
In the same Linked accounts section, you’ll find the option to connect a WhatsApp Business number. This is especially useful if your customers prefer reaching you on WhatsApp, and it lets you add a “Send WhatsApp Message” CTA button to your Page.
Benefits of Linking Accounts
- Manage Facebook and Instagram from one place in Meta Business Suite
- Run ads across both platforms simultaneously
- Reply to messages from both platforms in a single unified inbox
- Cross-post content between Facebook and Instagram more easily
How to Optimise Your Facebook Business Profile Setup
Getting your Page live is just the beginning. A well-optimised Page performs significantly better in Facebook’s internal search and makes a much stronger impression on visitors.
Complete Your About Section
Your About section is one of the first places a potential customer looks. Make sure it includes:
- A complete business description (beyond the 255-character bio)
- Your founding date or story, if relevant
- Keywords related to your industry and location
- Your website, contact details, and physical address
Add Services, Products, or Menu
How Do I Add Services or Menu to My Facebook Page?
Go to your Page and look for the “Edit” option under your profile section or navigate to Settings → Templates and Tabs. Depending on your Page category, you may see options to add:
- Services — for consultants, agencies, freelancers, and service-based businesses
- Menu — for restaurants, cafes, and food businesses
- Products — for retail stores and ecommerce brands
Filling in this section gives visitors a clear picture of what you offer before they even contact you.
Choose the Right Facebook Page Template
Facebook offers pre-configured templates optimised for different business types — Restaurants, Shops, Services, Nonprofits, and more. Each template adjusts which tabs appear on your Page and how they’re organised.
To access templates, go to Settings → Templates and Tabs and browse the available options. Select the one that best matches your business type, as it makes your Page layout much more intuitive for visitors.
Enable Facebook Messenger
Make sure Messenger is enabled on your Page so customers can reach you directly. You can set an automated greeting message, configure an away message for when you’re offline, and even set up simple FAQ responses for common questions.
Pro Tip: Facebook shows your average response time on your Page. If you reply quickly and consistently, it displays a “Very responsive to messages” badge — which significantly boosts trust with potential customers.
Pin Important Posts
You can pin any post to the top of your Page so it’s always the first thing visitors see. Great options for a pinned post include an introductory video, a special offer, or your most popular product or service.
Set Up Facebook Page Verification
How Do I Verify My Facebook Business Page?
Verification adds a blue checkmark badge to your Page, signalling to visitors that you’re a legitimate, authentic business. If you’re new to the process, follow our guide on verifying your Facebook business account for step-by-step instructions.. In 2026, there’s only one type of verification badge available — the blue check. The grey badge no longer exists.
There are two paths to verification:
Free verification (merit-based): Go to Meta Business Suite → Security Center → Verification. You’ll need to submit business documents proving your registration and demonstrate that your business has a notable online presence. Your contact information must be consistent across your website, Google Business Profile, and Facebook Page.
Meta Verified (paid subscription): Available directly through Meta Business Suite under the Meta Verified section, this paid route also results in a blue badge but follows a simpler identity verification process.
Important: Before starting the verification process, audit your contact information. Make sure it matches exactly across your website, Google Business Profile, Facebook Page, and any directories where you’re listed. Inconsistent information is one of the most common reasons free verification applications get rejected.
For local businesses, the free route is worth pursuing once your Page is established and active.
Facebook Business Page SEO Tips
Create a Search-Friendly Page
Facebook’s internal search works similarly to Google — the more complete and keyword-relevant your Page is, the more likely it is to appear when someone searches for your type of business.
Facebook Business Page SEO Checklist:
- Include your primary keyword in your Page name (where it naturally fits)
- Add industry keywords and location keywords to your description
- Choose the most accurate categories for your business
- Fill in your complete address so you appear in local searches
- Post consistently — active pages rank higher
- Include your target keywords naturally in your posts, About section, and services
Optimise for Local Searches
If you serve customers in a specific area, local SEO on Facebook can drive significant foot traffic and enquiries. Here’s how to optimise your Page for local customers:
For example, if you run a clothing boutique in Lucknow, your description could read: “Trendy women’s fashion boutique in Hazratganj, Lucknow. Shop kurtas, western wear, and accessories.”
Additional steps for local optimisation:
- Enable check-ins if you have a physical location
- Encourage happy customers to leave reviews on your Page
- Join local Facebook groups and engage as your Page
- Use location-specific hashtags in your posts
Pro Tip: A Facebook Business Page optimised for local search can rank higher in Google results than many small business websites. The combination of your business name, category, address, and consistent contact details makes your Page a powerful local SEO asset — even beyond Facebook itself.
Facebook Business Page Tips for Small Businesses
Create Consistent Branding
Your Facebook Page should look and feel like a natural extension of your overall brand. Use the same colours, fonts, and tone of voice as your website and other social media profiles. This consistency builds recognition — when someone sees your content in their feed, they should immediately associate it with your brand.
Post Valuable Content
People scroll Facebook as a pastime, not with the express intent of buying something. That means your content needs to give them a reason to stop and engage. Focus on:
- Answering common questions your customers have
- Sharing tips, how-tos, and behind-the-scenes content
- Posting about local events, seasonal offers, or industry news
- Mixing formats — images, videos, Reels, Stories, and polls
Pro Tip: People go on Facebook as a pastime, not with the express intent of purchasing from a brand. To get them interested in your business, you have to genuinely connect with them as people, not just push products. Content that educates, entertains, or helps them solve a problem will always outperform purely promotional posts.
Use Facebook Stories
Stories appear at the top of the Facebook feed and are a great way to share quick updates, offers, and behind-the-scenes moments. They disappear after 24 hours, which makes them ideal for time-sensitive content like flash sales or event countdowns.
Engage With Comments
Responding to comments on your posts signals to Facebook that your content is engaging, which can increase its reach. It also builds a real sense of community around your brand. Even a simple reply to a positive comment goes a long way.
Use Facebook Insights
The Insights tab in your Page dashboard is one of the most valuable tools available to you — and it’s completely free. It shows you:
- How many people your posts are reaching
- Which content formats (video, images, text) perform best
- When your audience is most active
- Audience demographics like age, gender, and location
Pro Tip: Check your Insights tab at least once a week. Pay attention to which posts get the most reach and engagement, and use that data to guide your future content. Over time, you’ll develop a clear picture of what your specific audience responds to — no guesswork needed.
Use this data to refine your content strategy over time rather than guessing what works.
Grow Organically Before Spending on Ads
Before putting money into Facebook Ads, focus on building a solid organic foundation. Post consistently for a few months, engage with your audience, and build a small but genuine following. When you do start running ads, you’ll have a much better understanding of what content resonates with your audience — which means better results for your ad spend.
Industry-Specific Examples
How to Create a Facebook Business Page for a Restaurant
Restaurants benefit enormously from Facebook’s features. When setting up your page:
- Select “Restaurant” or “Food & Beverage” as your category
- Add your full menu using the Menu tab
- Enable the “Book Now” or “Order Food” CTA button
- Upload high-quality photos of your most popular dishes
- Enable reviews and encourage happy diners to leave feedback
- Post regularly about daily specials, new menu items, and events
How to Create a Facebook Business Page for Ecommerce
For online stores, your Facebook Page should function as a social storefront:
- Set up Facebook Shop and connect your product catalogue
- Use the “Shop Now” CTA button
- Tag products in posts and Reels so users can shop directly
- Connect your Instagram account to sync your shop across both platforms
- Use Facebook Ads to retarget website visitors
Facebook Business Page for Small Business
If you’re running a small business with limited time and resources, focus on the basics first. Complete your profile fully, post two or three times a week, and respond promptly to messages and comments. Consistency matters more than volume — a Page that posts regularly and engages with its audience will always outperform one that posts infrequently, no matter how polished the content is.
Common Facebook Business Page Mistakes to Avoid
Incomplete profile: A Page with missing contact details, no cover photo, or a vague description looks unprofessional. Fill in every field you can before you start promoting it.
Missing CTA button: Leaving this out means visitors have no clear next action. Always add the button most relevant to how you want customers to reach you.
Wrong category: Choosing an inaccurate category means Facebook won’t recommend your Page to the right people. Take the time to find the best match.
Low-quality images: Blurry profile pictures or stretched cover photos create a poor first impression. Use properly sized, high-resolution images from day one.
No posting schedule: An active Page with regular posts builds trust and visibility. Even posting twice a week is better than posting in bursts followed by weeks of silence.
Ignoring customer messages: Facebook tracks your response rate and time. Unanswered messages hurt your page’s credibility and responsiveness badge.
Important: An incomplete profile is one of the most common — and most avoidable — mistakes on Facebook. Potential customers who land on a Page with no cover photo, missing contact details, or a blank About section are far less likely to trust your business. Complete your profile before you promote it.
How to Manage and Grow Your Facebook Business Page
Use Meta Business Suite
Meta Business Suite (accessible at business.facebook.com or via the mobile app) is your central hub for managing your Facebook and Instagram presence. It’s completely free to use and brings together:
- Content scheduling for Facebook and Instagram
- A unified inbox for messages and comments from both platforms
- Detailed analytics and audience insights
- Ad management through Meta Ads Manager
- Facebook Shop management
- A visual content calendar (the Planner)
If you’re managing even just one Page and one Instagram account, Meta Business Suite will save you significant time.
Schedule Posts
You can schedule posts in advance through Meta Business Suite’s content planner. This allows you to batch-create content once a week and have it publish automatically at optimal times — no need to be online every day.
Analyse Facebook Insights
Check your Insights tab at least once a week. Pay attention to which posts get the most reach and engagement, and use that information to guide future content. Over time, you’ll develop a clear picture of what your specific audience responds to.
Run Facebook Ads
Once you’ve established some organic momentum, Facebook Ads can dramatically accelerate your growth. You can run ads to:
- Promote your Page and grow your following
- Drive traffic to your website
- Generate leads through lead forms
- Retarget people who’ve visited your website or engaged with your Page
- Promote specific products from your Facebook Shop
Pro Tip: Even a modest daily budget can produce meaningful results when your targeting is well-defined. Start with a small test budget, identify which ad creative performs best, and then scale what works.
Even a modest daily budget can produce meaningful results when your targeting is well-defined.
Join Relevant Facebook Groups
Engaging in Facebook Groups related to your industry or local area helps build awareness for your Page without any advertising spend. Share useful content, answer questions, and participate in conversations as your Page. Over time, this builds familiarity and trust with the right audience.
Frequently Asked Questions
How do I create a Facebook Business Page?
Log into your personal Facebook account, click the menu icon, and select “Create” → “Page.” Fill in your business name, category, and description, upload your profile picture and cover photo, then add your contact details and a CTA button. Your Page will be live once you complete these steps.
Do I need a personal Facebook account to create a Business Page?
Yes, Facebook requires a personal account to create and manage a Business Page. Your personal information stays private and is never shown to visitors of your Business Page.
Can I create a Facebook Business Page without a personal account?
No, this isn’t currently possible. Every Business Page on Facebook must be linked to a personal account on the back end. If you want to keep things separate, you can create a dedicated personal account with a professional email address.
Can I set up a separate Facebook account for my business? You can create a personal account using a business email and use that account to manage your Page. However, having multiple personal accounts violates Facebook’s Terms of Service unless you’re using Facebook Business Manager or Meta Business Suite for legitimate business purposes.
Can I separate my business page from my personal account?
Your Business Page and personal profile are already separate in terms of what the public sees. Visitors to your Page cannot see your personal account. You can also assign other admins to manage the Page so they don’t need access to your personal account at all.
Can I delete my personal Facebook account and keep my business page?
No — if you delete your personal account, the Business Page linked to it will also be removed. Before deleting a personal account, transfer admin ownership of any Pages to another account.
How do I add admins to my Facebook Page?
Go to Settings → Page Setup → Page Access. Click “Add New” and search for the person you want to add. Choose their access level (Business Tools Only, Partial Access, or Full Access) and confirm.
How do I verify my Facebook Business Page?
Go to Meta Business Suite → Settings → Security Center → Verification. Submit your business registration documents and follow the prompts. Alternatively, you can subscribe to Meta Verified (paid) through the Meta Verified option in Meta Business Suite for a faster path to the blue badge.
How do I change my Facebook Page name?
Go to your Page, click “Edit” on the About section, and update your Page name. Note that if your Page has a large number of followers, name changes require Facebook’s review and approval.
How do I add services or a menu to my Facebook Page?
Navigate to Settings → Templates and Tabs. Depending on your Page category, you’ll see options to add a Services tab or Menu tab. Enable these and fill in the relevant details.
Is a Facebook Business Page free?
Yes, completely free. You can create, set up, and manage a Facebook Business Page at no cost. Spending money only becomes relevant if you choose to run Facebook Ads or subscribe to Meta Verified.
How do I create another Facebook Business Page?
You can manage multiple Pages from the same personal account. Simply go to facebook.com/pages/create and repeat the setup process. All your Pages will be accessible from your account’s Pages section and from Meta Business Suite.
What is the difference between a Facebook Business Account and a Facebook Page?
A Facebook Business Page is the public-facing profile for your brand on Facebook. A Facebook Business Account (or Meta Business Account) is an administrative layer managed through Meta Business Suite or Meta Business Manager, which allows you to control multiple Pages, ad accounts, and team access from one place. Most small businesses just need a Page; larger teams or agencies benefit from setting up a full Business Account to manage multiple assets.
How much money do you make for 100,000 views on Facebook?
There’s no fixed amount — Facebook’s Content Monetisation Program (CMP), which replaced the standalone Reels Play bonus in 2025, pays creators based on a combination of qualified views, audience location, engagement quality, content originality, and ad revenue sharing. Meta keeps roughly 45% and passes around 55% to creators. Earnings from 100,000 views could range from a few dollars to over $50 depending on whether your viewers are from high-value ad markets (like the US, UK, or Australia) versus lower CPM regions. Content type and niche also make a significant difference. Beyond ad revenue, Facebook creators earn through Stars (viewer tips), fan subscriptions, and brand deals — which often exceed ad earnings for established pages.
Final Thoughts: Create Your Facebook Business Page Today
Setting up a Facebook Business Page is one of the most straightforward things you can do to establish your brand’s online presence — and the cost is zero. In under 20 minutes, you can have a professional page live and ready to reach new customers.
To recap what you’ve covered in this guide: start by logging into your personal account and creating a new Page, then fill in your business details, upload your profile picture and cover photo, add your contact information, create a custom username, and set up your CTA button. From there, optimise your About section, connect Instagram and WhatsApp, add any necessary admins, and start posting content.
Once your Page is live, make Meta Business Suite your best friend. It brings together everything you need to schedule content, manage messages, track performance, and eventually run ads — all from one free dashboard.
The most important thing after setup is consistency. A Page that posts regularly, responds to messages promptly, and genuinely engages with its community will always outperform one that’s technically perfect but rarely active.
Useful Official Resources for Creating Your Facebook Business Page
If you want reliable, Meta-backed information about setting up your business profile and managing your audience connections, the following official resources are worth reviewing. They cover how to use built-in management tools, how to retrieve audience analytics, and how to resolve common setup issues safely.
- Create a Facebook Page – Official Overview: Meta explains the full logic behind setting up your public page, including how to display your contact information, choose the right business category, and set up call-to-action buttons for your customers.
- Meta Business Suite – Official Support Guide: A user-friendly guide covering how the Meta Business Suite is natively integrated into your account, allowing you to quickly organize your incoming messages, cross-post to Instagram, and schedule updates without needing third-party software.
- Page Insights – Advanced Audience Discovery: Technical documentation outlining how to navigate your Page Insights and analytics dashboard. This is perfect for learning how to find the demographic data and engagement metrics of the people connected to your online community.
- Connect WhatsApp and Instagram – Integration Details: An official explanation of how to use Meta’s Account Center to link your broader communication infrastructure. This is highly useful for managing cross-platform messages when your customers try to reach out through different apps.
- Meta Ads Manager – Campaign Configuration: Advanced documentation detailing how to use the Ads Manager to launch targeted campaigns and retrieve structured performance data. This is ideal for power users and marketing professionals looking to automate and optimize their lead generation.
- Fix Page Access Issues on Facebook: Meta’s general troubleshooting guide that includes how to safely add admins, adjust page roles, and update business settings to repair broken team access as part of routine page maintenance.
Visit Our Post Page: Blog Page
Discover more from Izoate
Subscribe to get the latest posts sent to your email.