
Blocked from upgrading to Windows 11 or launching games in 2026? Learn how to check if secure boot is enabled using quick steps.
You are likely reading this because you hit a wall. You are trying to upgrade your PC to Windows 11, but the PC Health Check app says your system does not meet the requirements. Or worse, you are trying to launch Call of Duty, Battlefield, or a game with EA Javelin Anti-Cheat, and the game is flat-out refusing to open, throwing a Secure Boot error in your face.
Do not worry. This is one of the most common hurdles modern PC users run into, and it is completely fixable.
Secure Boot is a fundamental security feature built into your motherboard that ensures your PC only loads safe, trusted software when it turns on. Because modern games use kernel-level anti-cheat to stop hackers, they require this feature to be active. Similarly, Windows 11 uses it to lock down your system against malicious software like rootkits.
By the end of this post, you will know exactly what state your Secure Boot is in, what that means for your hardware, and the exact steps you need to take to get past that error screen.
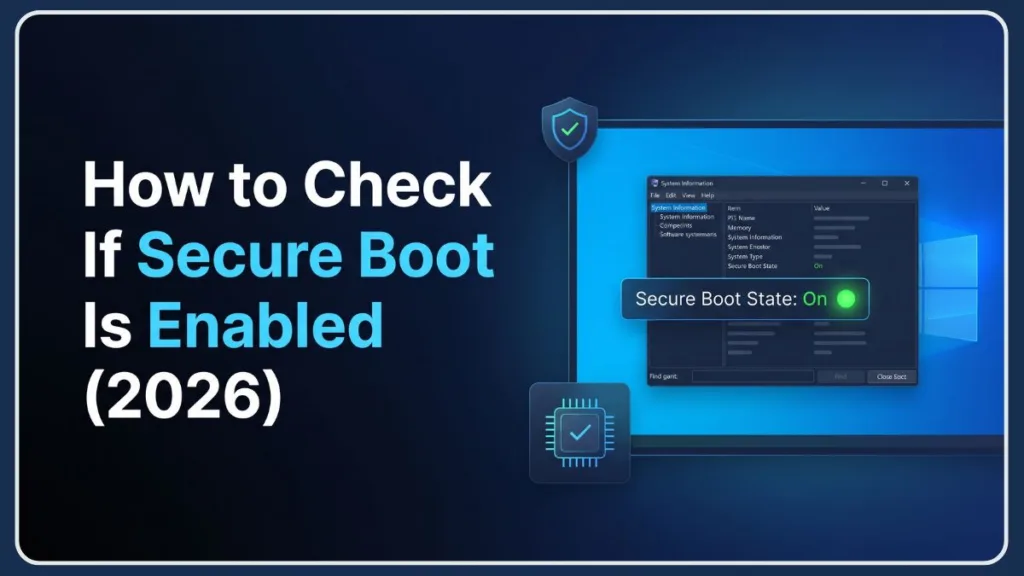
The Quickest Way: Check Secure Boot Status with System Information
The fastest way to see where your PC stands takes about ten seconds and does not require you to restart your machine.
- Press the Windows Key + R to open the Run dialogue box.
- Type
msinfo32into the box and press Enter. - In the System Information window that opens, make sure System Summary is selected in the left-hand menu.
- Scroll down the right-hand pane until you find the item named Secure Boot State.
Look at the value next to it. It will say On, Off, or Unsupported. Keep that result in mind, as we will decode exactly what it means in a moment.
The Advanced Way: Use PowerShell to Confirm Secure Boot State
If you want a definitive, command-level confirmation—or if you suspect Windows might be giving you a glitchy reading—you can ask your computer’s firmware directly using PowerShell.
- Click the Start button, type PowerShell, right-click the result, and select Run as Administrator.
- Type or paste the following command and press Enter:
Confirm-SecureBootUEFI - Look at the output on the next line.
If it returns True, Secure Boot is active. If it returns False, it is disabled. If you see an error stating “Cmdlet not supported on this platform,” it means your PC is using older legacy settings.
(Note: If you are running Windows 11 with the April 2026 security updates, you can also check your Secure Boot certificate health by navigating to Windows Security > Device security > Secure Boot to see a green, yellow, or red status badge.)
Decoding Your Results: What Does Your Secure Boot Status Mean?
Now that you have your reading, here is what it actually means for your PC and what you need to do next.
| Status Readout | What It Means | Your Next Step |
| On / True | Secure Boot is fully operational. Your motherboard is actively protecting your boot process. | You are good to go! Launch your game or proceed with your Windows 11 upgrade without issue. |
| Off / False | Your PC supports Secure Boot, but the feature is currently deactivated in your motherboard’s firmware. | You need to restart your PC and enable the feature inside your BIOS/UEFI settings. |
| Unsupported | Your PC is booting in Legacy mode (CSM), or your primary hard drive is using the older MBR partition style. | You must convert your drive to GPT and switch your motherboard to UEFI mode before enabling Secure Boot. |
How to Check Your Status Directly in the BIOS/UEFI
If your status came back as “Off,” you will need to head into your BIOS/UEFI settings to flip the switch. Entering the BIOS can feel a bit intimidating, but as long as you only change the specific settings mentioned here, your PC will be perfectly safe.
Instead of mashing the Delete or F2 key while your computer boots, the safest way to get there is through Windows:
- Click the Start button, type Change Advanced Startup Options, and hit Enter.
- Under the Advanced startup section, click Restart now.
- When your PC reboots to a blue menu, select Troubleshoot, then Advanced options.
- Click UEFI Firmware Settings and select Restart.
Your PC will now boot directly into your motherboard’s interface. Every manufacturer (like ASUS, MSI, or Gigabyte) designs their BIOS differently, so you will need to look around.
Navigate to the Boot, Security, or Advanced tab. Look for the Secure Boot option. Once you find it, change the state to Enabled or Windows UEFI Mode. Save your changes (usually by pressing F10) and let your PC restart normally.
Troubleshooting Common Secure Boot Error
Sometimes, the standard process hits a snag. If things are not going smoothly, here is how to navigate the most common roadblocks.
Why does my PC show Secure Boot as “Unsupported”?
This is one of the more frustrating situations you can run into. It means your Windows installation drive is formatted using an older standard called MBR (Master Boot Record). Secure Boot requires the modern GPT (GUID Partition Table) standard.
To fix this, you will need to use a built-in Windows tool to convert the drive. By opening an Administrative Command Prompt, you can run [mbr2gpt /validate /allowFullOS](https://learn.microsoft.com/en-us/windows/deployment/mbr-to-gpt). If it passes, you can run mbr2gpt /convert /allowFullOS. Always back up your important files before attempting a disk conversion.
Why is Secure Boot off even though UEFI is enabled?
If you enabled Secure Boot in your firmware but Windows is still stubbornly telling you it is off, your motherboard might be missing its factory keys. Go back into your BIOS settings, find the Secure Boot section, and look for an option that says “Restore Factory Keys,” “Install Default Secure Boot Keys,” or changes the mode from “Setup” to “User.” Apply that change, save, and restart.
Does Secure Boot affect dual boot with Linux?
If you run a dual-boot setup with a Linux distribution, you might be worried that turning on Secure Boot will lock you out of your Linux partition. Major distributions like Ubuntu and Fedora officially support Secure Boot out of the box. However, if you are running a custom kernel or a highly modified distro, you may need to keep Secure Boot disabled to ensure your Linux side continues to boot properly.
Frequently Asked Questions (FAQ)
How do I know if Secure Boot is enabled on my PC?
You can check quickly by pressing Windows Key + R, typing msinfo32, and looking at the Secure Boot State under System Summary.
What happens if Secure Boot is disabled?
Your PC will continue to function normally for everyday web browsing and work tasks. However, you will be blocked from upgrading to Windows 11, and certain modern video games utilizing strict kernel-level anti-cheat software will refuse to launch.
Is Secure Boot on or off by default?
On most pre-built computers and laptops manufactured after 2012, it is enabled by default. However, custom-built PCs or machines that have recently had their motherboard BIOS reset often default to having the feature turned off.
Does enabling Secure Boot affect performance?
No. It is strictly a pre-boot security verification. Once Windows fully loads, it has absolutely zero impact on your framerates, processing power, or general system performance.
How do I check Secure Boot status using PowerShell?
Open PowerShell as an Administrator, type Confirm-SecureBootUEFI, and press Enter. A result of True means it is enabled, False means disabled, and an error means your system is in Legacy mode.
Is Secure Boot required for Windows 11?
Yes. Microsoft mandates that your PC must be Secure Boot capable (which requires running in UEFI mode rather than Legacy BIOS) to install or upgrade to Windows 11.
Can I enable Secure Boot without reinstalling Windows?
Yes, provided your Windows installation is already on a GPT partition. If your installation is currently on an older MBR partition, you must safely convert the drive to GPT first (using the built-in Windows mbr2gpt tool) before enabling the feature in your firmware, otherwise your PC will fail to boot.
Will enabling Secure Boot delete my files?
No. Changing this firmware setting does not wipe or interact with your personal files. However, if you need to convert your drive from MBR to GPT to support the feature, it is highly recommended to back up your files first as a safety precaution.
How do I enable Secure Boot in UEFI/BIOS?
Restart your PC into Advanced Startup Options, select UEFI Firmware Settings, and navigate to the Boot or Security tab in your BIOS. Toggle the Secure Boot option to Enabled or Windows UEFI Mode, save your settings, and restart.
Is Secure Boot the same as UEFI?
No. UEFI is the operating system for your motherboard (it replaced the old BIOS). Secure Boot is a specific feature living inside UEFI that verifies software signatures during your computer’s startup sequence.
How does Secure Boot protect against rootkits?
It continuously checks the digital signature of the operating system and drivers before allowing them to load into memory. If a malicious rootkit attempts to insert itself into the boot process, the signature check fails, and your motherboard halts the boot, stopping the malware before it can hide itself in Windows.
Do games like Call of Duty require Secure Boot?
Yes. Modern competitive multiplayer games (including Call of Duty, Valorant, and many EA titles) utilize kernel-level anti-cheat engines that require this feature to prevent malicious actors from loading undetected cheat software prior to Windows starting.
What is the difference between Legacy BIOS and UEFI Secure Boot?
Legacy BIOS is an older, outdated firmware standard that lacks the capability to perform modern security checks. UEFI is the modern replacement that allows for advanced features like Secure Boot, faster startup times, and support for hard drives larger than 2TB.
Can Secure Boot be enabled on older PCs?
If your PC was manufactured prior to 2012, it likely uses Legacy BIOS and cannot support the feature. If it was built after 2012, it likely supports it, though you may need to update your motherboard’s firmware to properly access the setting.
Will enabling Secure Boot trigger a BitLocker recovery key?
It can. If you are using Windows BitLocker drive encryption, altering your boot environment can sometimes cause BitLocker to trigger a security failsafe, asking for your recovery key on the next boot. Ensure you have your BitLocker key backed up to your Microsoft account or printed out before making changes to your BIOS.
Final Thoughts and Next Steps
You now have total clarity on your PC’s security foundation. Whether you used msinfo32 for a quick glance or dove into PowerShell, you know exactly what is happening under the hood of your machine.
If you successfully flipped your status to “On,” your next step is waiting for you. Fire up the Windows 11 PC Health Check app to finalize your system upgrade, or launch your game and drop into the lobby.
Visit Our Post Page: Blog Page
Discover more from Izoate
Subscribe to get the latest posts sent to your email.