
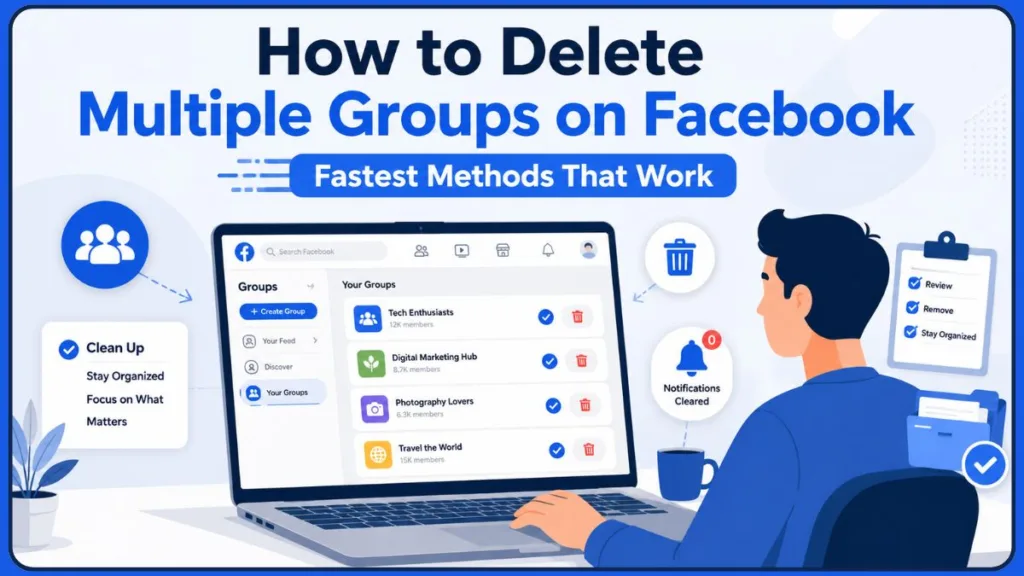
Want to delete multiple Facebook groups or leave unwanted groups quickly? Discover the fastest methods to bulk delete Facebook groups, along with step‑by‑step mobile instructions.
If you’ve been using Facebook for several years, there’s a good chance you’ve joined far more Facebook Groups than you currently use. From hobby communities, local buy-and-sell groups, school networks, gaming communities, business networking groups, and promotional groups, your Facebook account can quickly become cluttered with memberships that no longer serve a purpose.
At the same time, some users are not simply looking to leave groups. They may actually own multiple Facebook Groups and want to permanently remove them because the groups have become inactive, completed their purpose, or are no longer worth managing. This is especially common among community managers, social media administrators, and Facebook page owners who have accumulated several groups over time.
This is where many people get confused.
When users search for how to delete multiple groups on Facebook, they are often looking for one of three different solutions. Some want to delete Facebook groups they created as an admin. Others want to leave dozens of groups they joined over the years. Many simply want the fastest way to clean up their Facebook account without spending hours clicking through individual groups.
The challenge is that Facebook does not currently offer a true “one-click bulk delete feature”. Whether you’re deleting groups you own or leaving groups you’re a member of, you’ll need to work within Facebook’s existing tools and limitations. As of 2025, Meta has not introduced a native bulk group deletion or bulk leave groups feature inside Facebook.
In this guide, we’ll explain exactly what you can and cannot do, how to delete multiple Facebook groups you manage, how to leave multiple groups quickly, and some alternative methods that may help speed up the process.
Can You Delete Multiple Facebook Groups at Once?
The short answer is no.
Facebook currently does not provide a feature that allows users to delete multiple Facebook groups simultaneously with a single click.
If you own several Facebook Groups, each group must be deleted individually. Similarly, if you’re a member of hundreds of groups, Facebook requires you to confirm each group exit separately.
This limitation exists because deleting a group is a permanent action. Facebook wants to prevent accidental removals that could impact thousands of members and years of shared content, including posts, photos, videos, files, polls, and community discussions.
However, while there is no official “bulk-delete button”, there are ways to make the process faster. Depending on whether you’re an admin, moderator, or a regular member, you can streamline group removal using Facebook’s management tools and organization features.
Before proceeding, it’s important to understand the difference between deleting a group and leaving a group.
Delete vs. Leave Facebook Groups: What’s the Difference?
Many users use the terms “delete” and “leave” interchangeably, but Facebook treats them as two completely different actions.
When You Delete a Facebook Group
Deleting a Facebook group permanently removes the group from Facebook.
This option is only available to group admins. Once a group is deleted, all posts, photos, files, comments, discussions, events, and member activity associated with that group are removed permanently.
If you’re the creator or administrator of multiple inactive groups, deleting them may be the best option when you no longer want them to exist.
When You Leave a Facebook Group
Leaving a Facebook group simply removes your membership.
The group itself remains active, and other members can continue using it normally.
This option is useful if you’re trying to clean up your Facebook feed, reduce Facebook notifications, improve your social media organization, or remove yourself from communities you no longer follow.
Which Option Should You Choose?
If you created the group and want it gone permanently, you should delete it.
If you’re simply a member of the group and no longer want to participate, leaving the group is the appropriate solution.
Understanding this distinction will help you choose the right method for your situation and avoid accidentally removing a community that still has active members.
Things to Do Before Deleting Multiple Facebook Groups
Before you start deleting groups, it’s worth taking a few minutes to ensure you don’t accidentally lose important information.
Save Important Content
Many Facebook groups contain years of discussions, shared resources, documents, photos, videos, and files.
If any of this information may be useful later, save it before deleting the group. Once a Facebook group is removed, there is no recovery option available.
Notify Group Members
If your group has active members, consider informing them about the upcoming deletion.
Providing advance notice gives members time to save files, exchange contact information, join a replacement community, or move to another platform such as Discord, Slack, WhatsApp Communities, or another Facebook group.
Transfer Ownership If Necessary
Sometimes you may be tired of managing a group but don’t actually want it deleted.
In that situation, transferring admin ownership to another trusted member may be a better solution than permanently removing the group.
Review Pending Content
Before deleting a group, quickly review scheduled posts, pending member requests, membership questions, and unpublished content.
This helps avoid confusion for members who may still be expecting updates.
Important: Once a Facebook group is deleted, the action cannot be reversed. Make sure you’re completely certain before proceeding.
How to Delete Multiple Facebook Groups You Own
If you are the admin of several Facebook groups, you’ll need to delete them individually. While this takes some time, the process itself is relatively straightforward.
Step 1: Open Facebook Groups
Log in to your Facebook account and navigate to the Groups section from the left-hand menu.
You’ll see all groups you’re a member of, along with groups you manage.
Step 2: Select a Group You Administer
Choose one of the groups you want to remove and open it.
Ensure that you’re logged into an account with administrative privileges. Without admin access, the delete option won’t appear.
Step 3: Remove Members If Required
Depending on Facebook’s current interface and group settings, you may need to remove remaining members before deletion becomes available.
Visit the Members section and review the member list.
If necessary, remove participants individually until only administrators remain.
Step 4: Open Group Settings
Within the group, locate the Settings section.
Facebook occasionally changes menu layouts, but group management options are generally found in the left sidebar or Admin Tools panel.
Step 5: Find the Delete Group Option
Scroll through the available settings until you locate the group deletion section.
Facebook often places this option within a section sometimes referred to as a “Danger Zone” because the action is permanent.
Step 6: Confirm Group Deletion
When prompted, confirm your decision.
After confirmation, Facebook will permanently remove the group and all associated content.
Step 7: Repeat the Process
Unfortunately, there is currently no way to select multiple groups and delete them together.
You’ll need to repeat these steps for each Facebook group you own.
Tips to Speed Up the Process
If you’re deleting several groups, consider opening each group in a separate browser tab.
You can also create a checklist of groups you intend to remove so you don’t accidentally skip any or delete the wrong one.
If you manage a large number of communities, start with inactive groups first. This often reduces the amount of content and member management required before deletion.
For better efficiency, many administrators also organize groups by activity level, member count, and engagement metrics before beginning the deletion process.
How to Leave Multiple Facebook Groups Quickly
For many users, leaving groups is actually more common than deleting them.
Perhaps you’ve joined dozens of communities over the years, followed temporary event groups, participated in short-term projects, joined marketplace communities, subscribed to interest-based groups, or accepted invitations from friends.
Over time, these memberships can clutter your notifications, homepage, news feed, and overall Facebook experience.
Fortunately, Facebook provides a few ways to make group cleanup easier.
Method 1: Using Facebook Group Management Settings
Facebook periodically offers management tools that help users review their group memberships.
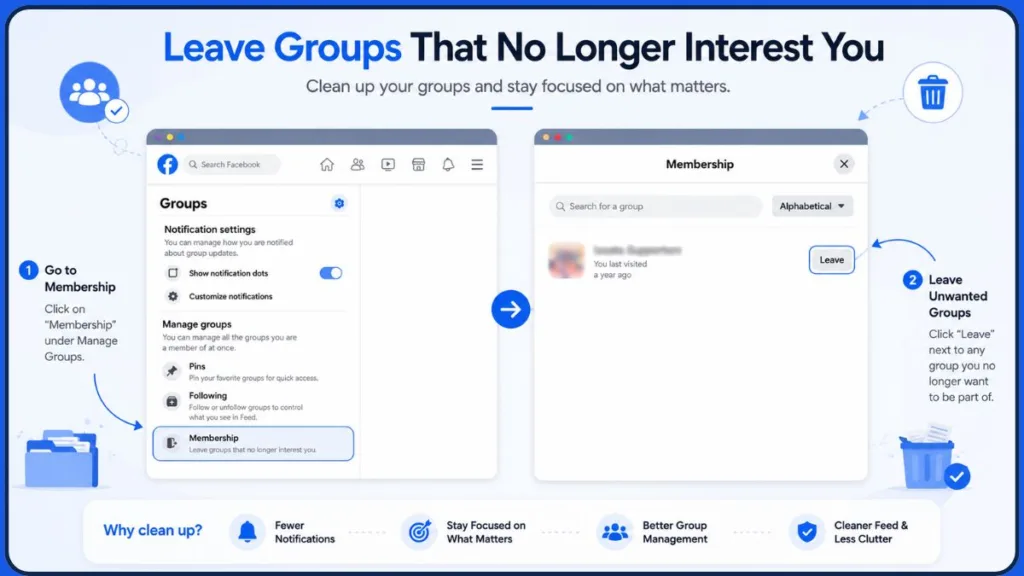
To begin, open Facebook and navigate to the Groups section.
Look for account or group management options that allow you to review joined groups.
Some users may see options similar to “Leave groups that no longer interest you.”
If available, this feature displays a list of your groups and allows you to review them more efficiently.
Work through the list carefully and leave groups you no longer wish to follow.
While Facebook still requires individual confirmations, having all groups displayed in one place can significantly reduce the time required.
This method is particularly useful for users trying to improve Facebook account organization, reduce notification overload, and optimize their social media experience.
Method 2: The Rapid Leave Technique
If you’re trying to leave dozens or even hundreds of Facebook groups, repeatedly moving your mouse to confirm every prompt can become time-consuming.
Some Facebook users speed up the process by using a simple keyboard workflow after clicking the Leave Group button.
Here’s how it works:
Step 1: Click Leave Group
From your list of Facebook groups, click the Leave Group button next to the group you want to exit.
Step 2: Use Keyboard Shortcuts to Confirm Faster
Once the confirmation prompt appears:
- Hold Shift and press Tab.
- Press Enter (Return) to confirm the action.
- Press Escape (Esc) to close the dialog and return to the group list.
Your cursor should remain in roughly the same position, allowing you to move directly to the next group without excessive mouse movement.
Step 3: Repeat for Additional Groups
Continue the same sequence for each group you want to leave:
- Click Leave Group
- Press Shift + Tab
- Press Enter
- Press Esc
This can significantly speed up the process when cleaning up a large number of Facebook groups.
Important: Before confirming each action, quickly review the group name. Leaving a professional community, family group, local neighborhood group, or business networking group by mistake can be inconvenient to reverse later.
How to Delete or Leave Multiple Facebook Groups on Mobile
Many people primarily use Facebook on their smartphones, so it’s natural to wonder whether you can delete or leave multiple Facebook groups using the Facebook mobile app.
While Facebook allows both actions on Android and iPhone, the experience is often more limited compared to the desktop version. Some group management tools available on a computer may not appear within the mobile app, and menu locations can vary depending on your Facebook app version. As of recent Facebook updates, the platform continues to refine its Groups feature, but there is still no official bulk delete or bulk leave groups option available directly within the app.
On Android
To leave a Facebook group on Android, open the Facebook app and tap the menu icon. Navigate to “Groups” and locate the group you want to leave.
Once inside the group, tap the menu options and look for the “Leave Group” option. Confirm your choice when prompted.
If you’re an administrator trying to delete a Facebook group, open the group you manage and access the admin tools or group settings. Depending on the group’s setup, you may need to remove members and other administrators before the delete option becomes available.
Repeat the process for each group you want to remove.
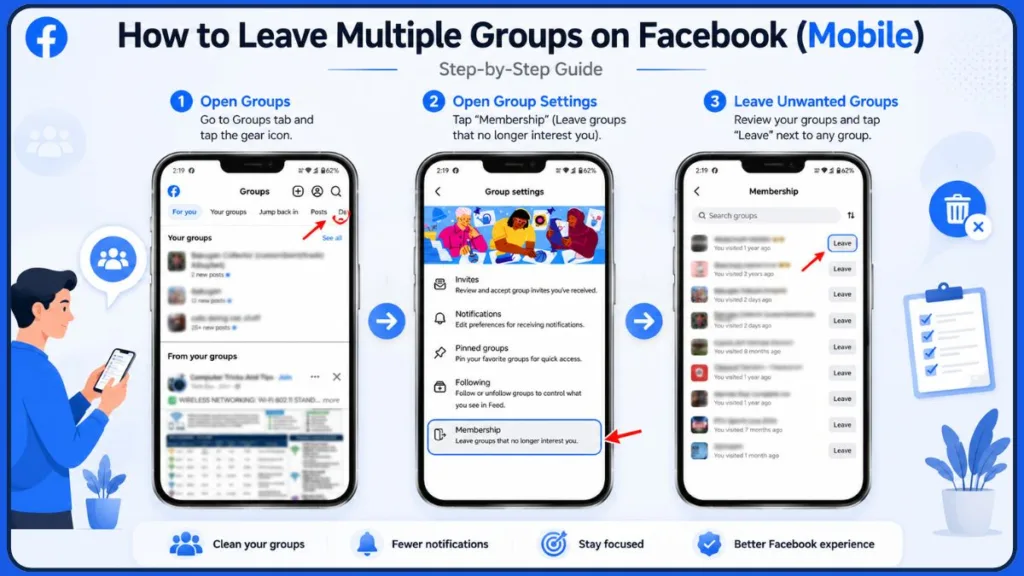
On iPhone
The process on iPhone is very similar.
Open the Facebook app, tap the menu icon, and go to your Groups section. Select the group you want to leave or delete.
If you’re a member, choose “Leave Group” and confirm the action.
If you’re an admin, open the group settings and look for deletion options. Facebook occasionally changes the placement of these settings, so you may need to explore the “Admin Tools” section.
Mobile Limitations You Should Know
One of the biggest frustrations users encounter is that Facebook sometimes rolls out features gradually. As a result, an option visible on a desktop browser may not appear on your mobile device.
Additionally, leaving or deleting multiple Facebook groups is generally easier from a desktop computer because you can manage multiple tabs and navigate settings more quickly.
If you’re planning to clean up dozens or even hundreds of groups, using a desktop browser is usually the most efficient approach.
Related topics such as Facebook account management, social media organization, and notification control often become easier when using the desktop interface.
Fastest Way to Remove Yourself From Dozens of Facebook Groups
If your goal is simply to clean up your account, efficiency becomes important.
Many Facebook users have accumulated memberships in hundreds of groups over the years. Trying to leave them one by one without a strategy can quickly become time-consuming.
The fastest approach is to first identify which groups no longer provide value.
Start by reviewing inactive communities. Groups that haven’t had meaningful discussions in months are often the easiest to remove from your list.
Next, focus on promotional groups, giveaway groups, temporary event communities, and old interest-based groups that no longer match your current interests.
Rather than randomly leaving groups, work through them in organized batches. For example, you might remove all gaming groups first, followed by marketplace groups, then educational groups.
This organized approach helps prevent mistakes and allows you to complete the process much faster.
Another useful strategy is avoiding excessive actions in a short period.
Facebook’s security systems sometimes view rapid repetitive actions as unusual behavior. If you attempt to leave a very large number of groups within minutes, you may encounter temporary restrictions.
Taking short breaks between large batches can help prevent these issues.
“Tip:” If you’re removing dozens of groups, consider spending 15–20 minutes per session rather than attempting to leave hundreds of groups at once. This approach aligns with Facebook’s platform integrity policies and helps reduce the likelihood of triggering automated security checks.
Alternative Ways to Leave Multiple Facebook Groups
Because Facebook does not currently offer a true “bulk-leave feature”, many users search for alternative solutions.
One commonly discussed workaround involves browser extensions designed to automate repetitive Facebook tasks.
Using a Chrome Extension
There is a solution by using this Chrome extension: Facebook Group & Page Scanner Chrome Extension.
Steps:
- Install the extension.
- Log in to your Facebook account and click the extension.
- In the Dashboard, select Group & Page Scanner.
- Choose the Group you want to leave after selecting.
- Click Delete at the top.
This method can help streamline the process of leaving multiple Facebook groups compared to manually opening each group one by one.
Before trying any extension, it’s worth reviewing discussions from the Facebook community. Many users prefer community-driven recommendations and real-world experiences shared in forums such as this Reddit community discussion on leaving multiple Facebook groups, where members discuss available options, limitations, and their experiences with Chrome extensions.
However, there are important considerations you should keep in mind.
Benefits of Using an Extension
The primary advantage is speed.
Instead of manually navigating through countless groups, automation tools may allow you to review and process multiple memberships from a centralized dashboard.
For users who joined hundreds or even thousands of groups over the years, this can dramatically reduce the time required for cleanup.
Many users also prefer checking Reddit community feedback before installing an extension, since community discussions often provide practical insights that aren’t available in promotional materials.
Why Can’t I Delete or Leave Facebook Groups?
Sometimes the process doesn’t go as expected.
If you’re unable to delete or leave Facebook groups, several factors may be responsible.
You Are Not an Admin
Only administrators can delete Facebook groups.
If you don’t have admin privileges, you’ll need to contact a group administrator for assistance.
The Delete Group Option Is Missing
In some cases, the delete option may not appear because there are still members or administrators assigned to the group.
Review the group’s management structure and ensure all requirements have been met before attempting deletion.
Leave Group Button Not Working
Temporary Facebook glitches can occasionally prevent actions from being completed.
Refreshing the page, clearing browser cache, updating the Facebook app, or trying a different device often resolves the issue.
Facebook Has Temporarily Restricted the Action
If you’ve been leaving large numbers of groups in a short period, Facebook may temporarily limit your activity.
This restriction is designed to prevent spam, automation abuse, and suspicious behavior.
Waiting several hours or a day before trying again often resolves the problem.
Browser-Related Issues
Browser extensions, outdated browsers, or corrupted cache files can interfere with Facebook functionality.
Try opening Facebook in an incognito window or using a different browser to determine whether the issue is browser-related.
What Happens After You Delete a Facebook Group?
Before permanently removing a group, it’s important to understand the consequences.
Once a Facebook group is deleted, all associated content is removed from Facebook.
This includes posts, comments, discussions, uploaded files, photos, videos, polls, and member interactions.
Members immediately lose access to the community.
Group URLs and links generally stop functioning, and the group can no longer be found through Facebook Search.
Perhaps most importantly, the action is irreversible.
Facebook does not provide a recovery feature for deleted groups.
If there is any possibility you may need the group’s content later, consider downloading important information or exploring alternatives before proceeding. Facebook’s Download Your Information feature may help preserve certain account-related data before major changes are made.
Alternatives to Deleting a Facebook Group
Deleting a Facebook group isn’t always the best solution.
In many cases, you may simply want to step back from active management while preserving the community.
Archive the Group
Archiving allows you to preserve the group’s content while preventing further activity.
This option can be useful if the group contains valuable information but no longer requires ongoing discussions.
Pause Group Activity
Some administrators choose to pause activity rather than permanently deleting the community.
This allows members to retain access to previous content while reducing administrative responsibilities.
Make the Group Private
Changing privacy settings can significantly reduce unwanted activity.
A private group may better suit your needs if you simply want more control over membership and visibility.
Transfer Ownership
If another member is willing to manage the group, transferring ownership may be the ideal solution.
This allows the community to continue operating without requiring your involvement.
Frequently Asked Questions
Can I Delete Multiple Facebook Groups at Once?
No. Facebook currently requires groups to be deleted individually.
Can I Leave Multiple Facebook Groups at Once?
Facebook does not provide a “one-click option” to leave all groups simultaneously. However, you can speed up the process using group management tools and organized workflows.
Can I Delete Multiple Facebook Groups on Mobile?
Yes, but each group must still be processed individually.
Can Deleted Facebook Groups Be Recovered?
No. Once a Facebook group is deleted, it cannot be restored.
Will Members Be Notified If I Delete a Group?
Facebook does not typically send a dedicated deletion notification to all members, though members will lose access once the group is removed.
Why Can’t I Leave More Facebook Groups?
Facebook may temporarily restrict repetitive actions if it detects unusually high activity levels.
Does Facebook Limit How Many Groups I Can Leave Per Day?
Facebook does not publicly disclose exact limits, but users occasionally report temporary restrictions after leaving large numbers of groups in a short period.
Is It Safe to Use Chrome Extensions to Leave Facebook Groups?
Safety depends on the extension. Always review permissions, privacy policies, developer reputation, and user feedback before installing any third-party tool. Whenever possible, compare extension claims with feedback from trusted communities such as Reddit before making a decision.
Final Thoughts
Cleaning up your Facebook groups can make your account easier to manage and help reduce unnecessary notifications, distractions, and digital clutter.
If you’re looking to delete multiple Facebook groups you own, remember that Facebook currently requires each group to be removed individually. While this can be time-consuming, following an organized process will help you complete the task more efficiently.
If your goal is simply to leave unwanted groups, Facebook’s group management tools can make the process much faster, especially when combined with a structured cleanup strategy.
Although some users turn to browser extensions and automation tools, it’s important to carefully evaluate their permissions and security implications before use. Community-driven resources—especially Reddit discussions from people who have already tested these tools—can often provide more balanced guidance than promotional descriptions alone.
Ultimately, whether you’re deleting inactive communities, leaving outdated groups, or simply organizing your Facebook experience, taking the time to review your memberships can help create a cleaner and more relevant social media environment.
If you found this guide helpful, you may also want to explore other Facebook management tips, including how to manage notifications, review privacy settings, improve Facebook security, optimize your news feed experience, and organize your account for a better overall experience.
Visit Our Post Page: Blog Page
Discover more from Izoate
Subscribe to get the latest posts sent to your email.